How to make printf work

| This tutorial has only been tested on linux systems |
At some point, it would have been good for all of us to be able to use the printf function as if the code were running on our computer. The objective of this article is to explain how we can make this function work in an STM32CubeIDE console.
To make printf work in our computer is more complex than it may seem because what we want is that printf writes in a terminal that is in a different computer to the one that is executing the code. To achieve this we have to make that printf can communicate with our computer, and to make it comfortable this must be through the own cable with which we programmed the microcontroller. This can be achieved using UART.
The following tutorial is divided in two parts.
- The first part explains the code needed for the
printffunction to send messages via UART. - The second part explains how to prepare an STM32CubeIDE console to receive and display the messages.
In this part we will see how to configure the UART and the code that we must add to make the messages be sent by UART.
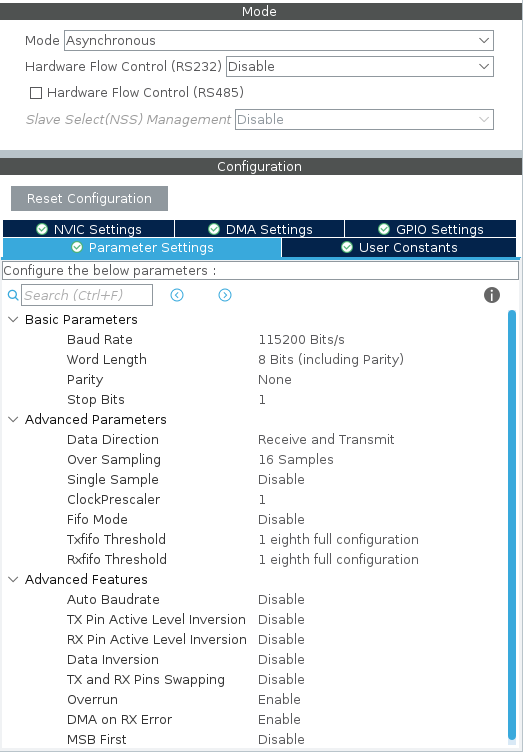
The first thing we have to take into account is that we must have a UART configured that has the same pins that we use to program the microcontroller. If we are using a Nucleo this configuration is done by default when creating the project. The recommended options for the UART are those that can be seen in the following figure.
Once we have the ioc correctly we will only have to generate code.
In order to send the messages by UART we will have to overwrite the _write() function of the standard C library.
To do this we will add the following code in the "User code 4" of the main.cpp file:
#ifdef __cplusplus
extern "C" {
#endif

int _write(int file, char *ptr, int len)
{
    HAL_UART_Transmit(&huart3, (uint8_t*)ptr, len, 1000);
    return len;
}

#ifdef __cplusplus
}
#endifTo prepare a console capable of receiving data through UART is as simple as following the steps below:
-
The first thing we have to do is to connect the microcontroller to our computer.
-
Then we open the STM32CubeIDE.
-
We select the project in which we want to use
printf. -
Now we must click on Open Console and select 3 Command Shell Console as you can see in the following figure.

- Next we must select the options shown in the following figure and click on New.

- Fill in all the data as shown in the following figure. The name is recommended to be as descriptive as possible as shown. The serial port that you must select will probably be called the same as the one in the figure, it is also possible that it is called
/dev/ttyUSBxor/dev/ttyACMxwhere the x's must be replaced by the corresponding number. To get the serial port you must have the microcontroller connected. One way to see which one is yours in your case is to use the following command in a linux terminalls /dev/tty*with the microcontroller connected and not connected, in this way observing which one is the one that varies you will know which one is yours. The baud rate and the rest of the options must be exactly the same as the one used by the UART of the microcontroller.

- Once everything finished we give to finish and accept. Next the console will be created and we will be able to select it as it is seen in the following image, if we want to anchor this console so that always this visible we will have to click in the icon that there is to the left of the one to select the console.

- Finally if everything went well you should see the console with the message CONNECTED.

As you may have seen it is relatively simple to set everything up and the reward is great. The printf opens up a world of testing possibilities unimaginable without it. It is a very reliable way to receive feedback on what is happening.
If you have followed all the steps you can now write your first program that makes use of this function. The simplest possible one is to send a Hola Mundo!
printf("Hola Mundo!")When this program is executed you will be able to see in your console (make sure you have selected the one we have just created) the message.
