Using VexOS in easyC
The primary method for using VexOS is to import the library and its header files into a easyC competition project. It is also possible to use VexOS directly with an external IDE and the GCC-ARM toolchain, see Using VexOS outside of easyC.
To get started VexOS, follow these steps:
- Get VexOS
- Create a new easyC competition project
- Import the VexOS library and header files
- Place declarations of the VexOS hooks in UserInclude.h
- Call the VexOS hooks from each easyC block
- Create Robot, Subsystem and Command source files
The best way to get VexOS is to clone the Git source code repository from github, which also happens to be hosting this wiki. This allows you full access to the latest source code and you can experience the full joy of Building VexOS yourself. However, since this requires more machine setup and potentially exposes you to untested code, you may want to simply download latest binary release. It is available here.
If using the binary release, expand the release ZIP file to a convenient location. If building VexOS, you will need to follow the direction in the link above and make sure that VexOS compiles without errors.
Using File > New Competition Project, create a project and enter your team number.

After the empty project opens, it is a good idea to save it immediately to a known location.
If it's not shown already, bring up the Project Explorer side-bar. This can be show by choosing View > Project Explorer Panel. In the panel, perform the following steps:
- Right click on the Library Files tree item.
- Choose Add Existing Item...
- Navigate to either the expanded ZIP directory (if using the binary release) or the /build/ directory of the VexOS Git repository directory.
- Select "VexOS.lib" and choose Open. The VexOS.lib should now appear in the tree section.
- Next, right click on the Header Files tree item.
- Choose Add Existing Item...
- Navigate to either the expanded ZIP directory, or the /include/ directory of the Git repository.
- Add the main "VexOS.h" header file. The file should now appear in the tree section.
- For a typical project, steps 5-8 must be repeated for more header files, based on what you intend to implement in your robot software. The mandatory files are:
- VexOS.h - Main VexOS declarations and core objects
- Subsystem.h - Header file needed to create new Subsystems
- Hardware.h - Header file needed to use the VexOS Hardware Abstraction Layer (HAL) classes
- CommandClass.h - Header file needed to create new Commands classes
- For more advanced projects, you might need to include these optional headers as well:
- ButtonClass.h - Header file needed to create new custom Button classes
- UserInterface.h - Header file needed to create dashboards and LCD screens
When complete, your project explorer should look as follows:

For code in the VexOS library to be run by easyC, you must add a call to a "hook" function to the code blocks that easyC will call during the Initialize, Autonomous and OperatorControl portions of the competition. For easyC to know about these functions, they must be declared in the UserInclude.h file, as this is the only header file visible to easyC visual code blocks.
Copy the following code into UserInclude.h, right after the TODO comment:
void VexOS_Initialize();
void VexOS_Autonomous();
void VexOS_OperatorControl();
When done, the top of your UserInclude.h should look like this:

The next step is to add call to each VexOS function within the relevant easyC blocks. This (thankfully!) is the only modification you will be required to do within the easyC visual environment.
Calls to VexOS are implemented using the User Code block element. Start by double-clicking Initialize under Block Diagram in the Project Explorer panel. Then, from the Function Blocks panel (which can be shown by choosing View > Function Blocks Panel, if it's not visible already), click and drag the User Code element into the block diagram, after the comments.
When the add dialog appears, fill it in as follows:
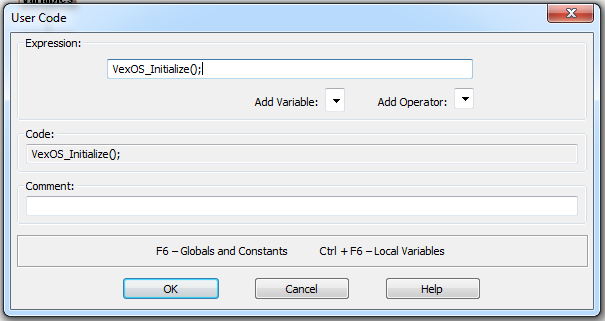
Click ok. The block should now contain this:

Repeat the same steps for the Autonomous block diagram, but use VexOS_Autonomous(); as the function to call.

For the OperatorControl block diagram, the empty while(1) loop must be deleted first. In the OperatorControl diagram, right click on the while(1) element and choose Delete. Then, repeat the steps above to insert a User Code element, using VexOS_OperatorControl(); as the function to call.
When done, the block should look like this:

That should be the last you will ever need to touch the easyC visual code designer when using VexOS. I personally like unexpanding the Block Diagrams item in the Project Explorer to get more room to do real work in an efficient way.
A best-practice of object-oriented coding is that each globally visible object should be defined in its own source file. In VexOS, these objects are the Robot, Subsystems and Commands (and Buttons, if you are making custom button classes). Thus, each object should have its own file. To add each file, right click on Source Files in Project Explorer and choose Add New Item..., the select the Create a source file (.c) option.
When working in easyC, the Project Explorer does not allow creation of sub-folders under Source Files to organize your work. Since VexOS requires creating separate files for different types of objects, a naming convention is advised so that others can easily make sense of your work. The proposed VexOS convention is:
-
Robot - create in a file called
Robot.c -
Subsystems - create in files prefixed with sys_, such as
sys_Drive.corsys_MegaClaw.c. If the subsystem name is made of multiple words, utilize CamelCase. -
Commands - create in files prefixed with cmd_, such as
cmd_DriveWithJoystick.corcmd_SuckBalls.c. Naming convention should be the same as subsystems. -
Buttons - create in files prefixed with btn_, such as
btn_CustomButton.c. Naming convention should be the same as subsystems. - Other utility files can follow any convention, but when possible extra code (such as dashboard or UI code) should be included in
Robot.cunless there is a good reason not to do so.
For information on how implement the class types above, refer to the relevant topics in the documentation:
Defining the Robot
Defining Subsystems
Defining Commands
Defining Buttons