DISCLAIMER: THIS IS A PERSONAL GUIDE FOR ME AND FOR MY OWN COMPUTER.
- Windows 10
- Veracrypt encrypted windows partition
- Arch Linux encrypted partition with LUKS (seperate unecrypted boot partition)
- rEFInd boot manager and en ext4 filesystem for linux
- KDE Plasma
I am not going to go through this as I am going to be installing arch on a machine with windows already installed but I will have a quick quide below.
- Install the Windows 10 Media Creation Tool: https://www.microsoft.com/en-us/software-download/windows10
- Create an ISO file for windows on your hard drive
- Burn the ISO file to a disc or usb. I suggest using Balena Etcher. rufus also works
- Go to the control panel, go to power options, go to
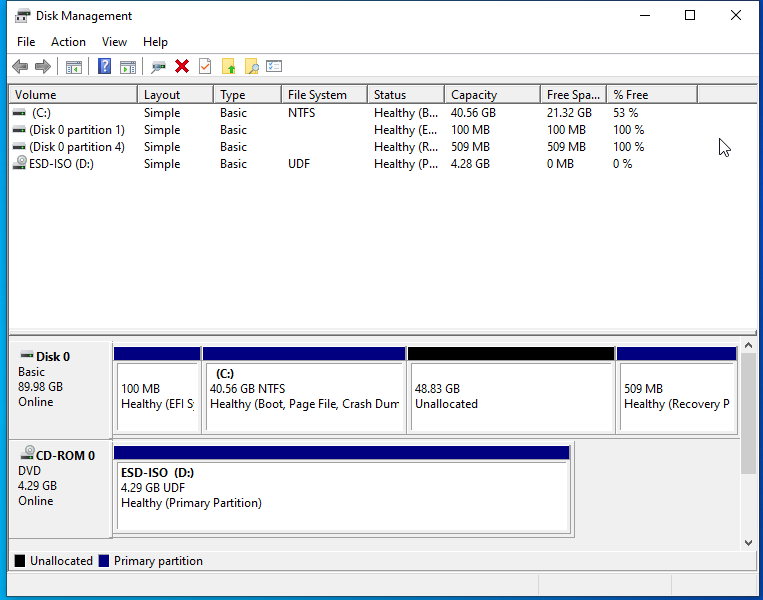
Change what the power buttons doand turn off fast startup - Configure your windows partition by searching
diskmgand clicking on theCreate and format hard disk partitions. - Configure your Windows partition to how much you want it to be. DO NOT DELETE THE RECOVERY OR EFI SYSTEM PARTITION. Right click on the windows partition and click shrink partition and shrink it to the amount you want for your arch linux partition.
- Download and install veracrypt from https://www.veracrypt.fr/en/Downloads.html
- Click on
Encrypt a system partition - Choose normal, encrypt windows partition, and click single-boot for number of operating systems. Then choose the encryption and hash algorithm you prefer, I will go with standard AES and SHA-512.
- Create a password and confirm it
- Generate random data with your mouse
- Create a rescue disk for Veracrypt.
- Choose your wipe mode (I will choose none).
- Allow Veracrypt to restart your computer and boot up again and log back in, then the veracrypt encrypt process will begin.
- And you are done with Windows! Power off the system

- You need to have a bootable usb of arch linux which you can get from the downloads page. Once again, you need to create a bootable usb or disk for the arch linux iso. I suggest using rufus, which I linked above. https://archlinux.org/download/
- If you have an ethernet cable, now is the time to plug it in. Also plug in your arch usb drive.
- Boot your machine and from the boot menu, select the arch linux iso to open up to a menu which looks like the following.
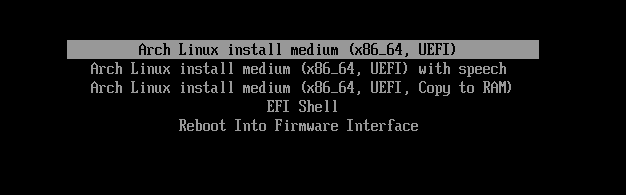
- Boot into the arch linux instlal medium and enter the arch iso!
- If you would like to change the keyboard layout, do it now.
- Connect to the internet, if you have an ethernet cable plugged in, you should already be connected. If not, then use
iwctlto connect to the internet ping archlinux.orgto verify you are connectedtimedatectl set-ntp trueto start network time synchronization.
If you want to install arch from a seperate machine through ssh, you can do so by following these steps.
- run
passwdand set a password for the root user of the arch iso - Enable
sshdby runningsystemctl start sshd - determine the machine's local ip address by running
ip a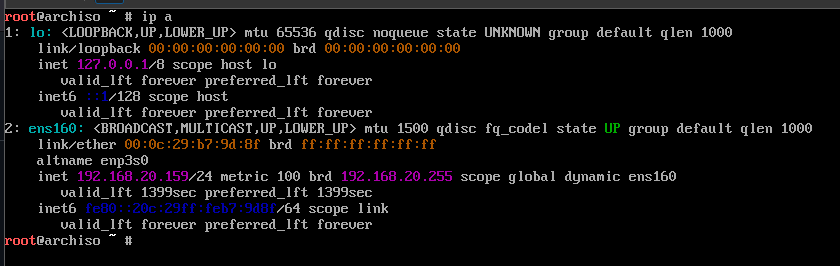
- The above image means that my local ip address is
192.168.20.159 - You can now ssh in by doing
ssh root@ipreplacingipwith the address you just got
- run
lsblkjust to see what you have right now. Here is an example output from vmware
- I will be using
cgdiskto partition my drive. Typecgdisk /dev/nvme0n1to bring up the utility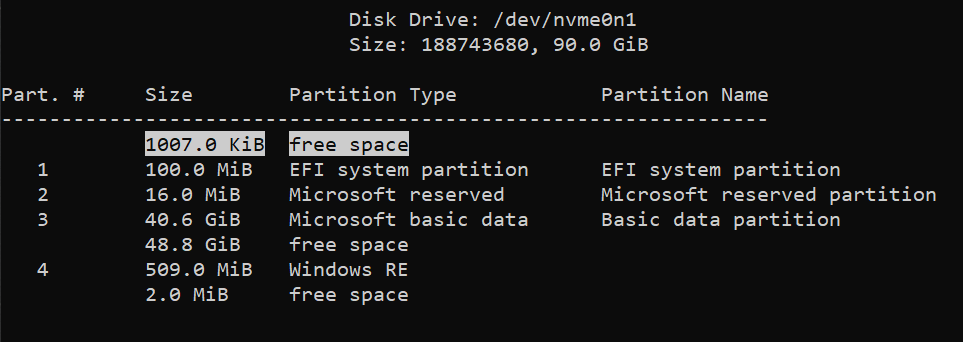
- Above is an example of how the output may look. Do not touch the EFI System partition or microsoft/windows partitions. The only partition we are worried about is the free space partition we created earlier, the 48.8 GiB is the largest free space partition and the one I chose to have arch linux.
- Go to the free space and use the arrow keys to go to
[ New ]and click enter - Use the default
first sectorvalue by just pressing enter - Enter 512Mib for the
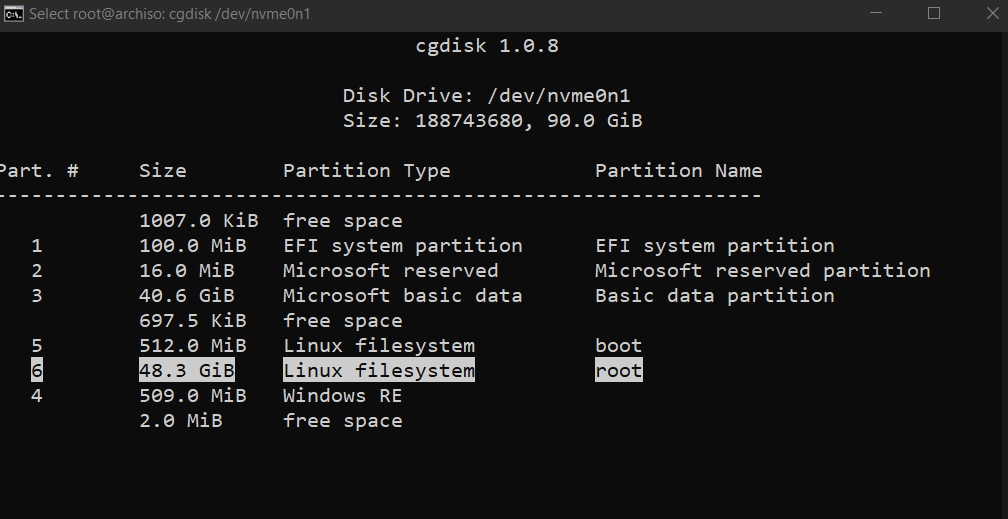
size in sectors - Leave the default partition type of Linux Filesystem and create a partition with the name of
boot. We will be seperating the boot and root as I do not want to encrypt the immediate boot of the computer. - With the free space, choose the default first sector, choose teh default size (which takes up the rest of the disk) and the default filesystem. Name this partition
root. - Use the arrow keys to navigate to
[ Write ]and type yes to confirm - Take note of your current partitions.
- Specifically, the partitions which matter are (These will likely be different for you)
EFI System Partition: /dev/nvme0n1p1
Boot Partition: /dev/nvme0n1p5
Root Partition: /dev/nvme0n1p6
- navigate to
[ Quit ]and exit cgdisk - Verify your partitions with
lsblk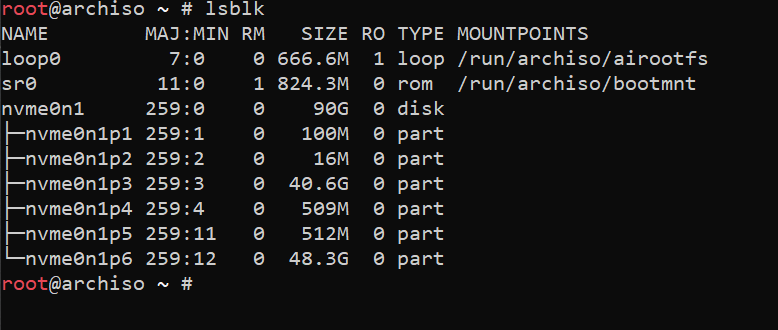
- Run
cryptsetup -y --use-random luksFormat /dev/nvme0n1p6- Change/dev/nvme0n1p6according to your needs. We are encrypting the root partition.
-y: interactively requests the passphrase twice.--use-random: uses /dev/random to produce keys.luksFormat: initializes a LUKS partition.
- type
YESand enter the password you want for the encrypted linux root partition - Now the partition is encrypted and we cannot access it! Open it up using the command
cryptsetup luksOpen /dev/nvme0n1p6 cryptrootto create a mapping in/dev/mapper/cryptroot - The output of
lsblkshould now look similar to the following with cryptroot attached to the root partition
- Format the boot and root partitions by running:
mkfs.ext4 /dev/nvme0n1p5for the boot partition (again, change the device to the name of yours) andmkfs.ext4 /dev/mapper/cryptrootfor the root partition. We need to access the root partition through the cryptroot mapper we created.
mount /dev/mapper/cryptroot /mntmount cryptroot at /mntmkdir /mnt/bootcreate a boot directorymount /dev/nvme0n1p5 /mnt/bootmount the boot partition to this directory (change the name as required)mkdir /mnt/boot/efimake efi directorymount /dev/nvme0n1p1 /mnt/boot/efito mount the existing efi directory.- Now comes the fun part. Running
pacstrapto install everything you need for a basic arch linux install. There are a multitude of packages you need to install depending on your needs. The following is a command to install everything I need. pacstrap /mnt linux linux-headers linux-firmware intel-ucode base base-devel git nano efibootmgr xf86-input-vmmouse xf86-video-vmware mesa networkmanager sof-firmware
linux,linux-headers, andlinux-firmwareare all packages for linux itselfintel-ucodeis for my processor microcode which is an intel one. Useamd-ucodefor AMD processors.baseandbase-develare some essential packagesgitis gitnanois a text editor for the consoleefibootmgrxf86-input-vmmousefor the touchpad in vmware. I would usexf86-input-synapticsorlibinputfor my actual computerxf86-video-vmwareas a video driver. I would usexf86-video-intelfor my computer. https://wiki.archlinux.org/title/Intel_graphicsmesafor opengl and other graphics thingsnetworkmanagera network and internet manager for the command linesof-firmwareSound Open Firmware
- MAKE SURE TO DO THIS:
genfstab -U /mnt >> /mnt/etc/fstabto generate the file system tables. We use-Uto use uuids rather than the names.
- Time to enter the system! Run
arch-chroot /mntand you are now in your linux installation! - Set the timezone by running
ln -sf /usr/share/zoneinfo/America/Los_Angeles /etc/localtimebut with your timezone - set the hardware clock with
hwclock --systohc - Run
nano /etc/locale.gen(or vim) and navigate to the commented out line for your locale. In my case, it would been_US.UTF-8 UTF-8then ctrl-o and ctrl-x to save and exit in nano locale-gento generate the localeecho "LANG=en_US.UTF-8" >> /etc/locale.confJust setting it up. Make sure to change the lang to the line you uncommentedecho "arkde" >> /etc/hostnameSet your hostname with whatever you would like to name your pc :)- Set hosts. Run
nano /etc/hostsand add the following lines.
127.0.0.1    localhost
::1          localhost
127.0.1.1    arkde.localdomain arkde
Rename "arkde" with your hostname
Ramdisk is essentially what to do when you boot up your machine.
- Use
nanoor any texteditor to change theHOOKSin/etc/mkinitcpio.confwithHOOKS=(base udev autodetect keyboard modconf block encrypt filesystems fsck). You will need to addencryptand movekeyboardearlier.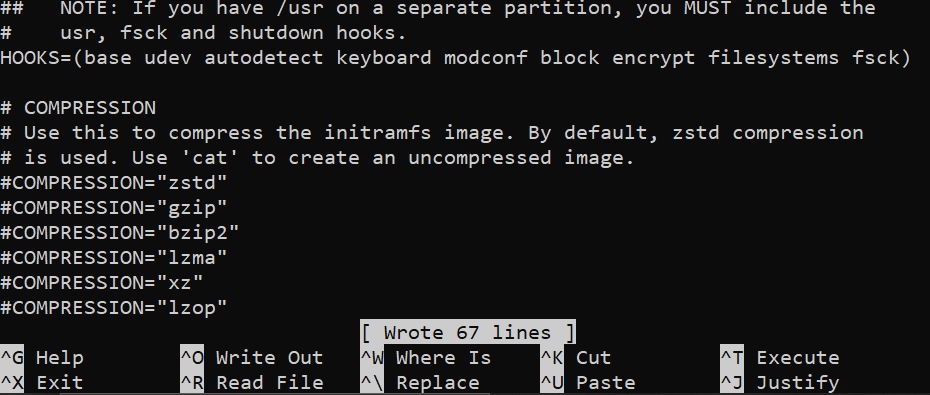
- Run
mkinitcpio -p linux
- Set the root password with
passwd - add a user with
useradd -m -G wheel abhayto create a user in the wheel group and one which has a home directory. - set the password of that user with
passwd abhayor whatever you named your user. - Use
EDITOR=nano visudoor whatever editor you choose to allow users of the wheel group to use sudo by uncommenting the line%wheel ALL=(ALL:ALL) ALL
- Enable network manager by running
systemctl enable NetworkManager.service - Download rEFInd by running
pacman -S refind - Install it by running
refind-install - Now, we need to make sure refind actually works and boots up linux because right now, it is configured based on the arch iso and the flash drive. This is a simple task to do. I will be doing the following in nano because that is easiest for me but you can do it in vim as well.
- Run
cp /boot/refind_linux.conf /boot/refind_linux.conf.bakto copy the current configuration (optional, you likely will not need it) - Run
blkid >> /tmp/id.txtto get the block ids and ouput it to/tmp/id.txt. - Run
nano /boot/refind_linux.confand erase everything except the first line - Erase the text in the second string so that your file now looks like
"Boot with standard options" "" - Now navigate below that and use
Ctrl-Rand type/tmp/id.txtto paste the contents into the file. - Erase everything but the line with your root filesystem, which would be
/dev/nvme0n1p6for us. - Erase everything in that line except the PARTUUID
- On the first line in the second set of quotations, add
cryptdevice=PARTUUID={YOUR PART UUID HERE}:root root=/dev/mapper/rootreplacing the text inside the {} and the {} themselves with the Partuuid you saved on step 11. You canctrl-kandctrl-uto cut and paste. - Save and quit with
ctrl-oandctrl-x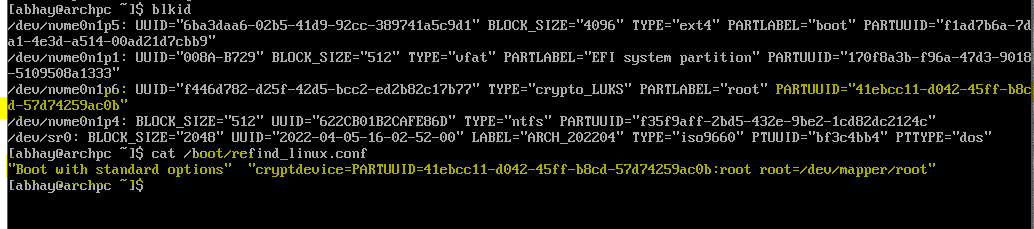
- run
exitto get back to the arch iso - unmount the partitions with
umount -R /mnt - Reboot with
reboot!
If you used grub and want refind, login and run refind-install, you should not have to do any editing and you can safely remove grub
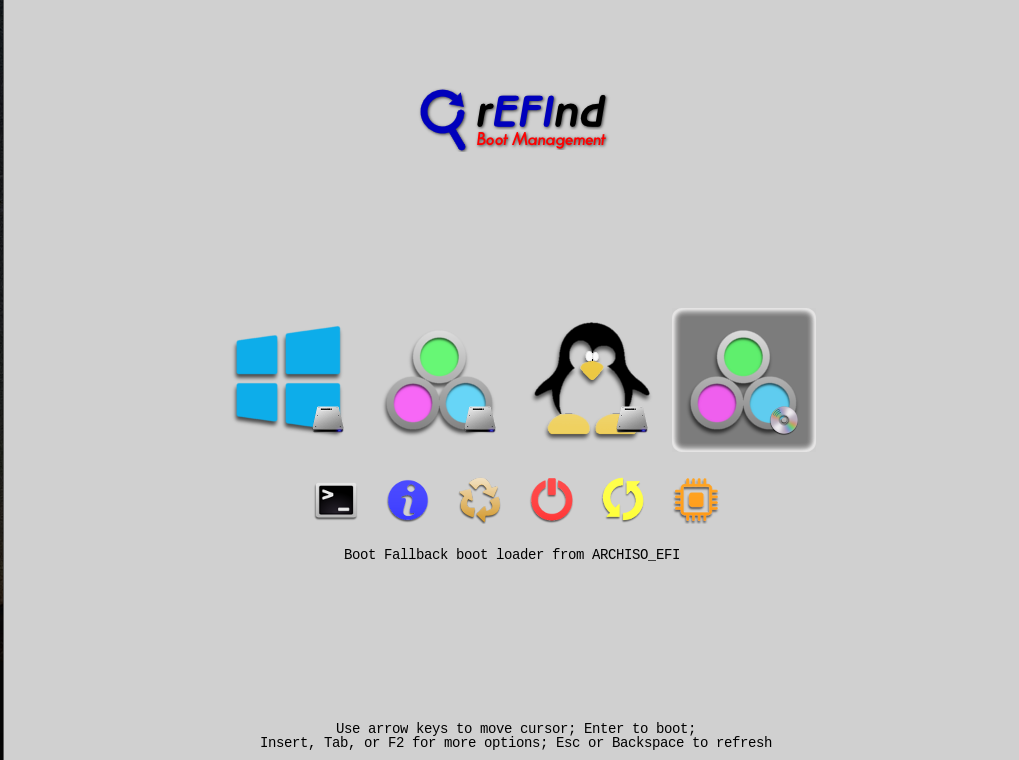 You should now have a boot menu which looks like this!
You can choose the windows icon or the second icon to boot windows
You can choose linux from the third option and the archiso flashdrive is the fourth option
You should now have a boot menu which looks like this!
You can choose the windows icon or the second icon to boot windows
You can choose linux from the third option and the archiso flashdrive is the fourth option
Here is how to get back into your system through the arch iso
- Boot up into the arch flash drive/iso.
- Mount everything by running:
cryptsetup luksOpen /dev/nvme0n1p6 cryptroot # To open the encrypted partition
mount /dev/mapper/cryptroot /mnt
mount /dev/nvme0n1p5 /mnt/boot
mount /dev/nvme0n1p1 /mnt/boot/efi
arch-chroot /mnt
from which you can fix anything you need inside the system. 3. To exit, just follow the same instructions listed up above for exiting the environment and rebooting.
- https://octetz.com/docs/2020/2020-2-16-arch-windows-install/ (Video version too)
- https://wiki.archlinux.org/title/REFInd
- https://bbs.archlinux.org/viewtopic.php?id=252853
- https://wiki.archlinux.org/title/Installation_guide
Edit /etc/pacman.conf with nano or any texteditor uncomment the below two lines.
#[multilib]
#Include = /etc/pacman.d/mirrorlist
You can also uncomment the line for installing packages concurrently
I like to run sudo pacman -Syyu after that just to sync multilib as well as doing any updates that I need to do.
git clone https://aur.archlinux.org/yay.git
cd yay
makepkg -si
Run the above commands
- Run
sudo pacman -S xorg plasma plasma-wayland-session sddm pipewire - After installation run
systemctl enable sddm.service - Run
sudo nano /usr/lib/sddm/sddm.conf.d/default.conf(or vim) and change the theme to "Breeze" so that the result is as follows
[Theme]
Current=breeze
sudo pacman -S konsole dolphin- Run
sudo pacman -S packagekit-qt5 fwupdfor getting app backends for kde discover pacman -S ufwfor a firewall which can be managed from KDE's system settingssudo ufw enableto start the firewallyay -S librewolf-binto install librewolfsudo pacman -S neofetchrebootinto plasma!
- Dark theme. Set screen resolution to 1920x1080.
- Wobbly windows and translucency
Smokey Arch Blue Splash Screen for KDE plasma
Grub/Refind themes
Plymouth
Install pipewire-pulse