Branching is a important concepts in Git that allow you to work on your codebase in a flexible and efficient way. Branching lets you have different versions of a repository at one time. By default, repository created has one branch named main. If you want to create different version of a project at a time, you can create a branch in the main. The branching is useful in many scenarios, for example. if you want to add a new feature to your project, but no change in the original code, adding a branch to your code is easy and helpful. These added branches doesnot affect your main branch, until you merge your newly created branch to the main branch. Few exaples:
-
If you want to check a particular feature into your original code, you just add a branch and check the feature and later merge it to the main branch.
-
Collaborating on a project and keeping track of individual once progress.
-
Branching: Branching allows you to create a separate line of development for your codebase. This is useful when you want to work on a new feature or fix a bug without affecting the main branch of your codebase. To create a new branch, you can use the git branch command, followed by the name of the new branch.
-
We have been doing our coding or creating multiple version of a single files with time to take care of its changes. This branching do the same thing.
For example:
git branch my-new-feature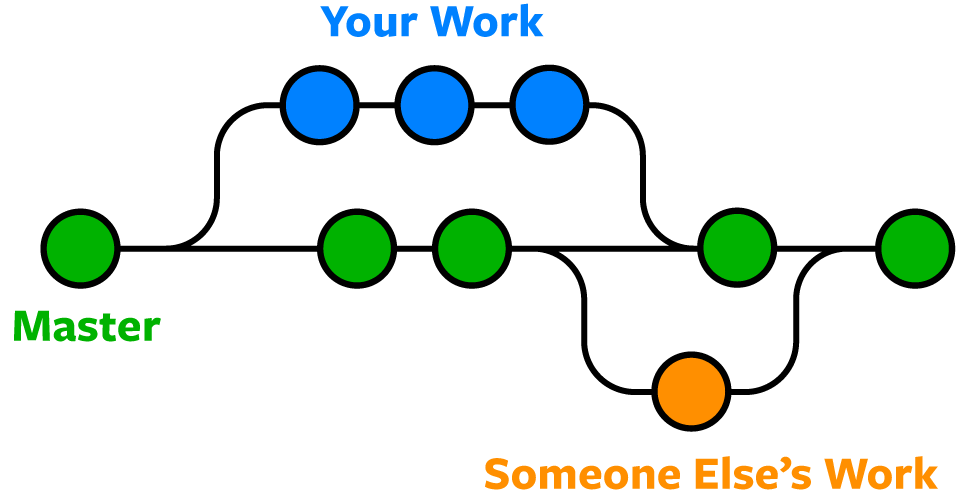
This diagram shows a main branch with green colored dots and other branch are in orange and blue colored dots.
- Pulling is the process of retrieving updates from a remote repository and merging them into your local repository. This is useful when you want to incorporate changes made by other team members into your codebase.
- Pull requests are the heart of collaboration on GitHub. When you open a pull request, you're proposing your changes and requesting that someone review and pull in your contribution and merge them into their branch. Pull requests show diffs, or differences, of the content from both branches. The changes, additions, and subtractions are shown in different colors.
- As soon as you make a commit, you can open a pull request and start a discussion with a whole team or mentioning a particular person by
@mention, even before the code is finished. - There are two ways, in which you can create a pull request. One is on Github online website, you can go to the
pull requestsection of your repository and create a pull request and second one is creating a pull request in the remote repository. To pull updates from a remote repository, you can usegit pull origin master - Pushing: Pushing is the process of sending your local commits to a remote repository. This is useful when you want to share your changes with other team members or make them available for deployment. To push your commits to a remote repository, you can use the git push command. For example: git push origin my-new-feature.
In this final step, you will merge your newly created branch into the main branch. After you merge your pull request, the changes on your new branch will be incorporated into main.
-
When you try to merge two branches that have diverged from each other, Git may detect conflicts between the changes made in each branch. To resolve these conflicts, you will need to manually edit the conflicting files to decide which changes to keep and which to discard. Here's a general process for resolving conflicts in Git:
-
Checkout the branch you want to merge into: Use the git checkout command to switch to the branch that you want to merge the other branch into.
-
Attempt to merge the branches: Use the git merge command to attempt to merge the branches. If there are conflicts, Git will mark the conflicting lines in the code and will not allow the merge to be completed.
-
Identify the conflicting files: Use the git status command to see a list of files that contain conflicts. These files will be marked as "unmerged".
-
Open the conflicting files: Open the conflicting files in a text editor and look for the lines that are marked with conflict markers. These markers will indicate which changes are in conflict.
-
Decide which changes to keep: Review the conflicting changes and decide which ones you want to keep. You will need to edit the file to remove the conflict markers and keep only the changes that you want to keep.
-
Mark the conflicts as resolved: Use the git add command to mark the conflicts as resolved. This will stage the modified files for commit.
-
Commit the merge: Use the git commit command to commit the merge. You will need to provide a commit message to describe the changes that were made.
-
Push the changes: If you are working with a remote repository, use the git push command to push the merged changes to the remote repository.