| title | Connecting to the Internet via USB |
|---|---|
| group | basic-networking |
{% include /style/icon.html type="warning" %} These instructions are for brickman v0.7.0{: .alert-link} and later. If you are using an older version, please upgrade. {: .alert .alert-warning}
-
{: tab="Mac OSX"}{% include /style/icon.html type="warning" %} If you are using OS X version 10.11, this may or may not work. Let us know about your experience on Issue #471{: .alert-link}. {: class="alert alert-warning"}
{% include /style/icon.html type="info" %} These instructions were written using OS X version 10.9, but should work for other versions as well. {: class="alert alert-info"}
-
Use the USB cable provided with the EV3 to connect the EV3 to your Mac. On your Mac, open up System Preferences and select Network.
{% include /util/screenshot.html source="/images/osx/10.9/SystemPreferencesNetwork.png" %}
-
Once you get the Network dialog, click on the
+icon in the lower left area to add a new network device. You'll need to select the CDC Composite Gadget in the drop down box. The name will be similar to what is shown below. I have renamed the service "ev3dev" so it's easier to keep track of later. Click Create when you are done.{% include /util/screenshot.html source="/images/osx/10.9/AddNewDevice.png" %}
-
Click Apply to save your changes. After a short time, the ev3dev entry (or whatever you named it) should show connected and have a Self-Assigned IP address.
{% include /util/screenshot.html source="/images/osx/10.9/CDC-Connected.png" %}
-
To share our Internet connection with the EV3, go back to System Preferences and select Sharing.
{% include /util/screenshot.html source="/images/osx/10.9/SystemPreferencesSharing.png" %}
-
Click Internet Connection on the left, but don't check the box yet. On the right, Share your connection from: will be Wi-Fi (or Ethernet if you have a wired connection). Also check the box next to CDC Composite Gadget
{% include /util/screenshot.html source="/images/osx/10.9/Sharing-Internet-Connection.png" %}
-
Now, check the box next to Internet Connection on the left to enable it. Read the warning and then click Start.
{% include /util/screenshot.html source="/images/osx/10.9/Sharing-Internet-Connection-Warning.png" %}
-
Time to switch to the EV3. On the EV3, go to Wireless and Networks and select All Network Connections, then select the Wired connection.
{% include /util/screenshot.html source="/images/brickman/networking-connections-wired-only.png" %}
-
The Status should change to Connecting and then Online to indicate that you are in fact connected to the Internet. You can also check the Connect automatically box so that this connection will come up automatically in the future.
{% include /util/screenshot.html source="/images/brickman/wired-status-online-connect-automatically-selected.png" %}
-
-
{: tab="Ubuntu"}{% include /style/icon.html type="info" %} These instructions were written using Ubuntu 15.10 and the default desktop (aka Unity). However, the instructions should work for other versions of Ubuntu and its derivatives as well as other desktops like GNOME Shell, Cinnamon and MATE. {:class="alert alert-info"}
-
On your host computer, with the EV3 connected via USB, open up the network application indicator (1). You should already see an entry for LEGO Group EV3+ev3dev (2). Click Edit Connections... (3) to open
nm-connection-manager. If you are using a different desktop environment that does not have this menu, you can runnm-connection-editorfrom a terminal instead.{% include /util/screenshot.html source="/images/ubuntu/15.10/network-application-indicator-edit-connections.png" %}
-
In the Network Connections dialog, click the Add... button.
{% include /util/screenshot.html source="/images/ubuntu/15.10/network-connections-add.png" %}
-
Make sure Ethernet is selected (1) and then click Create... (2).
{% include /util/screenshot.html source="/images/ubuntu/15.10/choose-a-connection-type.png" %}
-
Enter a Connection Name (1) and select the Device MAC Address of your EV3 from the list (2). The name can be anything you like. The MAC address will always start with
12:16:53, so choose that one.Be sure to delete the network interface name (e.g.
bnep0orenp0s20f0u4c2) in (2), leaving only the MAC address. Otherwise, the connection may not work if you plug the EV3 into a different USB port later.{% include /util/screenshot.html source="/images/ubuntu/15.10/editing-ev3dev-ethernet.png" %}
{% include /style/icon.html type="info" %} If the MAC address starts with
32:16:53instead of12:16:53, this means it is using the wrong USB configuration (technically speaking it is trying to use RNDIS instead of CDC, which kind of works but is not as good). Unplug your USB cable and plug it back in. {: .alert .alert-info} -
Then click on the IPv4 Settings tab (1) and change the Method to Shared to other computers (2). Click Save (3) when you are done.
{% include /util/screenshot.html source="/images/ubuntu/15.10/editing-ev3dev-ipv4-settings.png" %}
-
There may be a message that the network is connected. Don't believe it. We still have to tell the EV3 to connect. You can close the Network Connections dialog. We are done with it.
{% include /util/screenshot.html source="/images/ubuntu/15.10/network-connections-close.png" %}
-
Now, we need to assign an IP address to our EV3. In brickman, go to Wireless and Networks and select All Network Connections, then select the Wired connection with the USB icon.
{% include /util/screenshot.html source="/images/brickman/networking-connections-wired-only.png" %}
-
Then select Connect.
{% include /util/screenshot.html source="/images/brickman/wired-status-disconnected-connect-selected.png" %}
-
The Status should change to Connecting and then Online to indicate that you are in fact connected to the Internet. You can also check the Connect automatically box so that this connection will come up automatically in the future.
{% include /util/screenshot.html source="/images/brickman/wired-status-online-connect-automatically-selected.png" %}
-
-
{: tab="Windows"}{% include /style/icon.html type="info" %} These instructions were written using Windows 10, but should work on Windows 7 and 8 as well. {:class="alert alert-info"}
-
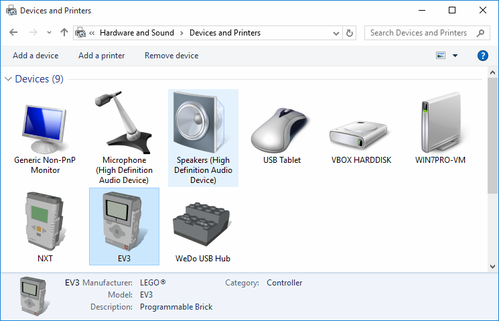
Before connecting the USB cable, go ahead and open Devices and Printers on your computer. It is in the Control Panel under Hardware and Sound. (Or just type Devices and Printers in the start menu.)
{% include /util/screenshot.html source="/images/windows/10/devices-and-printers.png" %}
-
Connect your EV3 to your Windows computer using the USB cable that came with the EV3. You should see an unknown device pop up right away.
{% include /util/screenshot.html source="/images/windows/10/devices-and-printers-new-device.png" %}
-
Wait a minute for Windows install the driver. It will detect the EV3 as a Remote NDIS Compatible Device.
{% include /util/screenshot.html source="/images/windows/10/devices-and-printers-rndis.png" %}
{% include /style/icon.html type="info" %} PROTIP: You can get an icon that looks like an actual EV3 by installing Programmable Brick Icons{: .alert-link}. Follow the link for more information. {% include /util/screenshot.html source="https://raw.githubusercontent.com/ev3dev/PBrickIcons/master/demo1.png" %} {:class="alert alert-info"}
-
Right-click the Remote NDIS Compatible Device and select Network Settings. This takes you to the Network and Sharing Center.
{% include /util/screenshot.html source="/images/windows/10/devices-and-printers-context-menu-network-settings.png" %}
-
In the Network and Sharing Center, make a note of which connection is your Internet connection (1) and then click on Change adapter settings (2). In this example, our Internet connection is Network 5.
{% include /util/screenshot.html source="/images/windows/10/network-and-sharing-center-change-adapter-settings.png" %}
-
There will be a connection that says Remote NDIS Compatible Device (1). This is the EV3. Let's rename it so it is easy to identify. Right-click the adapter and select Rename (2). Call it EV3 or whatever you like.
{% include /util/screenshot.html source="/images/windows/10/network-connections-context-menu-rename.png" %}
-
To share our Internet connection with the EV3, double-click the Internet network connection that you noted earlier (not the one we just renamed). This will show the connection status.
{% include /util/screenshot.html source="/images/windows/10/network-connections-internet-adapter.png" %}
-
If you have more than one other connection, you will want to verify that this connection is indeed the Internet connection (1). Then, click on the Properties button (2).
{% include /util/screenshot.html source="/images/windows/10/local-area-connection-status.png" %}
-
In the window that opens, select the Sharing tab (1) and check the box that says Allow other network users to connect through this computer's Internet connection (2).
{% include /util/screenshot.html source="/images/windows/10/local-area-connection-properties-sharing.png" %}
{% include /style/icon.html type="info" %} If you have more than two network connections, it will ask for a "Home networking connection". If you see this, select your EV3's network adapter from the list (this will be called EV3 if you renamed it earlier in the guide). {% include /util/screenshot.html source="/images/windows/8/local-area-connection-properties-sharing-with-extra-selection.png" %} {: class="alert alert-info"}
{% include /style/icon.html type="warning" %} Windows Internet Connection Sharing is temperamental. Sometimes it just stops working for no reason. If this happens, just turn it off (by unchecking Allow other... and clicking OK) and then turn it back on. It should start working again. {: class="alert alert-warning"}
-
Click OK when you are done and close the status window as well. Windows will automatically reconfigure your other network connections.
-
Now, we need to do some setting up on the EV3. Go to Networking and select Manage connections..., then select the Wired connection.
{% include /util/screenshot.html source="/images/brickman/networking-connections-wired-only.png" %}
-
Internet Connection Sharing on Windows is temperamental, so we are going to use a static IP address to make it a bit more reliable. Select IPv4 on the menu.
{% include /util/screenshot.html source="/images/brickman/wired-status-disconnected-ipv4-selected.png" %}
-
Select Change....
{% include /util/screenshot.html source="/images/brickman/wired-status-disconnected-ipv4-empty.png" %}
-
Then choose Load Windows Defaults.
{% include /util/screenshot.html source="/images/brickman/networking-load-windows-defaults.png" %}
-
The settings on the IPv4 screen will remain blank because we are not connected yet. Go back to the previous screen and check the box for Connect automatically. This way you don't have to connect manually after you reboot. Then select Connect. State should change to Online to indicate that your EV3 is connected to the Internet.
{% include /util/screenshot.html source="/images/brickman/wired-status-online-connect-selected.png" %} {: tab-list="os"}
-
Now that you have a network connection, you should connect to your EV3 with SSH if you haven't done so already.