-
Notifications
You must be signed in to change notification settings - Fork 2.3k
Expand file tree
/
Copy pathauto-generator.md
More file actions
325 lines (224 loc) · 12.8 KB
/
auto-generator.md
File metadata and controls
325 lines (224 loc) · 12.8 KB
1
2
3
4
5
6
7
8
9
10
11
12
13
14
15
16
17
18
19
20
21
22
23
24
25
26
27
28
29
30
31
32
33
34
35
36
37
38
39
40
41
42
43
44
45
46
47
48
49
50
51
52
53
54
55
56
57
58
59
60
61
62
63
64
65
66
67
68
69
70
71
72
73
74
75
76
77
78
79
80
81
82
83
84
85
86
87
88
89
90
91
92
93
94
95
96
97
98
99
100
101
102
103
104
105
106
107
108
109
110
111
112
113
114
115
116
117
118
119
120
121
122
123
124
125
126
127
128
129
130
131
132
133
134
135
136
137
138
139
140
141
142
143
144
145
146
147
148
149
150
151
152
153
154
155
156
157
158
159
160
161
162
163
164
165
166
167
168
169
170
171
172
173
174
175
176
177
178
179
180
181
182
183
184
185
186
187
188
189
190
191
192
193
194
195
196
197
198
199
200
201
202
203
204
205
206
207
208
209
210
211
212
213
214
215
216
217
218
219
220
221
222
223
224
225
226
227
228
229
230
231
232
233
234
235
236
237
238
239
240
241
242
243
244
245
246
247
248
249
250
251
252
253
254
255
256
257
258
259
260
261
262
263
264
265
266
267
268
269
270
271
272
273
274
275
276
277
278
279
280
281
282
283
284
285
286
287
288
289
290
291
292
293
294
295
296
297
298
299
300
301
302
303
304
305
306
307
308
309
310
311
312
313
314
315
316
317
318
319
320
321
322
323
324
325
---
title: Spring Boot 整合 MyBatis-Plus AutoGenerator 生成编程喵项目骨架代码
category:
- Java企业级开发
tag:
- Spring Boot
---
作为一名 Java 后端开发,日常工作中免不了要生成数据库表对应的持久化对象 PO,操作数据库的接口 DAO,以及 CRUD 的 XML,也就是 mapper。
Mybatis Generator 是 MyBatis 官方提供的一个代码生成工具,完全可以胜任这个工作,不过最近在开发“编程喵🐱”开源网站的时候试用了一下 MyBatis-Plus 官方提供 AutoGenerator,发现配置更简单,开发效率更高!于是就来给小伙伴们安利一波。
让我们来通过一个 gif 感受一下 AutoGenerator 的强大。
## 导入 SQL 文件
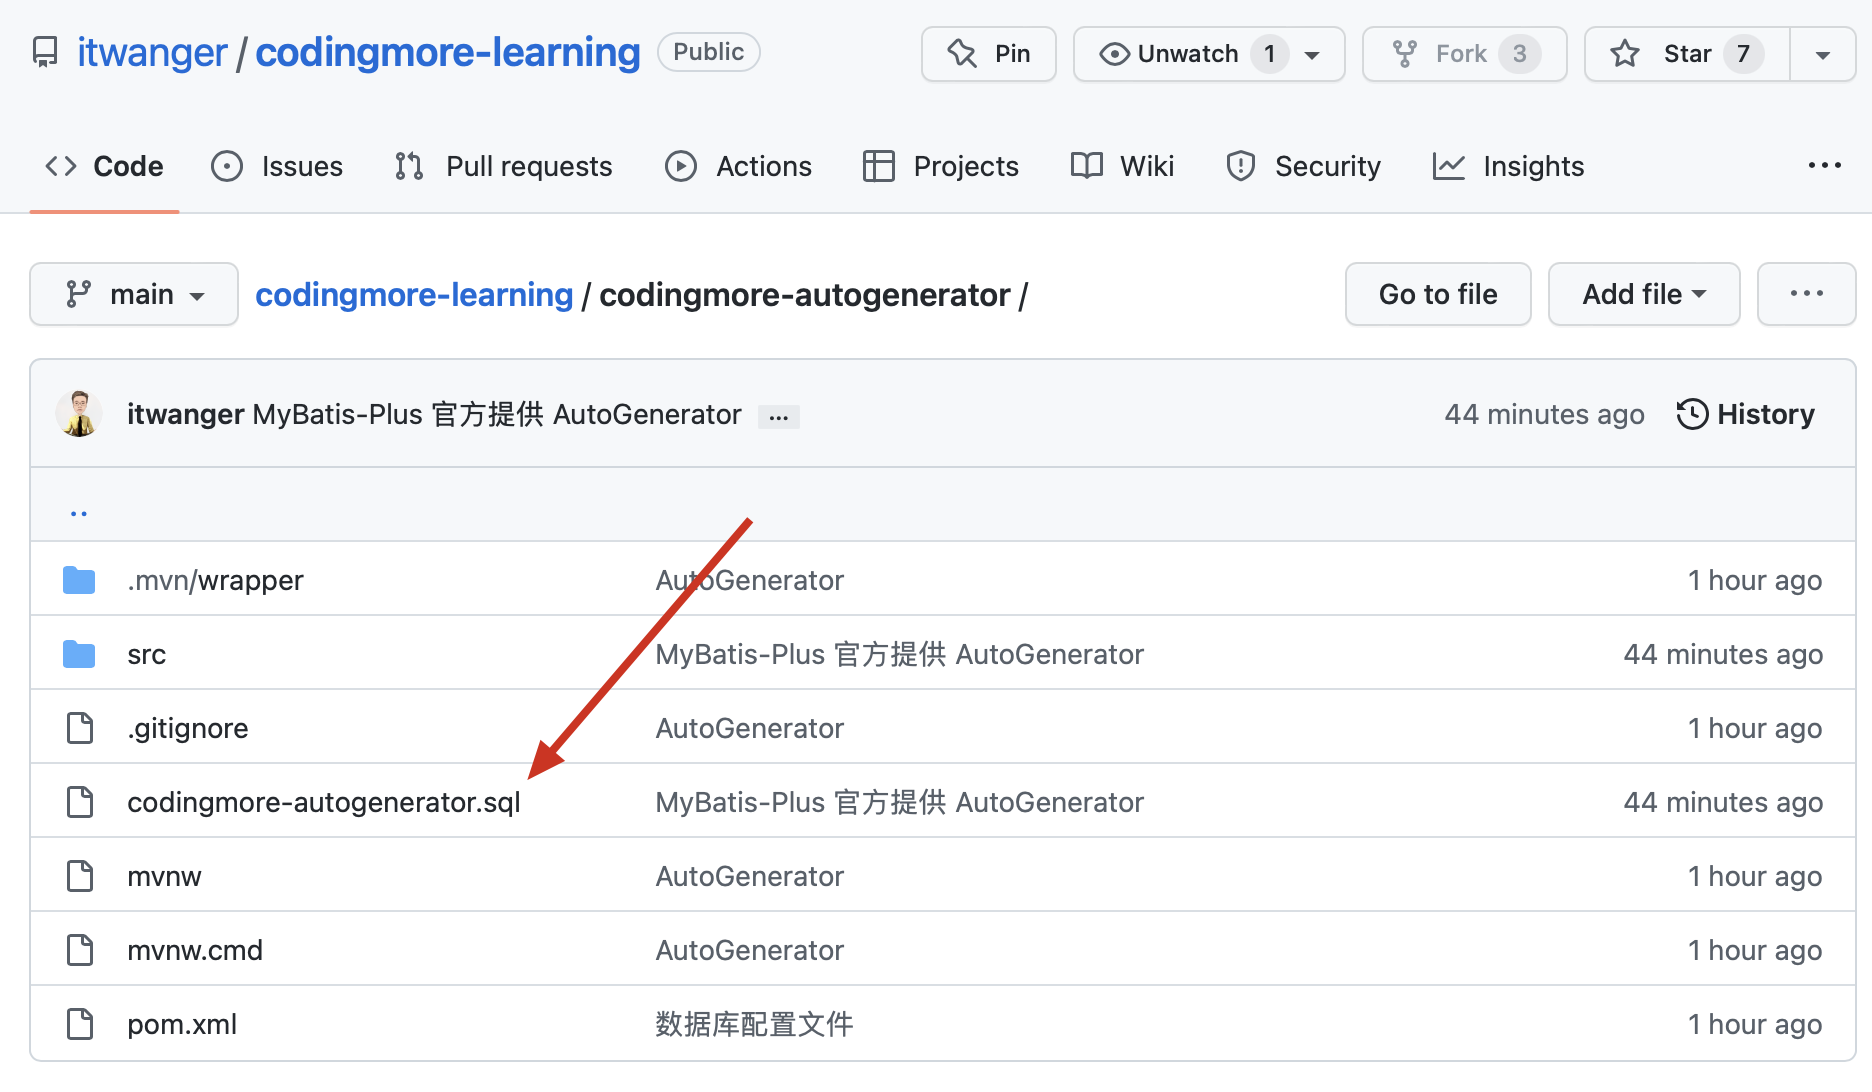
编程喵项目的 SQL 文件我已经同步到本教程所在的源码当中。
>路径:[https://github.com/itwanger/codingmore-learning/tree/main/codingmore-autogenerator](https://github.com/itwanger/codingmore-learning/tree/main/codingmore-autogenerator)
可以通过 GitHub 桌面版从 GitHub 上下载本教程专属的项目 codingmore-autogenerator 到本地,SQL 文件的位置参照下图。
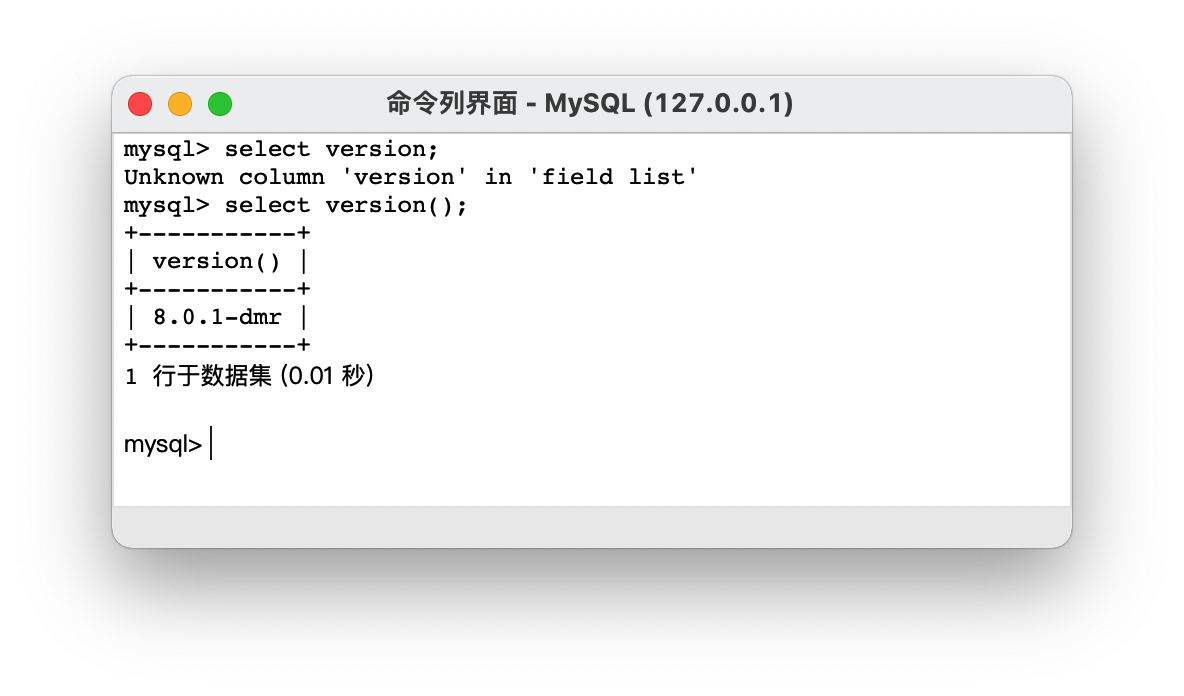
编程喵使用的 MySQL 版本是 8.0,可以在链接上 MySQL 后使用 `select version();` 命令查询版本。
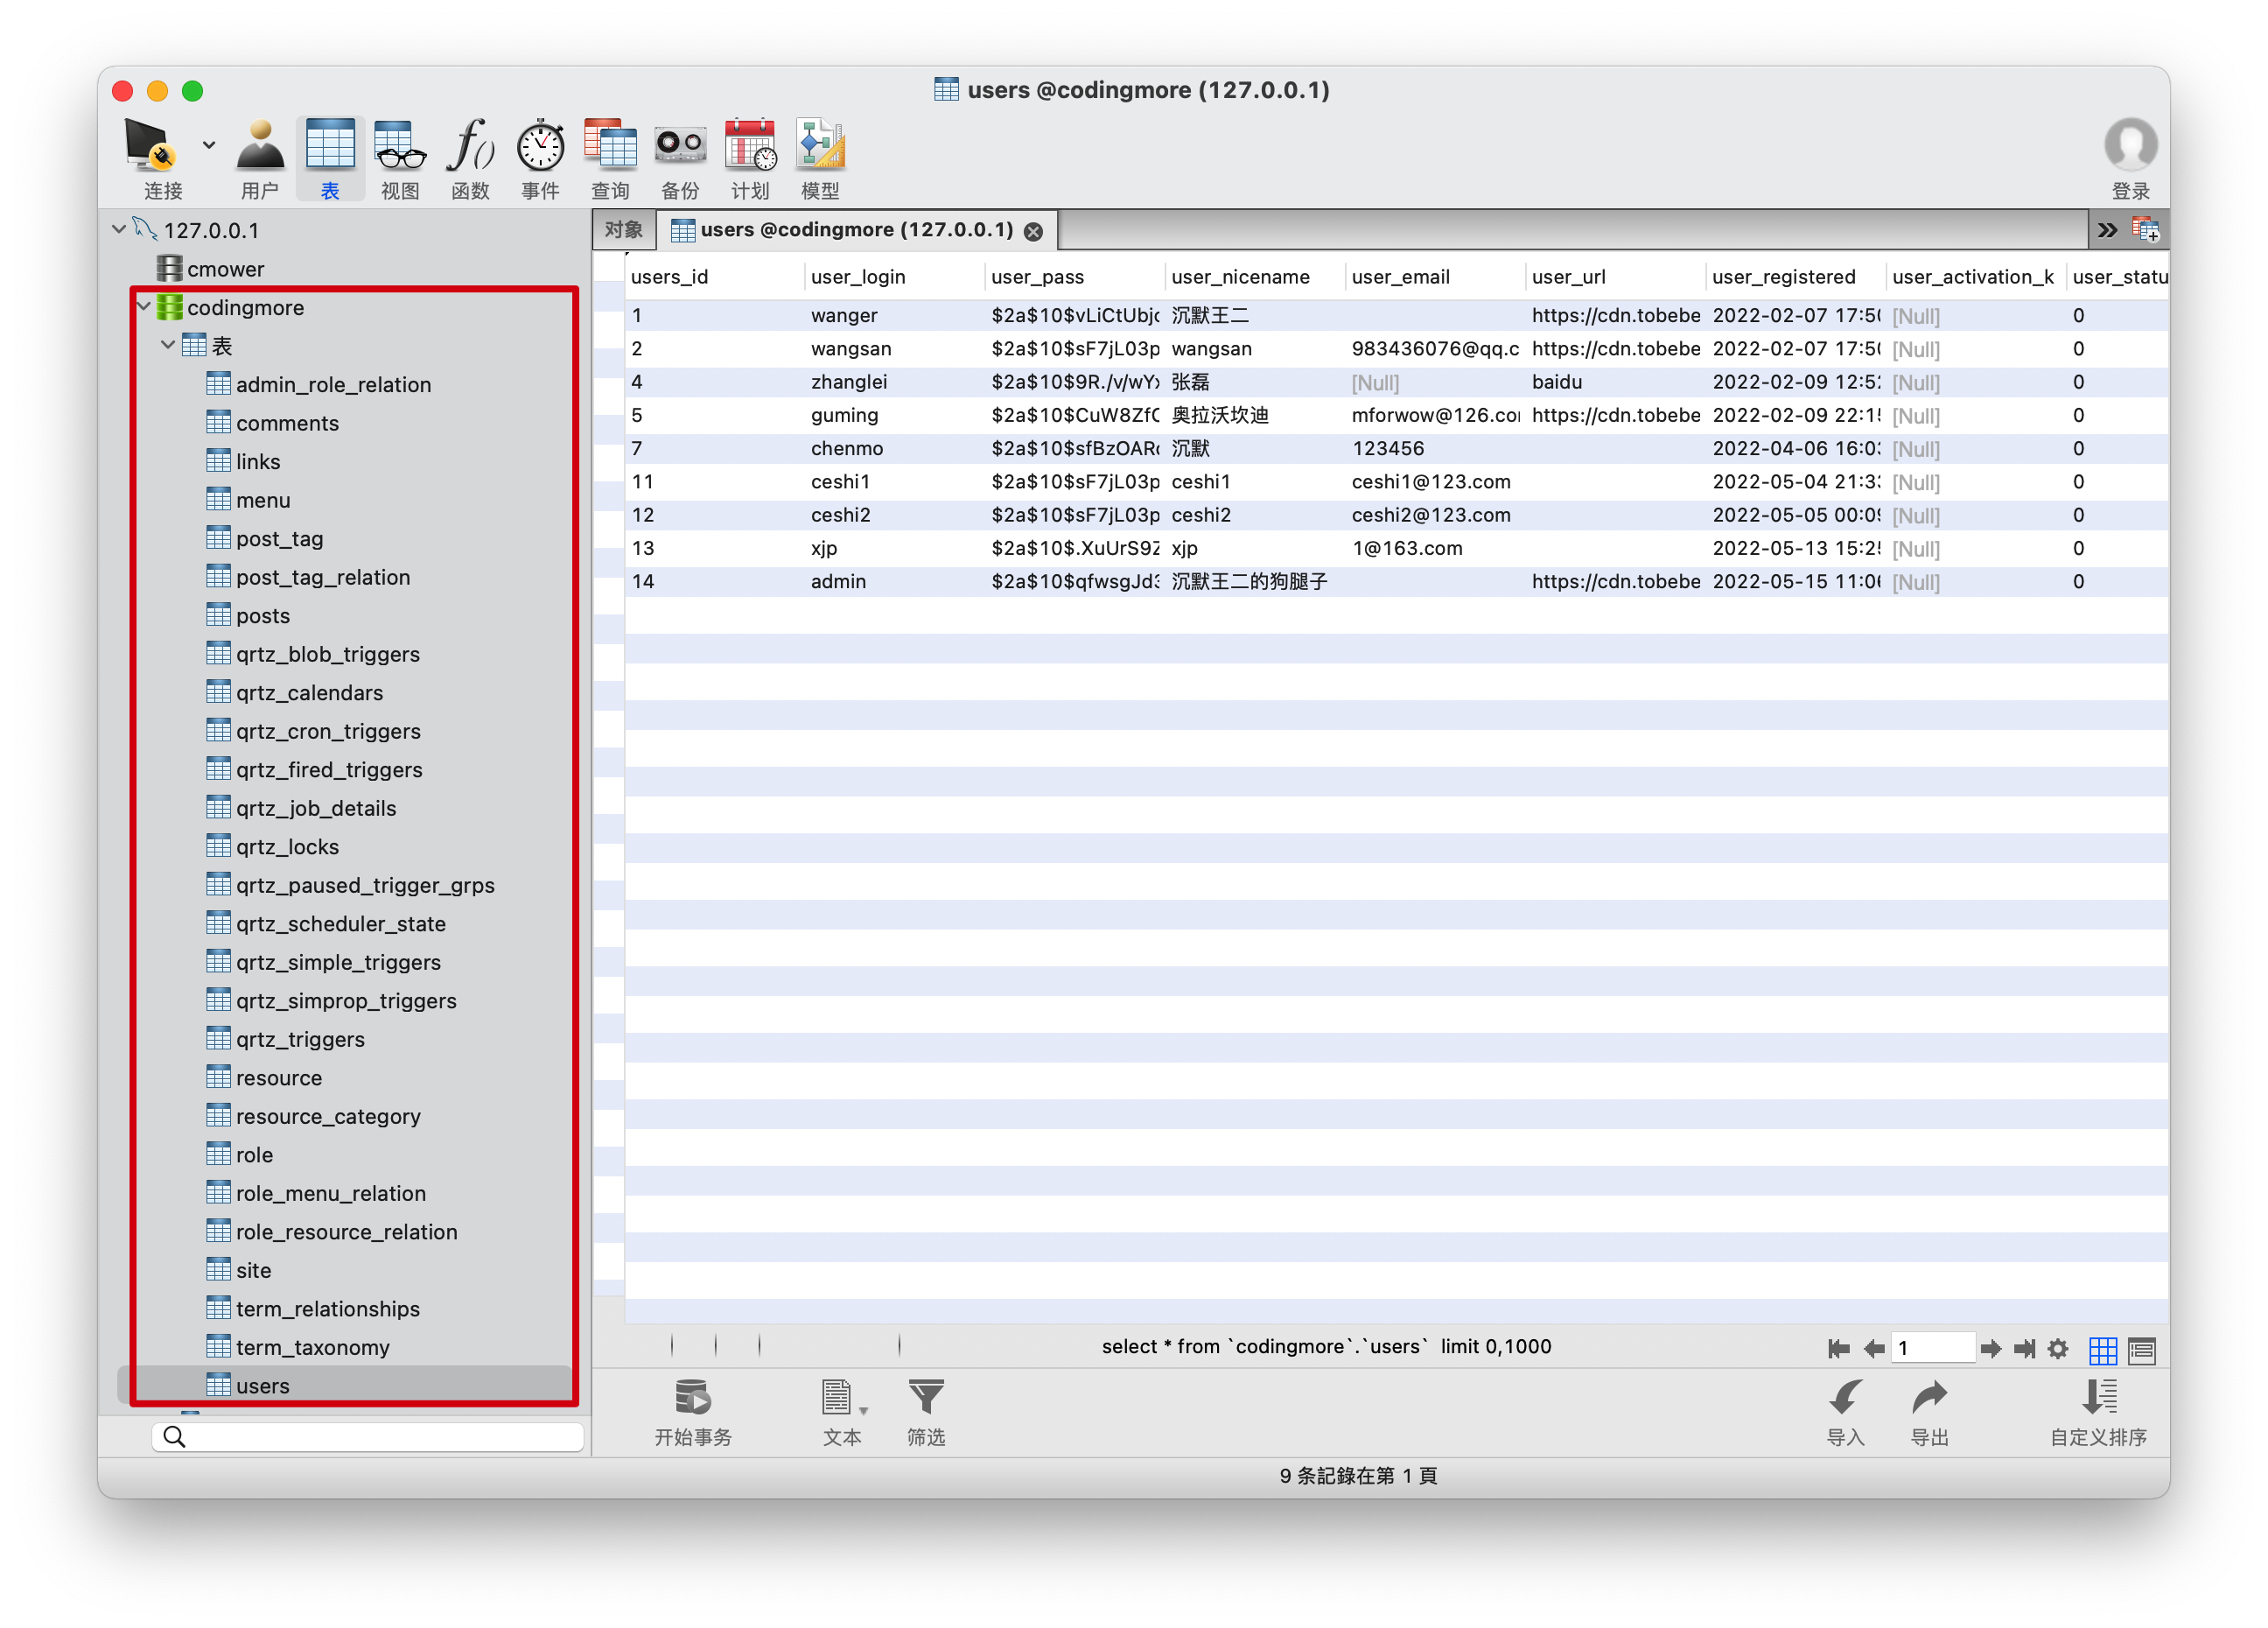
打开 Navicat,把 SQL 文件导入到本地数据库,
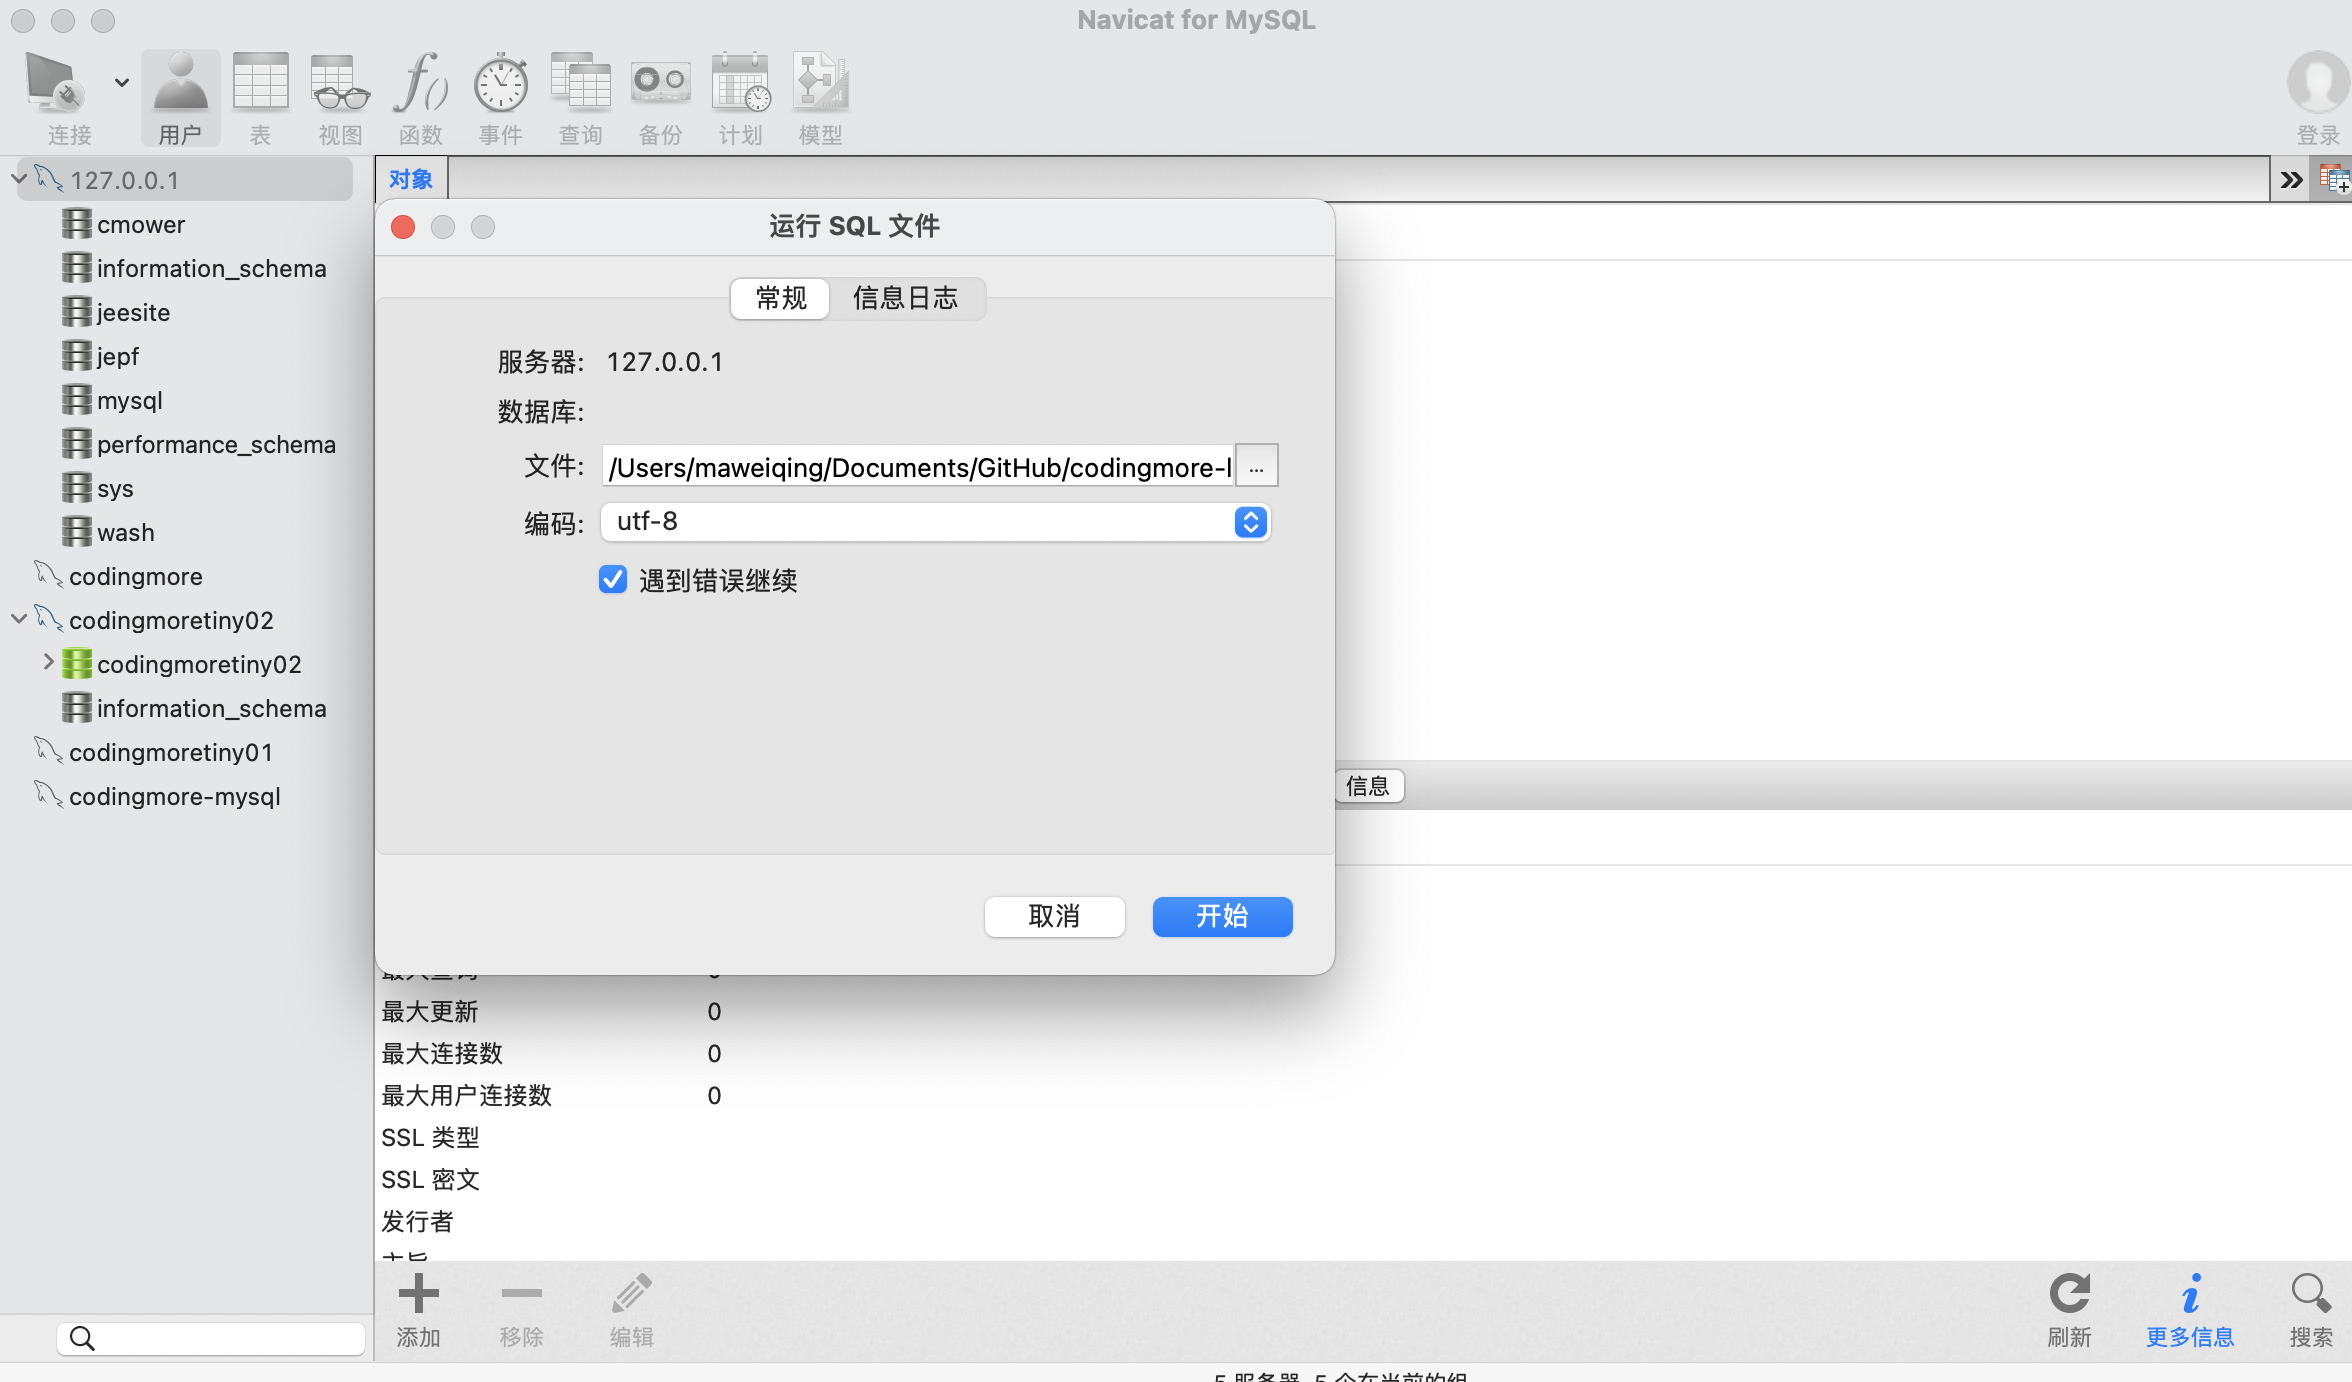
关闭链接,重新打开就可以看到导入后的数据库 codingmore,里面一共 27 张表。
## 先体验 Mybatis Generator
第一步,在 pom.xml 文件中添加 MySQL+MyBatis 的依赖(Mybatis Generator 的前置条件)。
```
<dependency>
<groupId>org.mybatis.spring.boot</groupId>
<artifactId>mybatis-spring-boot-starter</artifactId>
<version>2.2.2</version>
</dependency>
<dependency>
<groupId>mysql</groupId>
<artifactId>mysql-connector-java</artifactId>
<scope>runtime</scope>
</dependency>
```
添加完成后,一定要执行一次 Maven 重载(见下图),确保 MyBatis 的依赖加载完毕后再执行第二步。
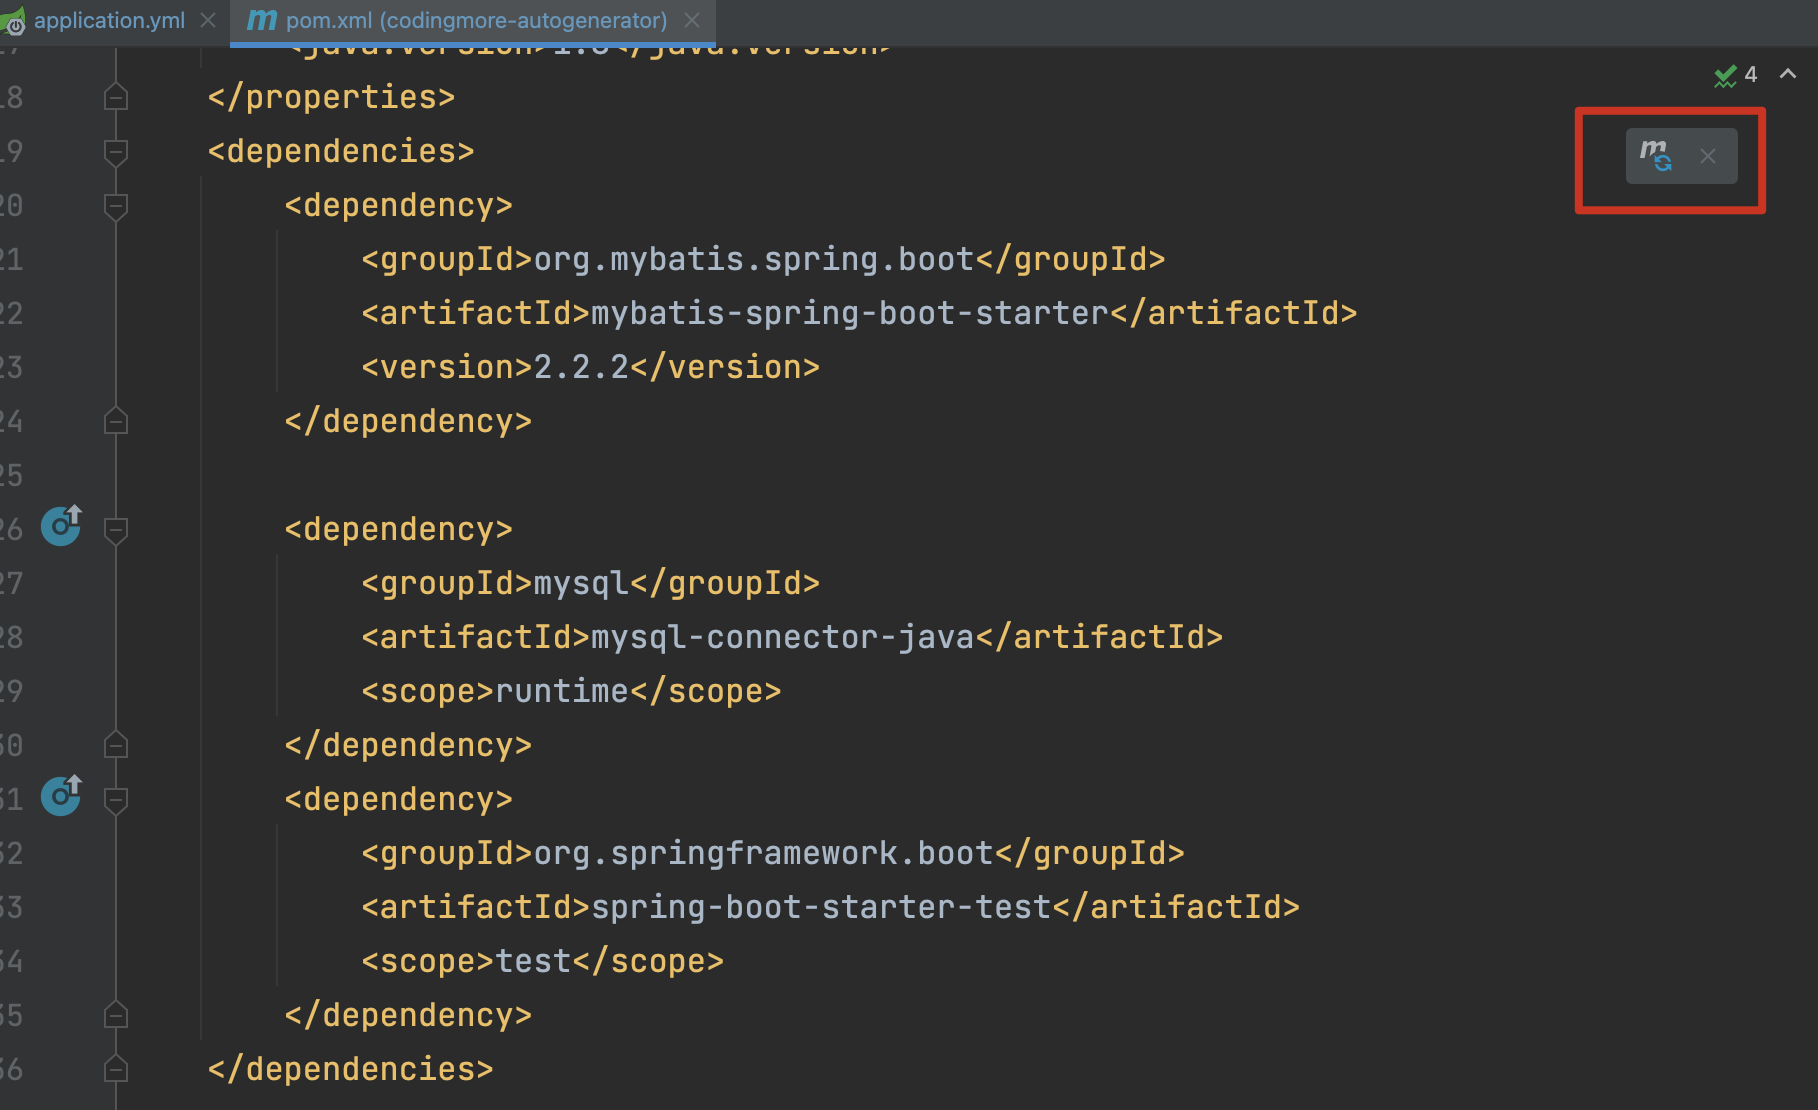
否则下一步可能不通过,但又得不到任何错误提示。不要问我为什么,踩过坑后痛苦的领悟。

添加完成后,可以通过 Maven 插件来生成骨架代码,也可以通过 Java 代码来生成骨架代码,这里以 Maven 插件的形式来演示。Java 代码的形式可参照 Mybatis Generator:
>[https://mybatis.org/generator/running/runningWithJava.html](https://mybatis.org/generator/running/runningWithJava.html)
第二步,在 pom.xml 文件中,添加 MyBatis Generator 插件,注意是在 **build→plugins** 下节点下添加。
```
<!-- MyBatis Generator 插件 -->
<plugin>
<groupId>org.mybatis.generator</groupId>
<artifactId>mybatis-generator-maven-plugin</artifactId>
<version>1.3.7</version>
<configuration>
<!-- MyBatis Generator 生成器的配置文件-->
<configurationFile>src/main/resources/mybatis-generator-config.xml</configurationFile>
<!-- 允许覆盖生成的文件,确定骨架代码后就可以设为 false 了,免得覆盖原有代码 -->
<overwrite>true</overwrite>
<!-- 将当前 pom 的依赖项添加到生成器的类路径中-->
<includeCompileDependencies>true</includeCompileDependencies>
</configuration>
</plugin>
```
MyBatis Generator 插件目前最新版是 1.4.0,我们采用上一个稳定版本 1.3.7,新版本容易有坑。
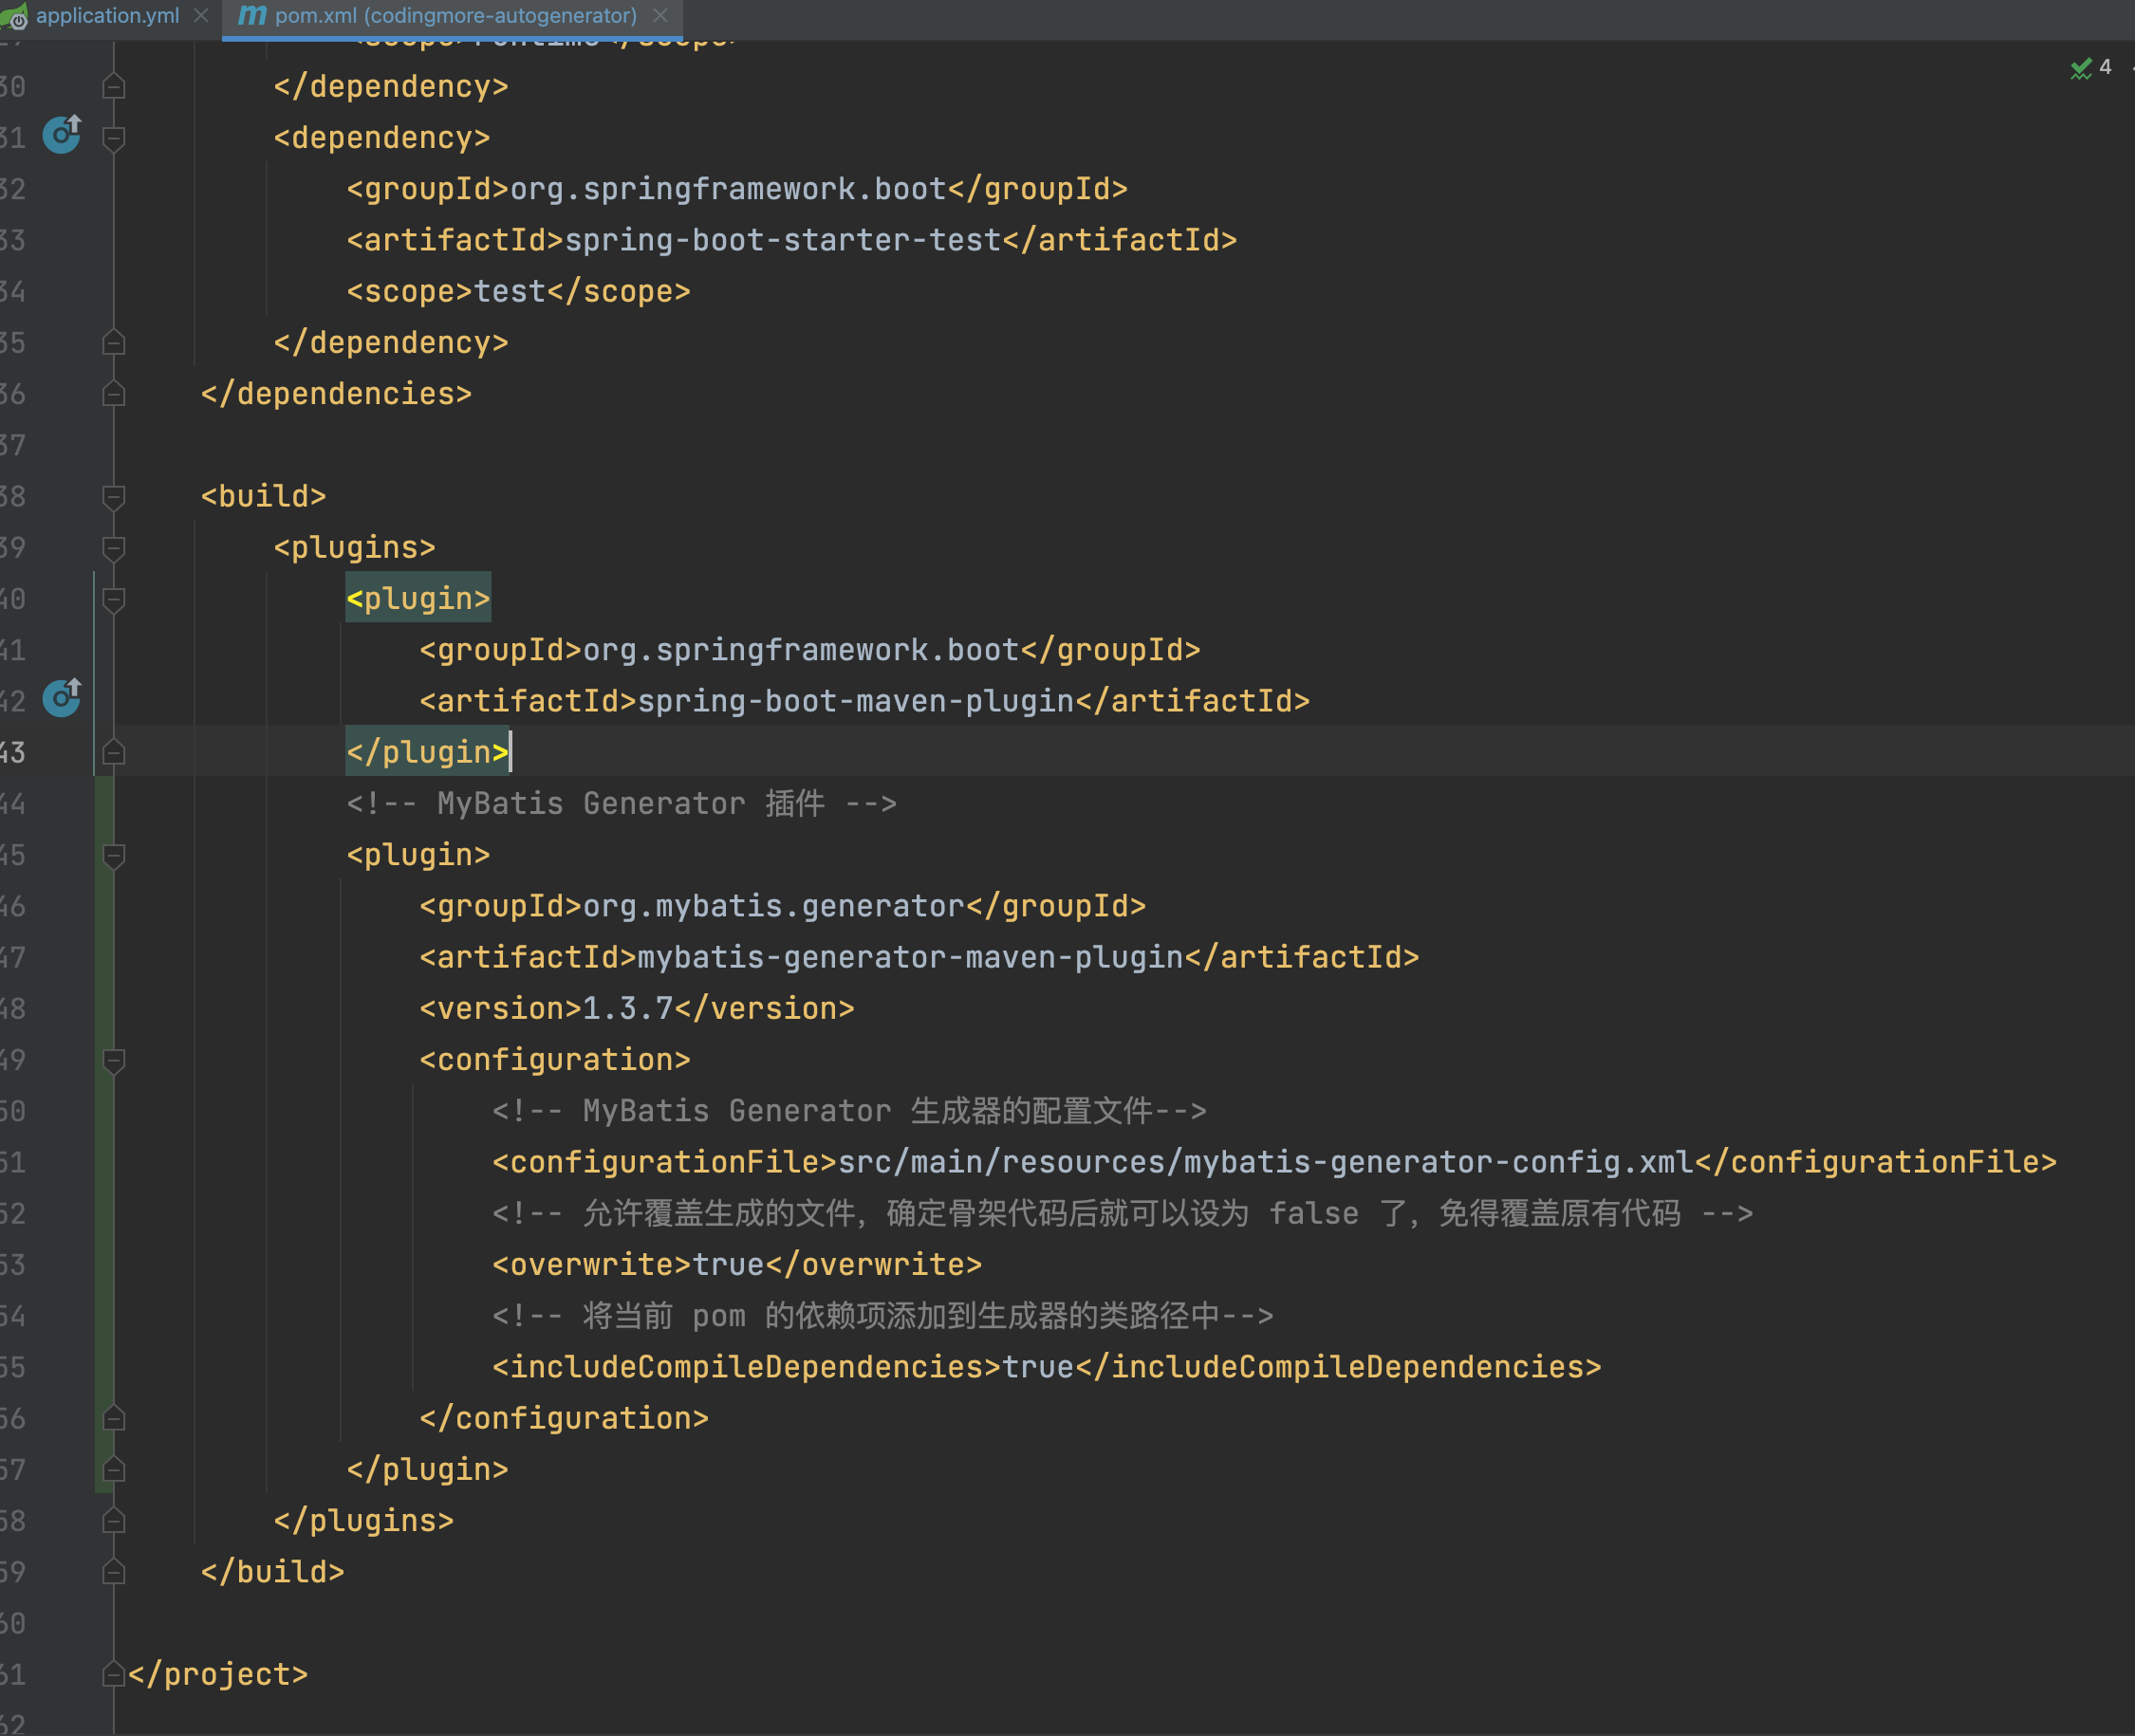
来看一下添加 MyBatis Generator 插件后 pom.xml 文件的结构图。
只添加插件还不够,还需要对其进行配置,我们使用 configurationFile 元素来指定一个配置文件 mybatis-generator-config.xml:
```
<configurationFile>src/main/resources/mybatis-generator-config.xml</configurationFile>
```
由于数据库表可能会发生变动,因此我们需要追加一个配置 `<overwrite>true</overwrite>`,允许覆盖旧的文件。为了防止我们编写的 SQL 语句被覆盖掉,MyBatis Generator 只会覆盖旧的 po、dao、而 *mapper.xml 不会覆盖,而是追加。
Mybatis Generator 需要连接数据库,所以还需要在 plugin 节点中添加数据库驱动依赖,就像这样:
```
<configuration>
</configuration>
<dependency>
<groupId>mysql</groupId>
<artifactId>mysql-connector-java</artifactId>
</dependency>
```
但我们在 pom.xml 文件中已经添加过 MySQL 的链接驱动了,这里再添加就会显得很多余。好在 Maven 为我们提供了 includeCompileDependencies 属性,可以让我们在插件中引用之前添加的依赖。
```
<includeCompileDependencies>true</includeCompileDependencies>
```
来看一下 mybatis-generator-config.xml 的位置。

来看一下 mybatis-generator-config.xml 的内容。
```
<generatorConfiguration>
<context id="myContext" targetRuntime="MyBatis3" defaultModelType="flat">
<!-- 注释 -->
<commentGenerator>
<!-- 是否不生成注释 -->
<property name="suppressAllComments" value="true"/>
</commentGenerator>
<!-- jdbc连接 -->
<jdbcConnection driverClass="com.mysql.cj.jdbc.Driver"
connectionURL="jdbc:mysql://localhost:3306/codingmore?useUnicode=true&characterEncoding=utf-8&serverTimezone=Asia/Shanghai&useSSL=false"
userId="root"
password="Huicheng123">
<!--高版本的 mysql-connector-java 需要设置 nullCatalogMeansCurrent=true-->
<property name="nullCatalogMeansCurrent" value="true"/>
</jdbcConnection>
<!-- 类型转换 -->
<javaTypeResolver>
<!--是否使用bigDecimal,默认false。
false,把JDBC DECIMAL 和 NUMERIC 类型解析为 Integer
true,把JDBC DECIMAL 和 NUMERIC 类型解析为java.math.BigDecimal-->
<property name="forceBigDecimals" value="true"/>
</javaTypeResolver>
<!-- 生成实体类地址 -->
<javaModelGenerator targetPackage="top.codingmore.mbg.po" targetProject="src/main/java">
<!-- 是否针对string类型的字段在set方法中进行修剪,默认false -->
<property name="trimStrings" value="true"/>
</javaModelGenerator>
<!-- 生成Mapper.xml文件 -->
<sqlMapGenerator targetPackage="top.codingmore.mbg.mapper" targetProject="src/main/resources">
</sqlMapGenerator>
<!-- 生成 XxxMapper.java 接口-->
<javaClientGenerator targetPackage="top.codingmore.mbg.dao" targetProject="src/main/java" type="XMLMAPPER">
</javaClientGenerator>
<!-- schema为数据库名,oracle需要配置,mysql不需要配置。
tableName为对应的数据库表名
domainObjectName 是要生成的实体类名(可以不指定,默认按帕斯卡命名法将表名转换成类名)
enableXXXByExample 默认为 true, 为 true 会生成一个对应Example帮助类,帮助你进行条件查询,不想要可以设为false
-->
<table schema="" tableName="posts" domainObjectName="Posts"
enableCountByExample="false" enableDeleteByExample="false" enableSelectByExample="false"
enableUpdateByExample="false" selectByExampleQueryId="false">
</table>
</context>
</generatorConfiguration>
```
- 配置文件至少得包含一个context
- commentGenerator 用来配置生成的注释
- jdbcConnection 用来链接数据库
- javaTypeResolver 配置 JDBC 与 Java 的类型转换规则
- javaModelGenerator 配置 po 生成的包路径和项目路径
- sqlMapGenerator 配置 mapper.xml 文件生成的目录
- javaClientGenerator 配置 mapper.java 文件生成的目录
- 一个 table 对应一张表,如果想同时生成多张表,需要配置多个 table
更多配置信息可以参照下面这篇文章:
>[https://juejin.cn/post/6844903982582743048](https://juejin.cn/post/6844903982582743048)
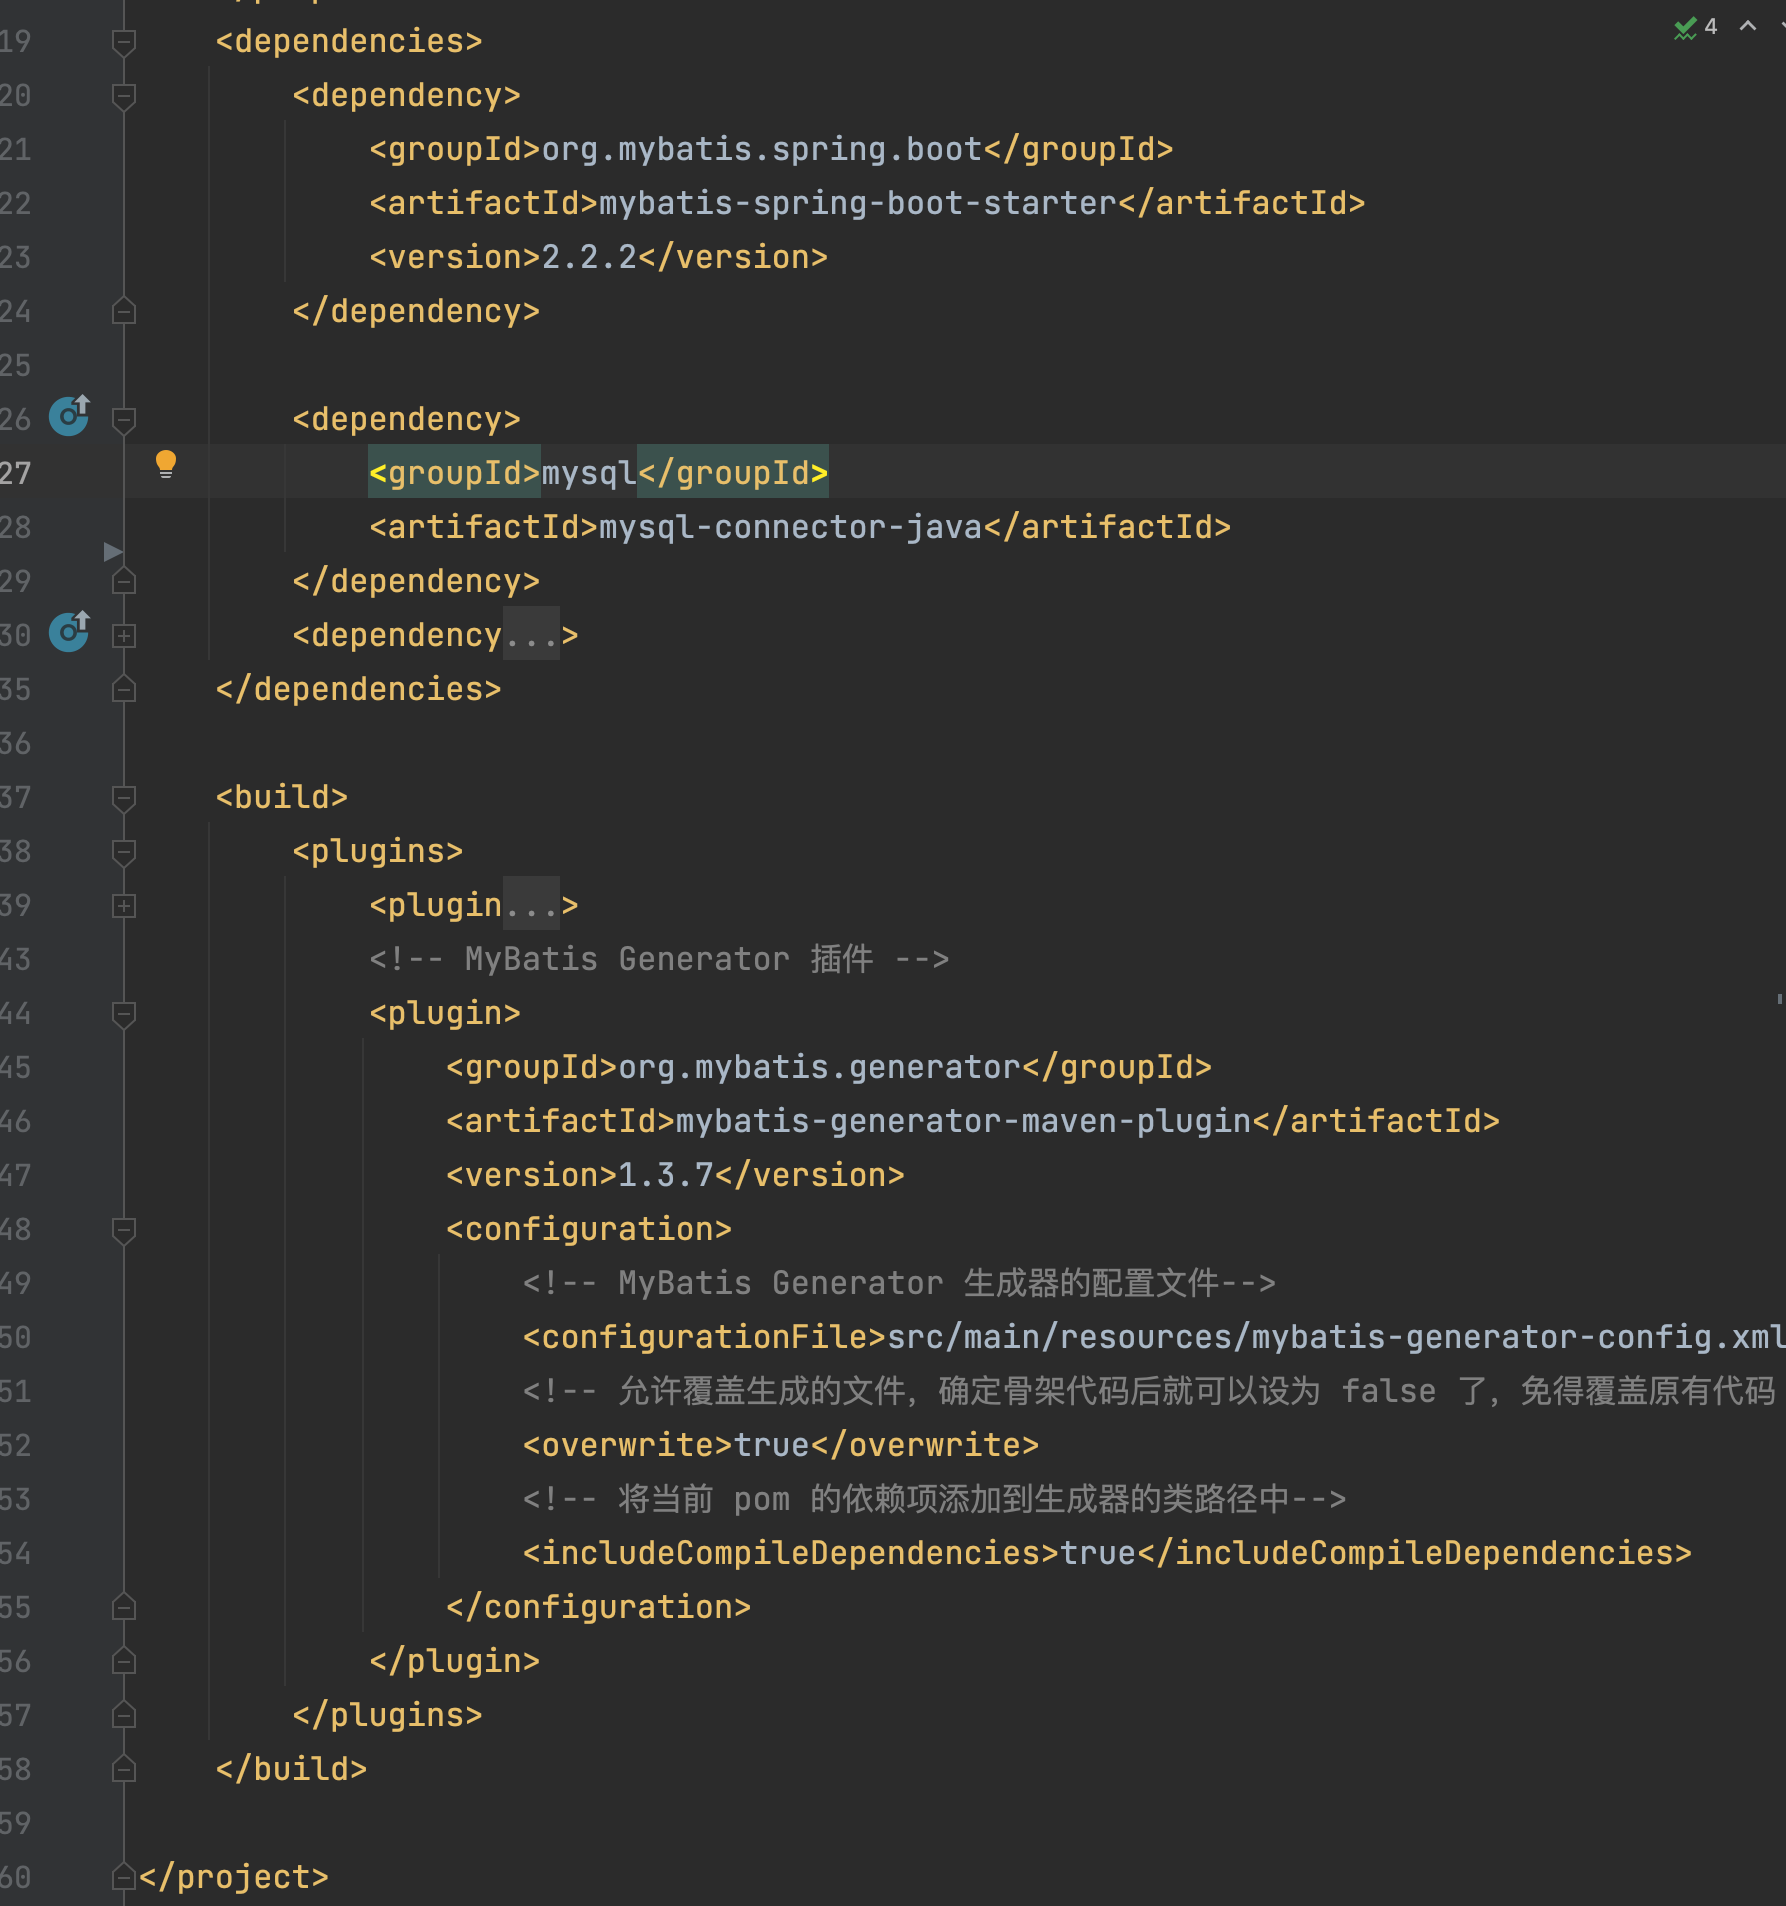
到此为止,mybatis-generator-maven-plugin 就算是配置完成了,完整内容如下图所示:
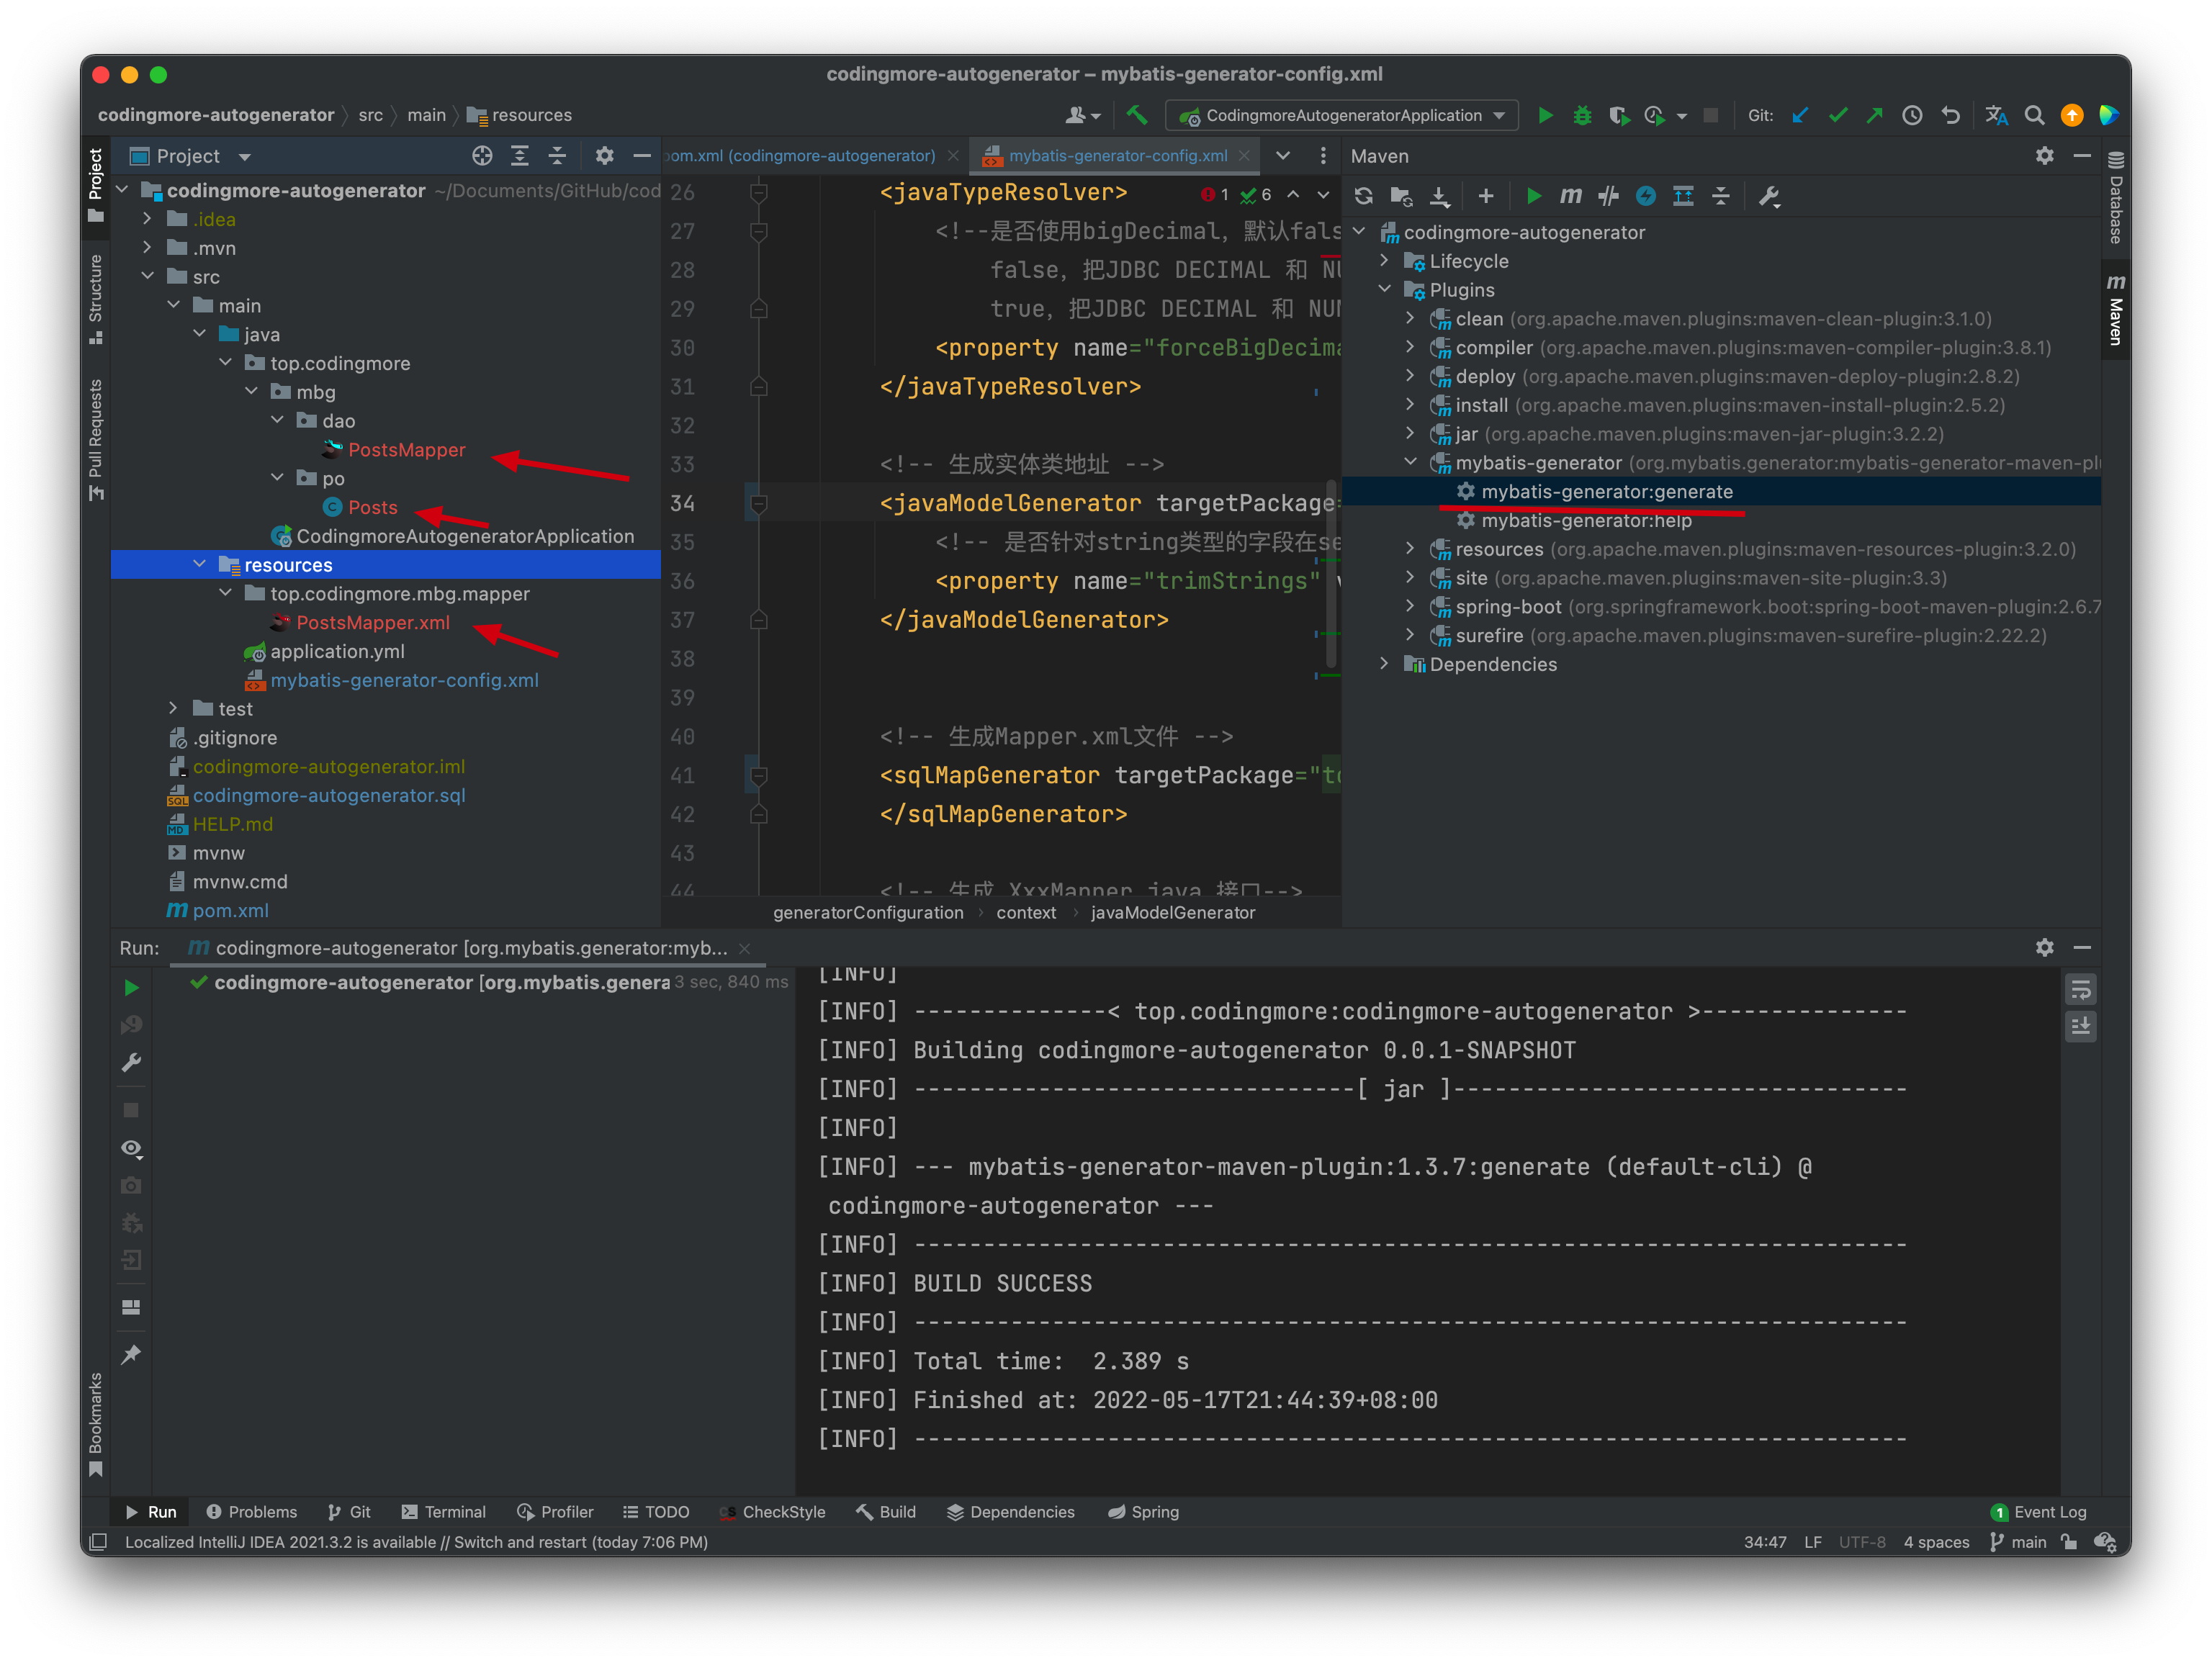
配置完成后可以双击运行 Maven 的插件 Mybatis Generator,没有问题的话,可以看到生成后的文件。
## 再体验 MyBatis-Plus 的 AutoGenerator
MyBatis-Plus(简写 MP)是 MyBatis 的增强工具,官方宣称 MP 和 MyBatis 的关系就好像魂斗罗中的 1P 和 2P,可谓好基友,天下走。

AutoGenerator 是 MyBatis-Plus 推出的代码生成器,可以快速生成 Entity、Mapper、Mapper XML、Service、Controller 等各个模块的代码,比 Mybatis Generator 更强大,开发效率更高。
通过前面的体验,想必大家确实感觉到了 Mybatis Generator 的繁琐,接下来,我们来体验一下 AutoGenerator,对比过后,大家心里就有答案了。
第一步,在 pom.xml 文件中添加 AutoGenerator 的依赖。
```
<dependency>
<groupId>com.baomidou</groupId>
<artifactId>mybatis-plus-generator</artifactId>
<version>3.4.1</version>
</dependency>
```
第二步,添加模板引擎依赖,MyBatis-Plus 支持 Velocity(默认)、Freemarker、Beetl,这里使用 Velocity 引擎。
```
<dependency>
<groupId>org.apache.velocity</groupId>
<artifactId>velocity-engine-core</artifactId>
<version>2.3</version>
</dependency>
```
第三步,新建 CodeGenerator.java 文件,在 main 方法中添加 MyBatis-Plus 的 AutoGenerator 对象。
```java
package top.codingmore.generator;
import com.baomidou.mybatisplus.generator.AutoGenerator;
/**
* 微信搜索「沉默王二」,回复 Java
*
* @author 沉默王二
* @date 5/17/22
*/
public class CodeGenerator {
public static void main(String[] args) {
// 代码生成器
AutoGenerator mpg = new AutoGenerator();
}
}
```
在 main 方法中添加全局配置。
```java
// 全局配置
GlobalConfig gc = new GlobalConfig();
String projectPath = System.getProperty("user.dir");
gc.setOutputDir(projectPath + "/src/main/java");
gc.setAuthor("沉默王二");
gc.setOpen(false);
gc.setDateType(DateType.ONLY_DATE);
gc.setSwagger2(true);
gc.setIdType(IdType.AUTO);
gc.setBaseColumnList(true);
gc.setBaseResultMap(true);
gc.setFileOverride(true);
mpg.setGlobalConfig(gc);
```
配置数据源。
```java
// 数据源配置
DataSourceConfig dsc = new DataSourceConfig();
dsc.setUrl("jdbc:mysql://localhost:3306/codingmore?useUnicode=true&characterEncoding=utf-8&serverTimezone=Asia/Shanghai");
dsc.setDriverName("com.mysql.cj.jdbc.Driver");
dsc.setUsername("root");
dsc.setPassword("123456");
mpg.setDataSource(dsc);
```
第五步,配置包。
```java
// 包配置
PackageConfig pc = new PackageConfig();
pc.setParent("top.codingmore.mpg");
```
更多配置项可以到官方查看:
>[https://baomidou.com/pages/061573/](https://baomidou.com/pages/061573/)
完整代码如下所示:
----
更多内容,只针对《二哥的Java进阶之路》星球用户开放,需要的小伙伴可以[戳链接🔗](https://javabetter.cn/zhishixingqiu/)加入我们的星球,一起学习,一起卷。。**编程喵**🐱是一个 Spring Boot+Vue 的前后端分离项目,融合了市面上绝大多数流行的技术要点。通过学习实战项目,你可以将所学的知识通过实践进行检验、你可以拓宽自己的技术边界,你可以掌握一个真正的实战项目是如何从 0 到 1 的。
----
## 源码地址:
>- 编程喵:[https://github.com/itwanger/coding-more](https://github.com/itwanger/coding-more)
>- codingmore-autogenerator:[https://github.com/itwanger/codingmore-learning](https://github.com/itwanger/codingmore-learning/tree/main/codingmore-autogenerator)
------
