-
Notifications
You must be signed in to change notification settings - Fork 50
update: Cloudflare One (Zero Trust) guide #752
New issue
Have a question about this project? Sign up for a free GitHub account to open an issue and contact its maintainers and the community.
By clicking “Sign up for GitHub”, you agree to our terms of service and privacy statement. We’ll occasionally send you account related emails.
Already on GitHub? Sign in to your account
Open
tamalchowdhury
wants to merge
1
commit into
main
Choose a base branch
from
tamal/update/cloudflare-one-zero-trust
base: main
Could not load branches
Branch not found: {{ refName }}
Loading
Could not load tags
Nothing to show
Loading
Are you sure you want to change the base?
Some commits from the old base branch may be removed from the timeline,
and old review comments may become outdated.
Open
Changes from all commits
Commits
File filter
Filter by extension
Conversations
Failed to load comments.
Loading
Jump to
Jump to file
Failed to load files.
Loading
Diff view
Diff view
There are no files selected for viewing
190 changes: 90 additions & 100 deletions
190
src/content/docs/integrate/third-party-tools/cloudflare-zero-trust.mdx
This file contains hidden or bidirectional Unicode text that may be interpreted or compiled differently than what appears below. To review, open the file in an editor that reveals hidden Unicode characters.
Learn more about bidirectional Unicode characters
| Original file line number | Diff line number | Diff line change |
|---|---|---|
| @@ -1,151 +1,141 @@ | ||
| --- | ||
| page_id: 855e5ca8-f2fb-4162-a594-10cee8a2ff8b | ||
| title: Kinde as identity provider with Cloudflare Zero Trust | ||
| description: Guide to configuring Kinde as an identity provider with Cloudflare Zero Trust using OpenID Connect for secure authentication across systems | ||
| title: Use Kinde as OpenID Connect provider for Cloudflare One (Zero Trust) | ||
| description: "Connect Kinde to Cloudflare One with OpenID Connect so users sign in through Kinde to access Zero Trust protected applications" | ||
| sidebar: | ||
| order: 2 | ||
| label: Cloudflare One (Zero Trust) | ||
| tableOfContents: | ||
| maxHeadingLevel: 3 | ||
| relatedArticles: | ||
| - a07f8f6b-5d6a-4096-be52-7b13b4a3b0a5 | ||
| - 7fe91aba-930c-4a63-8996-85af6bb605a7 | ||
| topics: | ||
| - integrate | ||
| - third-party-tools | ||
| - oidc | ||
| - cloudflare-one | ||
| sdk: [] | ||
| languages: [] | ||
| audience: | ||
| - developers | ||
| - admins | ||
| - security-engineer | ||
| complexity: intermediate | ||
| keywords: | ||
| - cloudflare zero trust | ||
| - cloudflare one | ||
| - openid connect | ||
| - identity provider | ||
| - oauth | ||
| - jwks | ||
| - token endpoint | ||
| - authorization endpoint | ||
| - oidc identity provider | ||
| - access control | ||
| - callback urls | ||
| updated: 2024-01-15 | ||
| - jwks | ||
| - id token claims | ||
| updated: 2026-06-13 | ||
| featured: false | ||
| deprecated: false | ||
| ai_summary: Guide to configuring Kinde as an identity provider with Cloudflare Zero Trust using OpenID Connect for secure authentication across systems. | ||
| ai_summary: "Step-by-step guide to configuring Kinde as an OpenID Connect identity provider for Cloudflare Zero Trust (Cloudflare One). Covers prerequisites including a Kinde backend web application and Cloudflare account, obtaining the Cloudflare team domain and callback URL, copying Kinde Client ID, Client secret, and domain, and listing required OIDC endpoints such as authorization, token, JWKS, userinfo, and logout URLs. Walks through adding Kinde as a generic OIDC provider in the Cloudflare Zero Trust dashboard, configuring optional OIDC claims for ID token attributes, testing the identity provider connection, and enabling Kinde as a login method on Zero Trust applications. Includes links to Cloudflare One documentation for access policies and further configuration. Intended for developers, admins, and security engineers managing identity and access for internal applications." | ||
| --- | ||
|
|
||
| If you use Cloudflare to manage authentication across your systems, you can use Kinde as an third-party identity provider. | ||
| Cloudflare Zero Trust (Cloudflare One) protects internal applications and resources with access policies and federated sign-in. Instead of managing users in Cloudflare directly, you can connect an external identity provider and have users authenticate through your existing auth stack. | ||
|
|
||
| Kinde supports OpenID Connect (OIDC), so you can use it as the identity provider for Cloudflare Zero Trust. This guide walks you through the setup: configuring your Kinde application, adding the required callback URLs and OIDC endpoints, and registering Kinde in the Cloudflare Zero Trust dashboard. | ||
|
|
||
| This topic explains how to set up Cloudflare Zero Trust to use Kinde as an auth identity provider through OpenID Connect. | ||
| ## What you need | ||
|
|
||
| You need to already have a backend [web application set up](/build/applications/add-and-manage-applications/) in Kinde to follow this procedure. | ||
| - A [Kinde](/get-started/guides/first-things-first/) account with **Admin** or **Engineer** permissions (sign up for free) | ||
| - A [Cloudflare](https://dash.cloudflare.com/) account (sign up for free) | ||
| - A backend [web application set up](/build/applications/about-applications/) in Kinde | ||
|
|
||
| ## Get your Cloudflare team domain | ||
| ## Quickstart | ||
|
|
||
| 1. [Sign into Cloudflare](https://dash.cloudflare.com/) and navigate to **Zero Trust**. | ||
| 2. Go to **Settings > Custom Pages**. | ||
| ### 1. Get your Cloudflare team domain | ||
|
|
||
| <img | ||
| src="https://imagedelivery.net/skPPZTHzSlcslvHjesZQcQ/9b73e4d9-5478-44f7-a917-8324c529d100/public" | ||
| alt="" | ||
| width="672px" | ||
| height="auto" | ||
| fetchpriority="low" | ||
| loading="lazy" | ||
| decoding="async" | ||
| /> | ||
| 1. [Sign in to Cloudflare](https://dash.cloudflare.com/) and go to **Zero Trust**. | ||
| 2. Go to **Settings > Team domain** and copy the team domain: | ||
|
|
||
| 3. Copy your **Team domain**. | ||
| ```text | ||
| <your_team_name>.cloudflareaccess.com | ||
| ``` | ||
|
|
||
| ## Set up your Kinde app | ||
| ### 2. Get your Kinde app keys | ||
|
|
||
| 1. In Kinde, go to **Settings > Applications**. | ||
| 2. Select **View details** on the relevant backend/web application. | ||
| 3. Copy the **Client ID** and **Client secret** and add them somewhere you can access later. | ||
| 4. Scroll to the **Callback URLs** section and enter the Zero Trust Team domain in the **Allowed callback URLs** field. (Copied in the procedure above) | ||
| 1. In Kinde, go to **Settings > Environment > Applications**. | ||
| 2. Select **View details** on the relevant backend web application. | ||
| 3. Copy the **Kinde domain** (or [custom domain](/build/domains/pointing-your-domain/)), **Client ID**, and **Client secret**, and save them somewhere you can access later. | ||
| 4. Scroll to the **Callback URLs** section and enter the following Zero Trust team callback URL in the **Allowed callback URLs** field. You can add multiple callback URLs, one per line. | ||
|
|
||
| In this example, we would paste: `mirosaurus.cloudflareaccess.com/cdn-cgi/access/callback` | ||
| ```text | ||
| https://<your_team_name>.cloudflareaccess.com/cdn-cgi/access/callback | ||
| ``` | ||
| <Aside> | ||
| Replace `<your_team_name>` with the name of your Cloudflare team | ||
| </Aside> | ||
|
|
||
| 5. Select **Save**. | ||
|
|
||
| ## Get your OpenID config info | ||
| ### 3. Get the OpenID endpoints | ||
|
|
||
| 1. In your browser, go to the OpenID configuration URL of your Kinde business. This will be `https://<your_kinde_subdomain>.kinde.com/.well-known/openid-configuration` | ||
| These are the OpenID endpoints for Kinde, found at: | ||
|
|
||
| Our example shows details for `mirosaurus.kinde.com/.well-known/openid-configuration` | ||
| ```text | ||
| https://<YOUR_DOMAIN>/.well-known/openid-configuration | ||
| ``` | ||
|
|
||
| <img | ||
| src="https://imagedelivery.net/skPPZTHzSlcslvHjesZQcQ/8e82dc48-a516-42c7-2a41-0bfea682a600/public" | ||
| alt="" | ||
| width="672px" | ||
| height="auto" | ||
| fetchpriority="low" | ||
| loading="lazy" | ||
| decoding="async" | ||
| /> | ||
| <Aside> | ||
| Replace `<YOUR_DOMAIN>` with either your custom domain or your Kinde domain (e.g., `https://your_business.kinde.com`) | ||
| </Aside> | ||
|
|
||
| 2. Copy the following information somewhere you can access it later. | ||
| - jwks_uri - e.g. `https://mirosaurus.kinde.com/.well-known/jwks` | ||
| - token_endpoint - e.g. `https://mirosaurus.kinde.com/oauth2/token` | ||
| - authorization_endpoint - e.g. `https://mirosaurus.kinde.com/oauth2/auth` | ||
| Copy the following information somewhere you can access it later: | ||
|
|
||
| ## Add Kinde as a provider in Cloudflare Zero Trust | ||
| - JWKS URI: `https://<YOUR_DOMAIN>/.well-known/jwks` | ||
| - Authorization endpoint: `https://<YOUR_DOMAIN>/oauth2/auth` | ||
| - Token endpoint: `https://<YOUR_DOMAIN>/oauth2/token` | ||
| - Userinfo endpoint: `https://<YOUR_DOMAIN>/oauth2/v2/user_profile` | ||
| - Logout endpoint: `https://<YOUR_DOMAIN>/logout` | ||
|
|
||
| 1. Back in the Cloudflare Zero Trust dashboard, go to **Settings > Authentication**. | ||
| **Other endpoints:** | ||
|
|
||
| <img | ||
| src="https://imagedelivery.net/skPPZTHzSlcslvHjesZQcQ/eb59f014-9fbb-4ef2-6291-ec1d946a7f00/public" | ||
| alt="" | ||
| width="672px" | ||
| height="auto" | ||
| fetchpriority="low" | ||
| loading="lazy" | ||
| decoding="async" | ||
| /> | ||
| - Revocation endpoint: `https://<YOUR_DOMAIN>/oauth2/revoke` | ||
| - Introspection endpoint: `https://<YOUR_DOMAIN>/oauth2/introspect` | ||
|
|
||
| 2. In the **Login methods** section, select **Add new**. The **Add a login method** screen opens. | ||
| ### 4. Add Kinde as a provider in Cloudflare | ||
|
|
||
| 1. Back in the Cloudflare Zero Trust dashboard, go to **Integrations > Identity providers**. | ||
| 2. Select **Add an identity provider**. | ||
| 3. Select **OpenID Connect** as the identity provider. | ||
| 4. On the new page that opens, enter the following details: | ||
| - Name: Your connection identifier (e.g. "Kinde") | ||
| - App ID: Kinde Client ID | ||
| - Client Secret: Kinde Client secret | ||
| - Auth URL: The authorization endpoint (e.g. `https://<YOUR_DOMAIN>/oauth2/auth`) | ||
| - Token URL: The token endpoint (e.g. `https://<YOUR_DOMAIN>/oauth2/token`) | ||
| - Certificate URL: The JWKS URI (e.g. `https://<YOUR_DOMAIN>/.well-known/jwks`) | ||
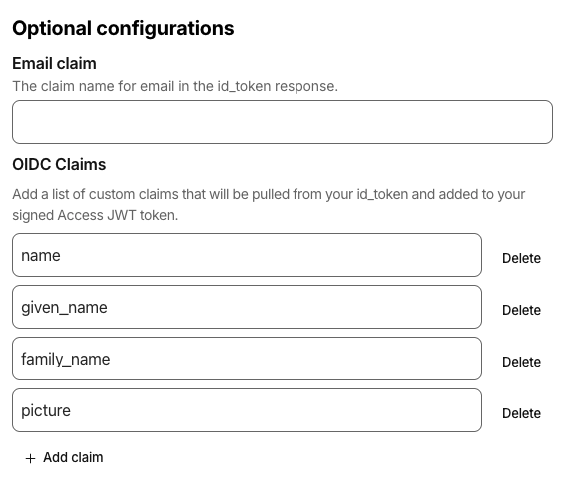
| 5. In the **Optional configuration > OIDC claims** section, configure the claims you want to receive from Kinde, such as `name`, `given_name`, `family_name`, and `picture`. See all available ID token claims on the [ID token page](/build/tokens/about-id-tokens/). | ||
|
|
||
| <img | ||
| src="https://imagedelivery.net/skPPZTHzSlcslvHjesZQcQ/eb21ed9c-150a-47cd-510d-0a0e5dc15500/public" | ||
| alt="" | ||
| width="672px" | ||
| height="auto" | ||
| fetchpriority="low" | ||
| loading="lazy" | ||
| decoding="async" | ||
| /> | ||
|
|
||
| 4. Follow the page guide and enter the following details: | ||
| - Name - Whatever you want | ||
| - App ID - this is the Client ID you copied from your Kinde app | ||
| - Client Secret - this is the Client secret you copied from your Kinde app | ||
| - Auth URL - the `authorization_endpoint` copied in the previous procedure | ||
| - Token URL - the `token_endpoint` copied in the previous procedure | ||
| - Certificate URL - the `jwks_uri` copied in the previous procedure | ||
|
|
||
| <img | ||
| src="https://imagedelivery.net/skPPZTHzSlcslvHjesZQcQ/e5cffb1e-e316-473d-d51a-3dac205b1a00/public" | ||
| alt="" | ||
| width="672px" | ||
| height="auto" | ||
| fetchpriority="low" | ||
| loading="lazy" | ||
| decoding="async" | ||
| /> | ||
|  | ||
|
|
||
| 5. Select **Save**. | ||
| 6. Select **Save**. | ||
|
|
||
| ## Enable Cloudflare to use Kinde as an auth provider | ||
| ### 5. Test the connection | ||
|
|
||
| 1. After saving the connection, you are redirected to the **Identity provider integrations** page. | ||
| 2. Select **Test** from the Kinde connection row. | ||
| 3. A new tab opens with the Kinde login page. Complete the authentication process. | ||
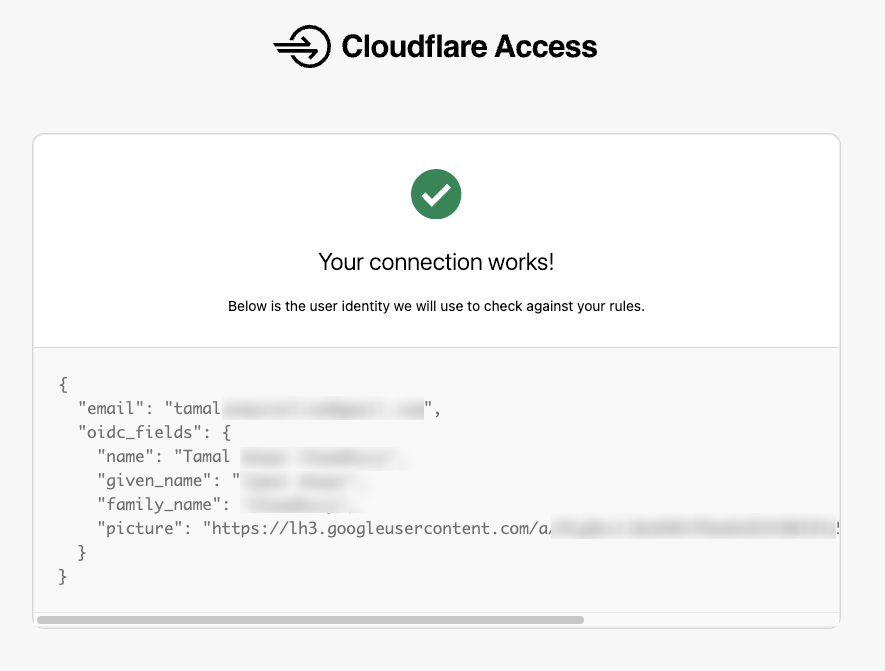
| 4. After successful authentication, you see the following page. If you enabled any OIDC claims, they appear on the page. | ||
|
|
||
|  | ||
|
|
||
| ### 6. Enable Kinde as an identity provider for applications | ||
|
|
||
| 1. In the **Zero Trust** dashboard, go to **Access controls > Applications**. | ||
| 2. Select your application, or create one. | ||
| 3. Select **Login methods** to open the **Authentication** section. | ||
| 4. From the **Choose available identity providers for this application** dropdown, select **Kinde (oidc)**. | ||
| 5. Select **Save**. | ||
|
|
||
| 1. In the **Zero Trust** dashboard, go to **Access > Applications**. | ||
| 2. In the **Authentication** tab, select the newly created **Open ID Connect** method. | ||
| You can now use Kinde as an OIDC provider to sign in to your Cloudflare Zero Trust applications. | ||
|
|
||
| <img | ||
| src="https://imagedelivery.net/skPPZTHzSlcslvHjesZQcQ/7e72598a-d4a6-48ae-7948-c8face8d0200/public" | ||
| alt="" | ||
| width="672px" | ||
| height="auto" | ||
| fetchpriority="low" | ||
| loading="lazy" | ||
| decoding="async" | ||
| /> | ||
| ## Further reading | ||
|
|
||
| 3. Select **Save application**. When an authentication event is triggered, Cloudflare will offload to Kinde to complete the authentication. | ||
| For access policies, protected applications, tunnels, and other Zero Trust features, see the [Cloudflare One documentation](https://developers.cloudflare.com/cloudflare-one/). For OIDC identity provider configuration details, see [Generic OIDC](https://developers.cloudflare.com/cloudflare-one/integrations/identity-providers/generic-oidc/) in the Cloudflare docs. | ||
Oops, something went wrong.
Add this suggestion to a batch that can be applied as a single commit.
This suggestion is invalid because no changes were made to the code.
Suggestions cannot be applied while the pull request is closed.
Suggestions cannot be applied while viewing a subset of changes.
Only one suggestion per line can be applied in a batch.
Add this suggestion to a batch that can be applied as a single commit.
Applying suggestions on deleted lines is not supported.
You must change the existing code in this line in order to create a valid suggestion.
Outdated suggestions cannot be applied.
This suggestion has been applied or marked resolved.
Suggestions cannot be applied from pending reviews.
Suggestions cannot be applied on multi-line comments.
Suggestions cannot be applied while the pull request is queued to merge.
Suggestion cannot be applied right now. Please check back later.
There was a problem hiding this comment.
Choose a reason for hiding this comment
The reason will be displayed to describe this comment to others. Learn more.
The templates above already include https:// (e.g. line 82: https://<YOUR_DOMAIN>/...), but this Aside shows replacing <YOUR_DOMAIN> with https://your_business.kinde.com, which produces https://https://....
Please clarify that <YOUR_DOMAIN> is the host only (e.g. your_business.kinde.com or a custom domain host), or redefine the placeholder as the full issuer URL and remove the leading https:// from the endpoint templates.