Welcome to the Kubernetes README! In this document, we will explore Kubernetes, an open-source container orchestration platform, in great depth. Kubernetes, often abbreviated as K8s, is designed to automate the deployment, scaling, and management of containerized applications. Developed by Google and now maintained by the Cloud Native Computing Foundation (CNCF), Kubernetes has become a cornerstone of modern application deployment and management.
- Kubernetes 101: An Overview of Container Orchestration
- Kubernetes: What it Solves that Docker Can't
- Kubernetes Components and Architecture
- Kubernetes architecture is divided into two main parts: the
Control Planeand theData Plane - Control Plane
- Data Plane
- 5. Kubernetes Services
- Main Responsibilities
- 5. Types of Kubernetes services
- 5.1 ClusterIP
- 5.2 NodePort
- 5.3 LoadBalancer
- 5.4 ExternalName
- Here is a simple comparison table to help you understand the service types at a quick glance.
- Creating a Kubernetes Service
- Service Discovery
- Load Balancing
- Service Annotations
- Managing Services with Labels and Selectors
- Headless Services
- Sticky Sessions
- Service Topology
- Endpoint Slices
- 12. Health Checks
- 13. Service Accounts and Service Tokens
- 14. Service Policies
- Some Detail Explanation of major components
- Important 16 Questions to ask yourself before deploying a Kubernetes Cluster in Production Environment :
- Useful Links
- Important Questions
- Kubernetes architecture is divided into two main parts: the
Kubernetes is a powerful and flexible platform that enables users to manage containerized applications across a cluster of nodes. At its core, Kubernetes aims to solve the challenges that arise when managing a large number of containers distributed across multiple hosts.
Kubernetes is an open-source container orchestration platform that automates the deployment, scaling, and management of containerized applications. It was originally developed by Google and is now maintained by the Cloud Native Computing Foundation (CNCF). Kubernetes provides a flexible and extensible architecture, making it suitable for a wide range of applications and infrastructure setups.
The fundamental purpose of Kubernetes is to:
-
Orchestrate Containers: Kubernetes allows you to run, manage, and interact with containers effectively. It abstracts away the complexity of dealing with individual containers and provides a higher-level API for managing them as cohesive units.
-
Scale Applications: Kubernetes can automatically scale the number of container replicas based on user-defined rules and metrics. This capability ensures that applications can handle varying levels of traffic without manual intervention.
-
Self-Heal Applications: Kubernetes monitors the health of applications and, if a container or node fails, it automatically restarts or reschedules the affected containers to maintain application availability.
-
Provide Network and Service Abstractions: Kubernetes offers advanced networking capabilities, enabling seamless communication between containers and services. Services provide stable endpoints for applications to interact with one another.
-
Declare Desired State: Kubernetes operates on a declarative model, allowing users to specify the desired state of their applications and infrastructure through configuration files. The control plane works to achieve and maintain this desired state.
Now shedding light on the unique capabilities that Kubernetes brings to the table, beyond what Docker offers. While Docker is an excellent tool for containerization, Kubernetes takes container management to the next level with its container orchestration capabilities.
While Docker simplifies the process of creating, packaging, and running containers on a single host, Kubernetes takes containerization to a higher level by managing containerized applications across a cluster of nodes. Let's explore the unique problems that Kubernetes solves, which Docker alone cannot address.
| Platform | Description |
|---|---|
| Docker | Docker is a leading containerization platform that allows developers to package applications and their dependencies into a single container. It ensures consistency across different environments, making applications highly portable. Docker offers an easy-to-use interface and is an essential tool in modern application development and deployment workflows. |
| Kubernetes | Kubernetes is an open-source container orchestration platform that builds upon Docker's containerization capabilities. It automates the deployment, scaling, and operation of containerized applications in a distributed environment. |
Kubernetes excels in scaling applications across multiple nodes in a cluster. With its Deployment and ReplicaSet objects, Kubernetes ensures that the desired number of replicas (Pods) are always running, even during heavy traffic or when nodes fail. It distributes incoming network traffic efficiently with built-in load balancing for services, ensuring high availability and optimal resource utilization.
Imagine your website has thousands of different clients per minute. It is not easy for a single server to keep up with the requests demand. This creates a bad user experience with unpredictable downtimes. In Kubernetes, a LoadBalancer Service is a crucial component for deploying and managing applications in Kubernetes. It exposes a service externally in the underlying infrastructure (for example, a cloud provider's load balancer).
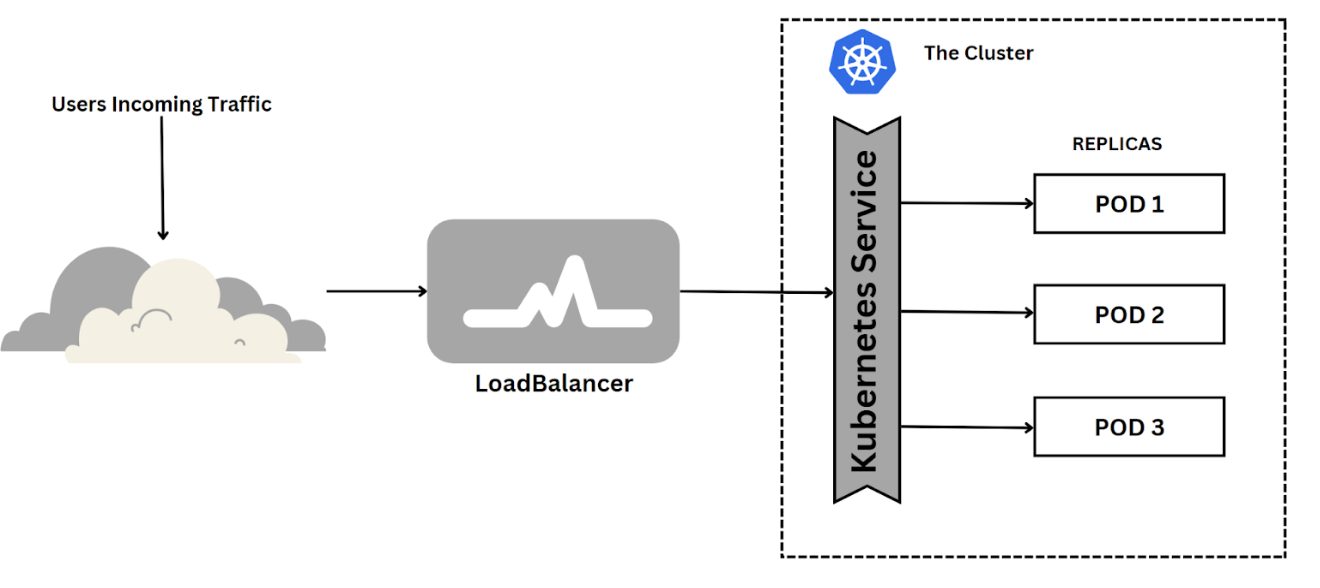
The LoadBalancer Service provides load-balancing abilities for incoming traffic to distribute evenly across multiple pods for better performance and high availability. It also allows you to scale up or down your application based on demand without affecting other services running on the same cluster. This is achieved by using a combination of Kubernetes' built-in features such as Horizontal Pod Autoscaling (HPA), ReplicaSets, and Deployments. These features allow you to scale your application horizontally by adding more pods when needed and vertically by increasing the number of resources allocated to each pod. This ensures that your application can handle high traffic volumes without any downtime or performance issues.
Unlike Docker, Kubernetes offers self-healing capabilities. If a Pod or container fails due to hardware issues or other reasons, Kubernetes automatically detects the failure and reschedules or recreates the Pod on a healthy node, ensuring that the application remains available. Kubernetes continuously monitors the health of applications and automatically restarts or replaces containers that fail. It can also take actions based on defined health checks.
Kubernetes operates on a declarative model. Users define the desired state of their applications and infrastructure using YAML or JSON files. The Kubernetes control plane continuously monitors the actual state of the cluster and takes corrective actions to bring it closer to the desired state, ensuring consistency and ease of management.This makes it easier to manage and automate complex deployments.
Kubernetes provides advanced networking capabilities, enabling seamless communication between containers and services. With built-in service discovery, applications can easily find and connect to other services without worrying about the underlying network setup.
Kubernetes allows for sophisticated deployment strategies, such as rolling updates and canary deployments. These strategies minimize downtime during application updates and enable easy rollbacks in case of issues.
Kubernetes automatically adjusts the number of running replicas (Pods) based on resource utilization or custom metrics through Horizontal Pod Autoscaling. This dynamic scaling ensures efficient resource utilization and cost savings.
Kubernetes can efficiently scale applications based on demand, handling large workloads effectively and maintaining performance.
While Docker is excellent for local development and packaging applications into containers, Kubernetes provides a powerful and comprehensive solution for managing containerized applications at scale. Kubernetes' container orchestration capabilities, including scalability, self-healing, declarative configuration, advanced deployments, and more, make it a must-have tool for production-grade, distributed environments.
Image Source: Kubernetes Architecture
The Control Plane serves as the "brains" of the Kubernetes cluster. It acts as the central control and management hub, making high-level decisions about the desired state of the system and working to bring the actual state in line with it. Essentially, the Control Plane is responsible for managing the Kubernetes cluster and its components. The control plane is a logical entity made up of various components running on the master node. It manages the overall state and orchestration of the cluster. It is responsible for making decisions about the desired state of the system and taking actions to achieve it. The control plane continuously monitors the cluster's actual state and takes corrective actions to reconcile any differences between the actual and desired states. It also handles the scheduling and placement of workloads on the cluster.
The Control Plane is responsible for the following tasks:
- Reconciliation: Continuously monitoring the cluster's desired state and taking action to ensure the actual state matches it.
- Horizontal Scaling: Handling the scaling of application replicas based on the desired state and resource availability.
- Self-Healing: Detecting and responding to node or pod failures by restarting or rescheduling affected components.
- Authorization and Authentication: Enforcing security policies by authenticating and authorizing users and applications.
- Configuration and Secrets Management: Managing configuration data and secrets for applications running on the cluster.
- Scheduling: Assigning workloads to nodes based on resource availability and constraints.
- Networking and Service Discovery: Managing network rules and providing service discovery and load balancing among containers and services.
- API Endpoint: Exposing the Kubernetes API, which serves as the primary interface for interacting with the cluster.
- Cluster Management: Managing the cluster's configuration data and the desired state of the resources.
- Resource Monitoring: Reporting resource usage and health status to the Control Plane for better decision-making.
- Logging and Monitoring: Collecting and aggregating logs and metrics from cluster components and applications.
- Cluster Upgrades: Performing rolling upgrades of the cluster to ensure that all components are running the latest versions.
- Cluster Add-ons: Managing add-ons such as the Kubernetes Dashboard, DNS, and container networking.
- Cloud Integration: Integrating with the cloud provider's APIs to manage resources such as load balancers, storage volumes, and instances.
- Cluster Federation: Managing multiple Kubernetes clusters as a single entity.
- Cluster Autoscaling: Automatically scaling the cluster based on resource utilization and demand.
- Cluster Backup and Restore: Backing up and restoring the cluster's configuration data and state.
- Cluster Security: Enforcing security policies and best practices to protect the cluster from malicious attacks.
- Cluster Maintenance: Performing routine maintenance tasks such as node upgrades and security patches.
- Cluster Troubleshooting: Troubleshooting issues with the cluster and its components.
- Cluster Monitoring: Monitoring the health and performance of the cluster and its components.
- Cluster Logging: Collecting and aggregating logs from cluster components and applications.
- Cluster Auditing: Auditing the cluster's configuration and state to ensure compliance with security policies and best practices.
- Cluster Networking: Managing network rules and providing service discovery and load balancing among containers and services.
- Cluster Storage: Managing storage volumes and providing persistent storage for applications running on the cluster.
 Image Source: Kubernetes Components
The main components of the Kubernetes Control Plane are:
-
kube-apiserver: This component exposes the Kubernetes API, which serves as the primary interface for interacting with the cluster. Clients, such as
kubectlor the Kubernetes Dashboard, communicate with the kube-apiserver to create, update, and delete resources in the cluster. -
etcd: It is a distributed key-value store that acts as the cluster's database. The kube-apiserver uses etcd to store the cluster's configuration data and the desired state of the resources.
-
kube-scheduler: The kube-scheduler is responsible for making decisions about where to place newly created pods based on factors like resource availability, node constraints, and quality of service requirements.
-
kube-controller-manager: This component includes several individual controllers responsible for managing different aspects of the cluster, such as node controller, replication controller, endpoint controller, and service account controller.
-
cloud-controller-manager (optional): In cloud-based Kubernetes clusters, this component integrates with the cloud provider's APIs to manage resources such as load balancers, storage volumes, and instances.
The Data Plane, also known as the User Plane or the Worker Plane, is responsible for executing the actual workload and handling user traffic. It consists of the worker nodes in the Kubernetes cluster, where containers are scheduled and executed.
The main components of the Kubernetes Data Plane are:
-
kubelet: The kubelet is an agent that runs on each worker node and is responsible for interacting with the Control Plane. It receives Pod specifications from the Control Plane and ensures the requested containers are running and healthy on the node.
-
kube-proxy: The kube-proxy runs on each worker node and is responsible for network communication within the cluster. It maintains network rules and load balancing for services to ensure seamless communication between pods and external traffic.
The Data Plane is responsible for the following tasks:
-
Container Management: Running and managing containers based on Pod specifications provided by the Control Plane.
-
Networking: Managing network rules and providing service discovery and load balancing among containers and services.
-
Resource Monitoring: Reporting resource usage and health status to the Control Plane for better decision-making.
In Kubernetes, a node is a fundamental building block of the cluster. It represents a single machine (physical or virtual) that is part of the larger Kubernetes cluster. Each node is responsible for running containerized applications and executing the workloads assigned to it by the control plane. Understanding nodes is essential for comprehending how Kubernetes distributes and manages containers in a cluster.
-
Master nodes are the control plane components of the Kubernetes cluster. They manage the overall state of the cluster, make decisions about the desired state of the system, and coordinate the activities of worker nodes.
-
The master nodes are responsible for handling the API requests, monitoring the cluster, and maintaining the desired configuration. They ensure that the system operates as expected and reacts to changes in the cluster's state.
-
The core components running on master nodes are:
- kube-apiserver: The API server acts as the front-end for the Kubernetes control plane. It exposes the Kubernetes API and processes RESTful API requests from users and other components. It validates and updates the state of the cluster accordingly.
- kube-controller-manager: The controller manager runs multiple controllers that continuously monitor the state of different objects in the cluster (e.g., pods, services, nodes). When there are deviations from the desired state, the controllers take corrective actions to bring the system back to the desired state.
- kube-scheduler: The scheduler is responsible for assigning newly created pods to nodes within the cluster. It takes into account factors like resource availability, affinity/anti-affinity rules, and node constraints when making scheduling decisions.
- etcd: While not strictly a component of the control plane, etcd is a distributed key-value store used as the persistent data store for Kubernetes. It stores the cluster's configuration data and the current state of all objects in the cluster.
-
Typically, there are multiple master nodes in a Kubernetes cluster, with one of them acting as the "leader" and the others as "followers." The leader node is responsible for handling write operations to the cluster, while the follower nodes replicate the data from the leader for high availability.
-
Worker nodes, also known as minion nodes, are the worker machines in the Kubernetes cluster. They host the actual containers and handle the execution of application workloads.
-
Worker nodes run the kubelet, which is responsible for managing the containers on the node as per the pod specifications received from the master nodes. The kubelet interacts with the container runtime (e.g., Docker, containerd) to start, stop, and monitor containers.
-
The core components running on worker nodes are:
- kubelet: Kubelet is an agent running on each worker node. It communicates with the Kubernetes API server on the master nodes and ensures that containers defined in pod specifications are running and healthy on the node.
- Container Runtime: The container runtime, such as Docker or containerd, is responsible for pulling container images from registries and running them as containers on the node.
- kube-proxy: Kube-proxy is responsible for network proxying and load balancing. It maintains network rules to ensure that packets are correctly forwarded to the appropriate destination pods.
-
Worker nodes perform the actual workload processing and host multiple pods. The number of worker nodes in the cluster can vary depending on the application requirements and the desired level of fault tolerance and scalability.
Communication between Master and Worker Nodes:
- The master nodes communicate with the worker nodes to manage the state of the cluster and orchestrate the deployment and execution of applications.
- The kubelet running on each worker node communicates with the kube-apiserver on the master nodes to receive pod specifications and report the status of the node and its pods.
In summary, master nodes in Kubernetes are responsible for managing the cluster's control plane, while worker nodes handle the execution of application workloads by running containers and managing the pod lifecycle. Together, they form the foundation of a Kubernetes cluster, providing container orchestration, scalability, and fault-tolerance.
The smallest and simplest unit in Kubernetes is the Pod. A Pod can contain one or more tightly coupled containers that share the same network namespace and can communicate with each other locally via localhost.
In Kubernetes, a Pod is the smallest and simplest unit that you can deploy. It represents a single instance of a running process in a cluster. A Pod can contain one or more tightly coupled containers that share the same network namespace, storage volumes, and other resources.
Pods are the basic building blocks of applications in Kubernetes, and they serve as the encapsulation for the container(s) and their shared resources. Containers within a Pod run on the same underlying node and can communicate with each other using localhost.
Here are some key characteristics of Pods:
-
Co-Located Containers: All containers within a Pod run on the same node and share the same network namespace. This allows them to communicate via
localhost, making inter-container communication more efficient. -
Shared Storage and Volumes: Containers within a Pod can share the same storage volumes. This enables them to share data or access configuration files that are mounted as volumes within the Pod.
-
Single IP Address: Each Pod is assigned a unique IP address within the cluster. Containers within the Pod share this IP address.
-
Lifetime and Scaling: Pods are considered relatively ephemeral. They are not designed to be long-lived. Instead, they can be easily created, updated, or deleted as needed. Scaling is achieved by creating multiple replicas of a Pod.
-
Atomic Unit for Deployment: When you want to deploy multiple containers together, such as an application and a sidecar container, you typically create them as part of the same Pod.
While Pods offer a convenient way to manage related containers as a single unit, they are not meant to be used as long-term entities. Instead, they are designed to be created, scaled, and destroyed frequently. This design philosophy aligns with Kubernetes' approach to manage applications in a declarative manner, where you specify the desired state of your application, and Kubernetes handles the actual state and takes the necessary actions to achieve the desired state.
Image Source: Kubernetes Deployments
So, why it is not the recommended way to create pods first?The answer is that pods are not self-healing. If a pod fails, it will not be recreated automatically. This is where Deployments come in handy as they provide a declarative way to manage pods and ensure that the desired state is always maintained.
In Kubernetes, a Deployment is a higher-level abstraction that facilitates the management of replica sets and rolling updates. Deployments defines the desired state of an application. It provides declarative updates for Pods and ReplicaSets, ensuring that the desired number of replicas is maintained. Deployments enable easy scaling and rolling updates, making them a crucial component of Kubernetes.
-
For example, if you want to deploy a web application, you can create a Deployment that defines the desired state of the application, including the container image, resource requests/limits, environment variables, and more. Kubernetes will then create a ReplicaSet to manage the lifecycle of Pods based on the Deployment's specifications in deployment.yaml file.If a Pod fails or becomes unresponsive, the ReplicaSet replaces it with a new Pod to maintain the desired state. This ensures that the application is always available and running as expected. -
Deployments also support rolling updates, allowing you to update your application to a new version without downtime. Kubernetes gradually updates the application by creating new replicas with the updated version while scaling down the old replicas. If any issues arise during the update process, you can quickly roll back to a previous version of the application.
-
Deployments are the recommended way to manage Pods in Kubernetes. They provide a declarative way to manage the lifecycle of Pods and ensure that the desired state is always maintained. Deployments also support rolling updates, allowing you to update your application to a new version without downtime. Kubernetes gradually updates the application by creating new replicas with the updated version while scaling down the old replicas. If any issues arise during the update process, you can quickly roll back to a previous version of the application.
Here are some key characteristics of Deployments:
-
Declarative Updates: Deployments allow you to declaratively define the desired state of your application. Kubernetes handles the actual state and takes the necessary actions to achieve the desired state.
-
Rolling Updates: Deployments support rolling updates, allowing you to update your application to a new version without downtime. Kubernetes gradually updates the application by creating new replicas with the updated version while scaling down the old replicas.
-
Rollbacks: Deployments also support rollbacks, allowing you to quickly revert to a previous version of your application if any issues arise during the update process.
-
Scaling: Deployments make it easy to scale your application by creating multiple replicas of the same Pod. You can scale up or down the number of replicas based on demand without affecting other services running on the same cluster.
-
Self-Healing: Deployments ensure that the desired number of replicas is always maintained. If a Pod or node fails, Kubernetes automatically restarts or reschedules the affected containers to maintain application availability.
-
Pod Template: Deployments use a Pod template to create new Pods. The template defines the desired state of the Pod, including the container image, resource requests/limits, environment variables, and more.
-
ReplicaSets: Deployments use ReplicaSets to manage the lifecycle of Pods. ReplicaSets are the next level of abstraction above Pods. They ensure that a specified number of pod replicas are running at any given time. If a pod fails or becomes unresponsive, the ReplicaSet replaces it with a new pod to maintain the desired state.
-
Pod Lifecycle: Deployments manage the lifecycle of Pods. They create new Pods when scaling up or updating the application and delete old Pods when scaling down or rolling back to a previous version.
-
Pod Scheduling: Deployments use the scheduler to assign Pods to nodes based on resource availability and constraints. They also support affinity/anti-affinity rules to control the placement of Pods on nodes.
Recommended Resources :
In Kubernetes, Pods are non-permanent resources - they can appear and disappear as needed. This is because Kubernetes constantly checks to make sure the cluster is running the desired number of replicas (copies) of your app. And Pods are created or destroyed to match this desired state.
Think of it this way: if you need more replicas of your app because of an increase in incoming traffic (more demand), Kubernetes will spin up some new Pods to handle it. If a Pod fails for some reason, no worries - Kubernetes will quickly create a new one to replace it. And if you want to update your app, Kubernetes can destroy old Pods and create new ones with the updated code.
Each Pod gets its own IP address (Kubernetes expects network plugins to ensure this). For a given Deployment in your cluster, the set of Pods running in one moment in time could be different from the set of Pods running that application a moment later.
This leads to a problem: if some set of Pods (call them "backends") provides functionality to other Pods (call them "frontends") inside your cluster, how do the frontends find out and keep track of which IP address to connect to, so that the frontend can use the backend part of the workload?
But here's the thing - if you want to access your app, how do you keep track of which Pod to connect to with all these changing IP addresses of Pods?
That's where Services come in. They provide an unchanging location for a group of Pods. So even though the Pods themselves are dynamic, the Services make sure you always have a central location to access your app.
Now that we understand one purpose of Kubernetes Services, let’s take a closer look at the different responsibilities of k8s Services and types of available Services.
Kubernetes Services have the following main responsibilities:
-
Network Abstraction: Services provide a stable network endpoint (IP address and DNS name) for accessing a group of pods. They shield clients from the underlying pod IP changes, allowing pods to scale or be replaced seamlessly.
-
Service Discovery: Services enable easy communication between different parts of an application. They provide DNS-based service discovery, allowing pods to discover and access services using their DNS names.
-
Load Balancing: Services distribute incoming traffic evenly among the pods behind them. They ensure that client requests are directed to available pods, facilitating horizontal scaling and improving application availability.
-
Exposing Applications: Services allow applications to be exposed both internally and externally. Different service types (ClusterIP, NodePort, LoadBalancer) enable various access methods based on requirements.
-
Cross-Namespace Communication: Services can span multiple namespaces, enabling communication between pods in different namespaces through the service's DNS name.
-
Routing Traffic to Pods: Services use selectors to identify target pods based on labels. They route traffic to pods that match the selector, ensuring requests reach the appropriate pods.
-
Internal Load Balancing: Services manage traffic between pods running on different nodes, providing internal load balancing without external load balancers.
-
Decoupling Applications: Services decouple clients from pod IP addresses. Clients can interact with services using their DNS names, allowing backend pods to scale or move without affecting client connections.
-
Service Endpoints: Services maintain a list of pod IPs and ports as their endpoints. These endpoints represent the actual instances of the service and change dynamically as pods scale or are terminated.
-
Headless Services: For stateful applications, services can be configured as "Headless," allowing direct DNS-based access to individual pods, bypassing load balancing.
Kubernetes supports different types of services, each designed for specific use cases. The main service types are:
- ClusterIP. Exposes a service which is only accessible from within the cluster.
- NodePort. Exposes a service via a static port on each node’s IP.
- LoadBalancer. Exposes the service via the cloud provider’s load balancer.
- ExternalName. Maps a service to a predefined externalName field by returning a value for the CNAME record.
- Headless. Exposes a service without a cluster IP. This type is used when you need to directly access the pods through their IP addresses.
ClusterIP is the default service type. It exposes the service on an internal IP address reachable only from within the cluster. Other pods within the same cluster can access the service using this IP.
This type is suitable for communication between different services within the cluster.
Use Cases:
- When you have microservices that need to communicate with each other within the same Kubernetes cluster.
- Internal APIs that should not be exposed to the external world.
apiVersion: v1
kind: Service
metadata:
  name: my-clusterip-service
spec:
  selector:
    app: my-app
  ports:
    - protocol: TCP
      port: 80
      targetPort: 8080
In this example, the ClusterIP service named "my-clusterip-service" will route incoming TCP traffic on port 80 to the pods with the label "app=my-app" listening on port 8080.
The NodePort service type exposes the service on a static port on every node in the cluster. This allows external clients to access the service using the node's IP address and the static port. It also retains the internal ClusterIP for communication within the cluster.
Use Cases:
- When you need to expose a service to external clients or developers for testing or debugging purposes.
- Useful for applications that require direct access from outside the cluster.
apiVersion: v1
kind: Service
metadata:
  name: my-nodeport-service
spec:
  selector:
    app: my-app
  ports:
    - protocol: TCP
      port: 80
      targetPort: 8080
  type: NodePort
In this example, the NodePort service named "my-nodeport-service" will expose port 80 on all nodes' IP addresses, forwarding incoming TCP traffic to pods labeled with "app=my-app" on port 8080.
The LoadBalancer service type automatically provisions an external load balancer (e.g., a cloud load balancer) and exposes the service externally with a public IP address. This type combines the functionalities of NodePort and ClusterIP services while adding external load balancing.
Use Cases:
- When you want to expose a service to external users over the internet.
- Ideal for applications with high traffic that need load balancing.
apiVersion: v1
kind: Service
metadata:
  name: my-loadbalancer-service
spec:
  selector:
    app: my-app
  ports:
    - protocol: TCP
      port: 80
      targetPort: 8080
  type: LoadBalancer
In this example, the LoadBalancer service named "my-loadbalancer-service" will create an external load balancer and route incoming TCP traffic on port 80 to the pods with the label "app=my-app" on port 8080.
The importance of the ExternalName service type is different from the other three (ClusterIP, NodePort, and LoadBalancer) as it serves a distinct purpose.
The ExternalName service type is used when you want to create a DNS alias to an external service located outside the Kubernetes cluster. It does not have any associated pods and does not perform load balancing or expose internal services to external clients. Instead, it acts as a way to provide a CNAME record to an external service.
Use Cases for ExternalName service type:
- Integrating with external services that are not part of the Kubernetes cluster, such as external databases or legacy systems.
- Hiding the actual location of the external service by providing a DNS alias, allowing easier migration or updates to the external service without changing the application code.
On the other hand, the other three service types (ClusterIP, NodePort, and LoadBalancer) are more focused on exposing and routing traffic to services within the Kubernetes cluster.
ClusterIPis used for internal communication between different services within the cluster.NodePortis used for exposing a service on a static port on each node in the cluster for external access.LoadBalanceris used to automatically provision an external load balancer and expose the service externally with a public IP address.
In summary, the ExternalName service type is not as commonly used as the other three, but it serves an important purpose when you need to integrate with external services or hide the actual location of external resources. The choice of service type depends on the specific requirements and architecture of your application.
apiVersion: v1
kind: Service
metadata:
  name: my-externalname-service
spec:
  type: ExternalName
  externalName: my.external.service.com
In this example, the ExternalName service named "my-externalname-service" will resolve to the DNS name "my.external.service.com." When applications within the cluster access this service, they will be directed to the specified external DNS name.
Image Source: Stack Overflow
To create a Kubernetes service, you need to define a Service manifest in YAML format. The manifest specifies the service type, metadata (including the service name), selector to determine which pods the service should target, and the ports through which the service will communicate with the pods.
Here's a basic example of a ClusterIP service manifest:
apiVersion: v1
kind: Service
metadata:
  name: my-service
spec:
  selector:
    app: my-app
  ports:
    - protocol: TCP
      port: 80
      targetPort: 8080
In this example, we create a ClusterIP service named "my-service" that targets pods with the label "app=my-app" and forwards incoming TCP traffic on port 80 to the pods on port 8080.
Once you have defined the service manifest, you can apply it using the kubectl apply command:
kubectl apply -f my-service.yaml
The service will then be created in your Kubernetes cluster, and the pods with the matching labels will be accessible through the service IP.
Service discovery is a crucial aspect of Kubernetes services. It refers to the process of locating and accessing services within the cluster. Kubernetes uses DNS to enable service discovery.
When you create a service, Kubernetes assigns it a DNS name based on the service name and the namespace in which it resides. For example, a
service named "my-service" in the "default" namespace will be accessible using the DNS name "my-service.default.svc.cluster.local." This DNS name resolves to the ClusterIP of the service.
Service discovery allows different parts of your application to communicate with each other by using these DNS names instead of hardcoded IP addresses. It abstracts the underlying infrastructure and allows pods to refer to each other dynamically.
Load balancing is a critical feature provided by Kubernetes services. When you have multiple replicas of a pod running to achieve high availability and scalability, the service ensures that incoming requests are distributed evenly among these pods.
The default load balancing algorithm in Kubernetes is round-robin, where each incoming request is forwarded to the next pod in the list. This ensures an even distribution of traffic across all replicas of the service.
With the LoadBalancer service type, an external load balancer is automatically provisioned by the cloud provider to distribute incoming traffic to the service. This allows you to expose your application to external users and manage incoming requests efficiently.
Kubernetes services support annotations, which are key-value pairs that provide additional information or configuration for the service. Annotations can be used to add extra metadata or control the behavior of the service.
For example, you can use annotations to configure SSL certificates for a LoadBalancer service or customize the behavior of the service proxy.
Here's an example of using annotations in a service manifest:
apiVersion: v1
kind: Service
metadata:
  name: my-service
  annotations:
    service.beta.kubernetes.io/aws-load-balancer-ssl-cert: "arn:aws:acm:us-west-2:123456789012:certificate/xxxxxxx-xxxx-xxxx-xxxx-xxxxxxxxxxxx"
    service.beta.kubernetes.io/aws-load-balancer-backend-protocol: "http"
    service.beta.kubernetes.io/aws-load-balancer-ssl-ports: "443"
spec:
  selector:
    app: my-app
  ports:
    - protocol: TCP
      port: 80
      targetPort: 8080
  type: LoadBalancer
In this example, we use annotations to configure an SSL certificate for the LoadBalancer service and specify the backend protocol and SSL ports.
Labels and selectors are fundamental concepts in Kubernetes used to group and identify objects. A label is a key-value pair attached to Kubernetes resources, such as pods, deployments, and services. A selector is used to match labels and group resources together.
In the context of services, the selector is used to specify which pods the service should target. When creating a service, you define a selector based on specific labels. The service then automatically discovers pods with matching labels and directs traffic to them.
For example, let's say you have several pods running your application, and they are labeled with "app=my-app" and "env=prod." To create a service targeting these pods, you can define the selector in the service manifest as follows:
apiVersion: v1
kind: Service
metadata:
  name: my-service
spec:
  selector:
    app: my-app
    env: prod
  ports:
    - protocol: TCP
      port: 80
      targetPort: 8080
In this example, the service named "my-service" will target pods with the labels "app=my-app" and "env=prod."
Labels and selectors are powerful tools for managing and organizing your resources in Kubernetes, allowing you to apply specific configurations to groups of objects.
A Headless Service is a special type of service in Kubernetes that does not allocate a ClusterIP. Instead, it provides DNS entries for the individual pods behind the service.
When you create a Headless Service, Kubernetes creates DNS records for each pod associated with the service. The DNS names take the form of <pod-name>.<service-name>.<namespace>.svc.cluster.local, and they resolve directly to the pod's IP addresses.
Headless Services are useful when you need to directly interact with individual pods, bypassing the load balancing and service proxy provided by the regular service types. This is common in stateful applications that require direct communication with specific pods, such as databases or messaging systems.
To create a Headless Service, set the service type to "ClusterIP" and specify the clusterIP field as "None" in the service manifest:
apiVersion: v1
kind: Service
metadata:
  name: my-headless-service
spec:
  clusterIP: None
  selector:
    app: my-app
  ports:
    - protocol: TCP
      port: 80
      targetPort: 8080
In this example, the Headless Service named "my-headless-service" will not have a ClusterIP, and DNS records for individual pods will be created.
Sticky sessions, also known as session affinity, is a feature provided by some load balancers that allows the same client to be directed to the same backend pod across multiple requests. This can be useful when your application relies on maintaining state or session data on a specific pod.
Kubernetes does not provide built-in support for sticky sessions in services. However, some cloud providers offer this feature through annotations or other load balancing options. If sticky sessions are a requirement for your application, check the documentation of your cloud provider to see if it is supported.
Service Topology is a feature introduced in Kubernetes 1.18 that allows services to use node topology information for more intelligent load balancing. It ensures that the service routes traffic to pods that are co-located on the same node as the client making the request.
This feature can improve the performance of applications that benefit from locality, such as distributed databases or caching systems.
To enable Service Topology, set the topologyKeys field in the service manifest to a list of node labels that represent the topology domain.
apiVersion: v1
kind: Service
metadata:
  name: my-service
spec:
  selector:
    app: my-app
  ports:
    - protocol: TCP
      port: 80
      targetPort: 8080
  topologyKeys:
    - kubernetes.io/hostname
In this example, the service named "my-service" will use the node hostname as the topology key.
Kubernetes 1.17 introduced Endpoint Slices, which is an enhancement to the traditional Endpoints resource. Endpoint Slices divide the service's endpoints into smaller, more manageable chunks.
Traditional Endpoints could become large and unwieldy, especially for services with many replicas. Endpoint Slices address this by creating smaller slices, each representing a subset of the service's endpoints.
The use of Endpoint Slices is transparent to users and applications that consume service endpoints. It's an internal implementation improvement that enhances the scalability and performance of the Kubernetes control plane.
Health checks are an essential aspect of managing Kubernetes services. They are used to ensure the availability and reliability of applications running within the cluster.
Kubernetes provides two types of health checks for services:
The liveness probe is used to determine if the pod is healthy and should remain in service. If the liveness probe fails, the Kubernetes control plane
will restart the pod.
Common liveness probe options include HTTP requests, TCP sockets, or executing commands within the container to check its health status.
The readiness probe determines if the pod is ready to serve incoming requests. If the readiness probe fails, the pod is removed from the service's load balancer until it becomes ready again.
The readiness probe is useful for avoiding sending requests to pods that are still starting up or experiencing issues.
To configure liveness and readiness probes for your pods, include the livenessProbe and readinessProbe fields in the pod's container specification.
apiVersion: v1
kind: Pod
metadata:
  name: my-app-pod
spec:
  containers:
    - name: my-app-container
      image: my-app-image
      ports:
        - containerPort: 8080
      livenessProbe:
        httpGet:
          path: /health
          port: 8080
        initialDelaySeconds: 15
        periodSeconds: 10
      readinessProbe:
        httpGet:
          path: /health
          port: 8080
        initialDelaySeconds: 5
        periodSeconds: 10
In this example, the pod includes both liveness and readiness probes, which check the health status of the application on port 8080 by sending an HTTP GET request to the "/health" path.
Kubernetes services can authenticate to the API server using service accounts and service tokens. A service account is a dedicated identity for processes running in pods within a Kubernetes cluster.
By default, pods are assigned a default service account that has limited permissions. You can create custom service accounts with specific RBAC (Role-Based Access Control) permissions and use them for different services in your cluster.
Service accounts are automatically mounted as volume mounts inside pods, providing access to service tokens. Service tokens are used to authenticate the pod to the Kubernetes API server when interacting with the Kubernetes API.
Service accounts and service tokens are a secure way to authenticate services running within the cluster without using sensitive credentials.
Service policies in Kubernetes help control network traffic and govern how services are accessed from different namespaces or external networks.
Two main service policies are commonly used:
NetworkPolicies are used to define rules that specify what traffic is allowed to reach a service or pod based on labels and namespaces. They can be used to isolate or secure applications within the cluster.
NetworkPolicies act as a firewall, controlling the flow of traffic at the pod level. Without appropriate NetworkPolicies, all pods within a cluster can communicate with each other.
Here's a simple example of a NetworkPolicy that allows incoming traffic only from pods labeled with "app=my-app" and within the same namespace:
apiVersion: networking.k8s.io/v1
kind: NetworkPolicy
metadata:
  name: my-app-network-policy
spec:
  podSelector:
    matchLabels:
      app: my-app
  ingress:
    - from:
        - podSelector:
            matchLabels:
              app: my-app
In this example, we create a NetworkPolicy named "my-app-network-policy" that allows incoming traffic from pods labeled with "app=my-app" within the same namespace.
Ingress controllers are another type of service policy in Kubernetes that allow you to expose HTTP and HTTPS routes from outside the cluster to services within the cluster. They act as an entry point for external traffic and provide powerful routing and load balancing capabilities.
Ingress controllers work with Ingress resources, which define the rules for routing traffic to services. Ingress resources can include path-based routing, hostname-based routing, SSL termination, and more.
To use an Ingress controller, you need to install and configure it in your cluster. Commonly used Ingress controllers include Nginx Ingress Controller, Traefik, and HAProxy Ingress.
Here's a simple example of an Ingress resource that routes incoming traffic to a service named "my-service" on the path "/app":
apiVersion: networking.k8s.io/v1
kind: Ingress
metadata:
  name: my-ingress
spec:
  rules:
    - http:
        paths:
          - path: /app
            pathType: Prefix
            backend:
              service:
                name: my-service
                port:
                  number: 80
In this example, we create an Ingress resource named "my-ingress" that routes incoming HTTP requests with the path "/app" to the service named "my-service" on port 80.
Ingress manages external access to services within the cluster. It acts as a gateway, routing incoming traffic to the appropriate services based on user-defined rules.
ConfigMaps store configuration data, and Secrets securely store sensitive information, such as passwords or API keys. Both ConfigMaps and Secrets can be accessed by applications running in Pods. .
Recommended Readings for understanding services
Kubelet is a fundamental component of the Kubernetes system, and it runs on each node (worker node) in the cluster. It plays a critical role in managing containers and ensuring that the containers defined in pod specifications are running and healthy.
Here's a detailed explanation of Kubelet and its responsibilities:
Kubelet Responsibilities:
-
Pod Lifecycle Management: Kubelet is responsible for managing the lifecycle of pods on a node. It communicates with the Kubernetes control plane to receive pod specifications and ensure that the pods are running and healthy. It starts, stops, and restarts containers based on the desired state specified by the control plane.
-
Container Operations: Kubelet interacts directly with the container runtime (e.g., Docker, containerd) to manage containers on the node. It starts and stops containers, monitors their health, and reports the container's status back to the control plane.
-
Volume Management: Kubelet mounts volumes specified in pod definitions and ensures that the appropriate storage is available to containers within the pod.
-
Pod Networking: Kubelet sets up the network namespace for each pod and ensures that containers within the pod can communicate with each other and other pods in the cluster. It works closely with the CNI (Container Network Interface) plugins to achieve this.
-
Resource Management: Kubelet monitors the node's resource usage (CPU, memory, disk, etc.) and reports this information back to the control plane. It ensures that resource requests and limits specified in pod definitions are enforced.
-
Health Monitoring: Kubelet continuously monitors the health of the containers it manages. If a container fails or becomes unresponsive, Kubelet takes appropriate actions based on the pod's restart policy.
-
Container Image Management: Kubelet pulls container images from container registries (e.g., Docker Hub) when required. It also periodically checks for image updates and ensures that the right versions of images are used.
-
Node Status Reporting: Kubelet is responsible for reporting the node's status, including its capacity, utilization, and conditions, to the control plane. This information is crucial for the scheduler to make informed decisions about pod placement.
-
Pod Security Policies: Kubelet enforces any pod security policies set by the cluster administrator to ensure that pods meet certain security requirements.
How Kubelet Works:
-
API Server Interaction: Kubelet interacts with the Kubernetes API server to receive instructions for pod creation, updates, and deletions. It also reports the status of the node and its managed pods back to the API server.
-
Pod Watches: Kubelet watches the API server for changes to pod specifications and reacts to updates or changes in the desired state of pods. If there are discrepancies between the actual state of a pod and the desired state, Kubelet takes appropriate actions to reconcile the differences.
-
Node Registration: When a node joins the cluster, Kubelet registers the node with the Kubernetes control plane, providing information about its resources and capabilities.
-
Managing Pod Manifests: Kubelet reads and interprets the pod manifests (definitions) provided by the control plane to determine which containers should be running on the node.
In summary, Kubelet is an essential agent running on each node in the Kubernetes cluster. It ensures that the containers defined in pod specifications are up and running, handles their lifecycle, and communicates with the control plane to maintain the desired state of the cluster. Without Kubelet, the Kubernetes cluster would not be able to manage and orchestrate containers effectively.
Important 16 Questions to ask yourself before deploying a Kubernetes Cluster in Production Environment :
- What is the purpose of the cluster?
- What are the requirements for the cluster?
- What are the security requirements?
- What are the performance requirements?
- What are the availability requirements?
- What are the scalability requirements?
- What are the reliability requirements?
- What are the monitoring requirements?
- What are the logging requirements?
- What are the backup and restore requirements?
- What are the disaster recovery requirements?
- What are the networking requirements?
- What are the storage requirements?
- What are the compute requirements?
- What are the authentication and authorization requirements?
- What are the compliance requirements?