Welcome to SharePoint Embedded! This tutorial aims to walk you through an overview of a boilerplate Sample App and how you may go about building a basic SharePoint Embedded App from setup to live demo on your own. We will use the Sample App source code in this repository as a reference guide that explain the key points of how to run the app, as well as its main functionality and architecture. Before proceeding you will need:
- An M365 Developer Tenant
- Be familiar with using Postman
- Intermediate developer skills
- App Overview
- App Quick Start
- Installing Visual Studio Code
- Adding Azure Functions Extension to Visual Studio Code
- Initialize Azure Functions workspace
- Download Node.js and npm
- Download Git
- Clone, configure and start the app
- App Login and Permission Consent
- Interacting with Storage Containers
- SharePoint Embedded Storage Container API Code Snippets
- App Auth Model
This sample app is built in Javascript using React.js for the UI and Azure Functions as the back-end for hosting endpoints to SharePoint Embedded APIs. The UI portion as well as the file management logic (utilizing Microsoft Graph APIs) of the app lives in /packages/client-app and the Azure Functions live in /packages/azure-functions.
The quickest way to get to our sample app running is to:
-
git clonethis repository and open the\Samples\raas-spa-azurefunctionfolder in Visual Studio Code -
Install the Azure Functions Extension in Visual Studio code
-
Install Azure functions core tools. This is necessary in order to run Azure Functions locally.
-
Update the provided
.env_templatefile in\Samples\raas-spa-azurefunction\packages\client-appfolder, updating the following fields to match your own application details:REACT_APP_CLIENT_ID = 'Insert client ID from provided config here' REACT_APP_TENANT_ID = 'Insert tenant id from provided config here'
and rename the file to
.envfrom.env_template. Failure to rename the file will prevent the app from functioning correctly. -
Update the provided
local.settings_template.jsonfile in\Samples\raas-spa-azurefunction\packages\azure-functions>folder, updating theAPP_CLIENT_ID,APP_AUTHORITY,APP_AUDIENCE,APP_CLIENT_SECRET, andAPP_CONTAINER_TYPE_IDfields to match your own application details:{ "IsEncrypted": false, "Values": { "AzureWebJobsStorage": "", "FUNCTIONS_WORKER_RUNTIME": "node", "APP_CLIENT_ID": "", "APP_AUTHORITY": "https://login.microsoftonline.com/<TENANT-ID>", "APP_AUDIENCE": "api/<APP-CLIENT-ID>", "APP_CLIENT_SECRET": "", "APP_CONTAINER_TYPE_ID": "" }, "Host": { "CORS": "*" } }
and rename the file to local.settings.json from local.settings_template.json. Again, failure to rename the file will prevent the app from functioning correctly.
-
Make sure that you are using the latest version of node and npm.
-
Make sure the Azure Function Workspace is initialized
-
Open a new terminal or command prompt and run
npm run startin the\Samples\raas-spa-azurefunctionfolder to run the client app(If the Azure Function endpoints are running on a different port than the default
localhost:7071, you'll need to make updates to\packages\client-app\src\services\raas.jsfile. See the Clone, configure and start the app section for details) -
Open
localhost:3000from a browser to see your app -
Login with your provided admin username and credentials, and grant permissions to each consent prompt, ensuring the "Consent on behalf of your organization" option is checked. You will need to make sure pop-ups are allowed in your browser of choice, otherwise the consent windows will be blocked
-
Go and explore the app!
For further details of getting the sample app running, and for a more in-depth look at the technicial implemention of the sample app, refer to the supplemental documentation below
- Go to the Visual Studio Code download page.
- Download the version for your operating system (Windows, MacOS, or Linux).
- Run the installer and follow the instructions to complete the installation.
- Open Visual Studio Code.
- Click on the Extensions button on the left-side panel or press
Ctrl/Cmd + Shift + X. - Search for "Azure Functions" in the Extensions marketplace.
- Click the Install button for the Azure Functions extension by Microsoft.
- After the extension is installed, click the Reload button if required.
- You should now see Azure Functions listed in the Extensions panel and be able to create and manage Azure Functions projects within Visual Studio Code.
You should now see Azure Functions listed in the Extensions panel and be able to create and manage Azure Functions projects within Visual Studio Code.
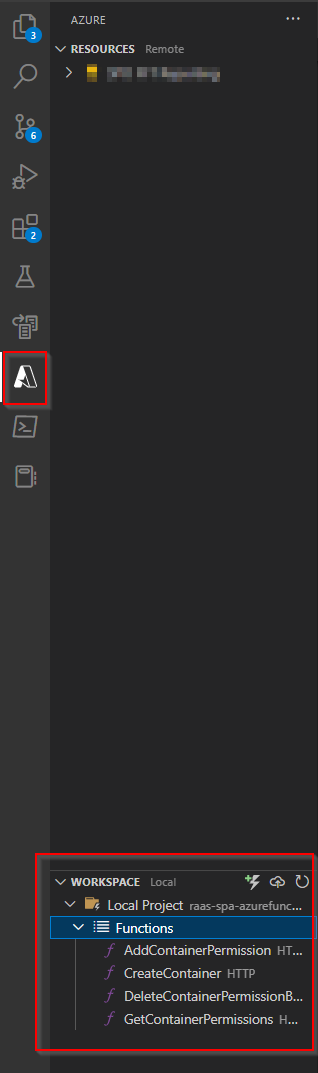
In order to be able to run and debug Azure Functions within VS Code, you may need to initialize the workspace if it isn't done by default. Click the 'A' icon on the VS Code sidebar to see if the workspace is initialized already. If it isn't, there will be an option to choose the language, select JavaScript. Afterwards, the workspace should look like:
- Download Node.js (version 18.14.2 LTS is compatible) from the official website: https://nodejs.org/en/download/
- Install Node.js on your system following the instructions provided with the download.
- Verify that Node.js and npm is installed by opening a terminal or command prompt and entering the following command:
node -v
npm -v- Check if Git is already installed by opening a terminal or command prompt and entering the following command:
git --version- If Git is not installed, download the latest version of Git from the official website: https://git-scm.com/downloads
- Follow the instructions provided with the download to install Git on your system.
- Verify that Git is installed by entering the following command in your terminal or command prompt:
git --versionTo run the sample app project, we will clone the syntex-repository-services repository. Make sure to do this inside a folder on your filesystem you have easy access to. From inside a terminal, run:
git clone https://github.com/microsoft/syntex-repository-services.gitcd to the correct folder and open the project folder:
cd .\syntex-repository-services\Samples\raas-spa-azurefunction\
C:\syntex-repository-services\Samples\raas-spa-azurefunction> code .
We need to now populate our .env file and local.settings.json file in the /client-app folder and /azure-functions folder respectively. If you copied over the pre-defined config files as described in the App Quick Start, you can skip manipulating the _template files
Note: There are template files marked with _template that need to be populated with custom values and renamed.
Starting with .env_template in \packages\client-app>:
REACT_APP_CLIENT_ID = 'Insert client ID from provided config here'and rename the file to .env from .env_template. Failure to rename the file will prevent the app from functioning correctly.
Next, update the values in the local.settings_template.json file located in \packages\azure-functions>
{
    "IsEncrypted": false,
    "Values": {
      "AzureWebJobsStorage": "",
      "FUNCTIONS_WORKER_RUNTIME": "node",
      "APP_CLIENT_ID": "",
      "APP_AUTHORITY": "",
      "APP_AUDIENCE": "",
      "APP_CLIENT_SECRET": "",
      "APP_CONTAINER_TYPE_ID": ""
    },
    "Host": {
      "CORS": "*"
    }
  }
Populate the following fields with their approriate values (as strings)
"APP_CLIENT_ID": "",
"APP_AUTHORITY": "https://login.microsoftonline.com/<TENANT-ID>",
"APP_AUDIENCE": "api/<APP-CLIENT-ID>",
"APP_CLIENT_SECRET": "",
"APP_CONTAINER_TYPE_ID": ""
and rename the file to local.settings.json from local.settings_template.json. Again, failure to rename the file will prevent the app from functioning correctly.
Once you have populated your config files, run npm install to retrieve all the necessary packages and install the lerna package, which allows developers to manage multiple packages within a single repository, making it easier to share code, manage dependencies, and optimize builds.
npm installOnce npm install pulls all the necessary dependencies, you will need to run the Azure Function locally to have access to Container Management functionality, such as creating containers and managing permissions. To do so, use Run > Start Debugging from the top toolbar on VS Code. Once you press Start Debugging you should see a terminal window open with similar output:
*  Executing task: func host start


Azure Functions Core Tools
Core Tools Version:       4.0.4915 Commit hash: N/A  (64-bit)
Function Runtime Version: 4.14.0.19631


Functions:

       AddContainerPermission: [POST] http://localhost:7071/api/AddContainerPermission

       CreateContainer: [POST] http://localhost:7071/api/CreateContainer

       DeleteContainerPermissionById: [DELETE] http://localhost:7071/api/DeleteContainerPermissionById

GetContainerPermissions: [GET] http://localhost:7071/api/GetContainerPermissionsImportant: Note that localhost:7071 is the standard for Azure Function local debugging. If the Azure Function endpoints get exposed on a different localhost port, you will need to update the apiUrl variable in the \packages\client-app\src\services\raas.js file to match the ports used in your command window. This will need to be done for the 4 container endpoints. This is only necessary if you see a port different from 7071 in your terminal output.
async createContainer(displayName, description) {
    const apiUrl = 'http://localhost:<your exposed port>/api/CreateContainer';
    if (Providers.globalProvider.state === ProviderState.SignedIn) {
      const token = await this.getApiAccessToken();
      ...
Once npm install successfully completes and you have the Azure Function app running locally on localhost:7071, open a new terminal or command prompt to run the client app in the \Samples\raas-spa-azurefunction folder:
npm run start-appor:
npx lerna run start --scope=raas-client-appThis will render the client application at localhost:3000, which you can access from your browser. Congratulations, you now have a running app!
In order to interact with SharePoint Embedded and Graph APIs in our sample application, we first need to be authorized to do so. We will use the credentials from our configuration file (the same credentials that we used to log into our application in AAD via Azure Portal), to login to our application, and consent to the necessary permissions (Graph and SharePoint Embedded) to be able to interact with storage containers and their contents. The entry point to our sample application is in the index.js of our application:
Providers.globalProvider = new Msal2Provider({
  clientId: process.env.REACT_APP_CLIENT_ID,
  scopes: ["openid", "profile", "offline_access", "User.Read.All", "Files.ReadWrite.All", "Sites.Read.All", "FileStorageContainer.Selected"]
});
This defines a new instance of the Msal2Provider class, which is a provider for the Microsoft Authentication Library (MSAL) version 2. The provider is being created with the following configuration options:
-
clientId: The value of theREACT_APP_CLIENT_IDenvironment variable (which we set above) is being passed as the clientId. This is the identifier for the client application that wants to authenticate and request access to resources. -
scopes: An array of strings specifying the permissions that the application requests from the Microsoft identity platform. For example, "User.Read.All" grants permission to read all user profiles in Microsoft 365 or Azure Active Directory, while "Files.ReadWrite.All" grants permission to read and write files in Microsoft 365 or SharePoint.
Once our provider is created and assigned to the globalProvider property, it can be used to authenticate users, request tokens, and manage user sessions.
The login functionality is handled by the <Login /> component from the @microsoft/mgt-react package in the App.js file
<Login loginCompleted={promptForContainerConsent} />The Login component is part of the Microsoft Graph Toolkit (MGT) library for React, which provides UI components and services for integrating with Microsoft Graph in your React app. The component provides an out-of-the-box solution for logging in a user with Microsoft Graph. It uses the Microsoft Authentication Library (MSAL) under the hood to handle the authentication process and manage the access tokens for accessing Microsoft Graph APIs. By using the Login component, you can easily add a login button to your app and authenticate the user with Microsoft Graph without having to write any additional code. The Login component will take care of the details of the authentication process, such as requesting consent from the user, handling redirects, and acquiring access tokens.
Now that we understand how the login portion of the application works, we can enter our admin username and password from the provided config, and we will be greeted with our first consent window:
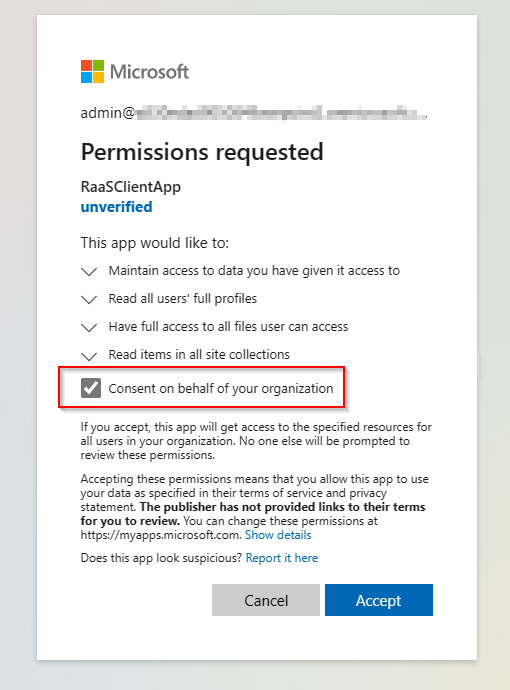
We need to grant our application the prompted permissions, first will be the Graph scopes (shown above), that are controlled in code by the scopes array we defined earlier in our Provider.
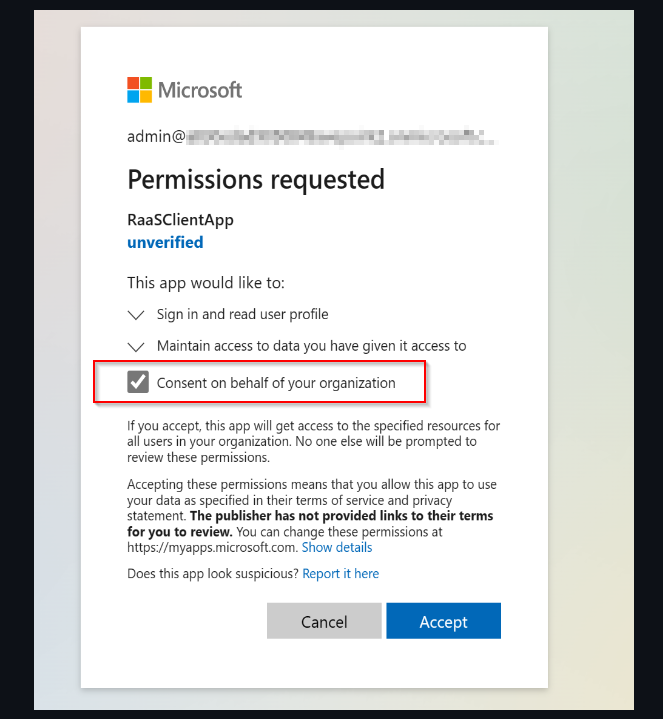
Important Note: The "Consent on behalf of your organization" option must be checked in each consent prompt in order to have APIs functioning correctly in all scenarios.
Next, we need to consent to the default Microsoft Graph Scopes:
Finally, we will need to consent to using the SharePoint Embedded file storage container APIs:
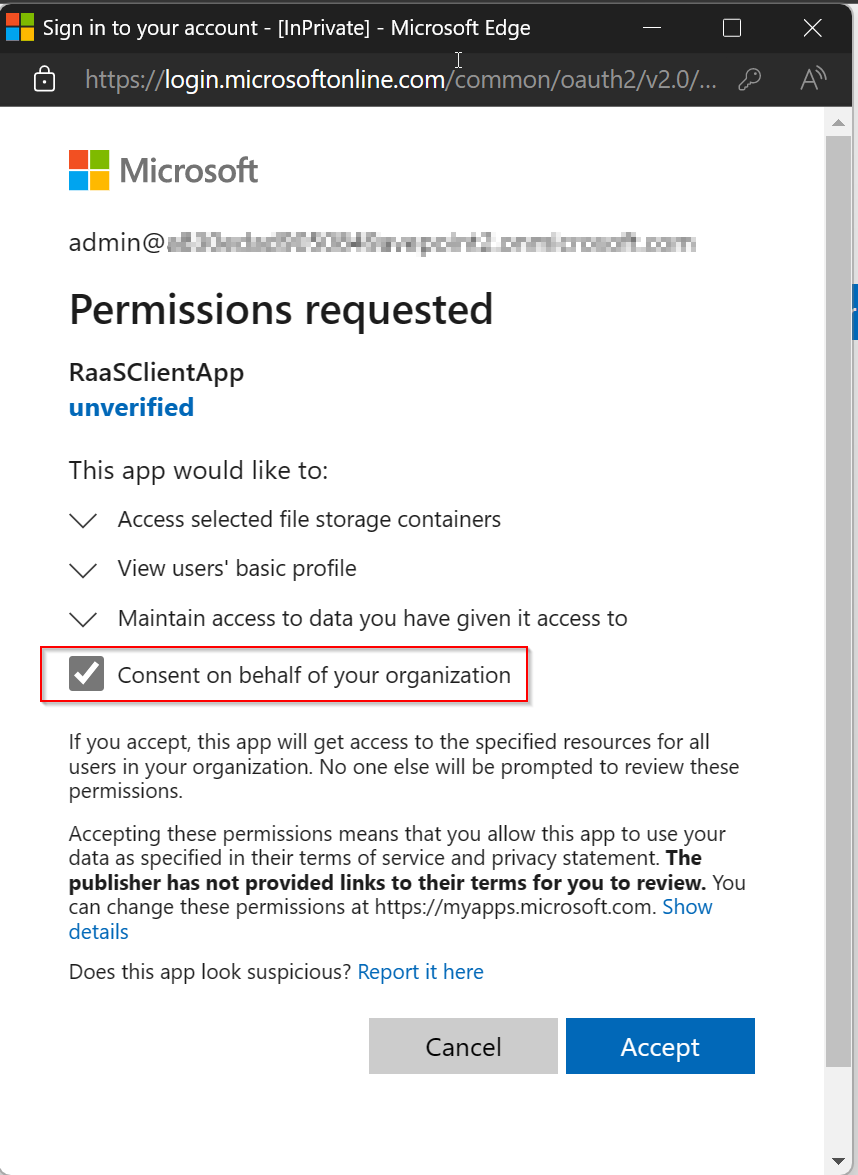
This prompt is created in code within the promptForContainerConsent function in App.js
async function promptForContainerConsent(event) {
    //... [full code omitted for brevity]
    const msalConfig = {
      auth: {
        clientId: process.env.REACT_APP_CLIENT_ID,
        authority: 'https://login.microsoftonline.com/<tenant-id>/',
      },
      cache: {
        cacheLocation: 'localStorage',
        storeAuthStateInCookie: false,
      },
    };

    const containerScopes = {
        scopes: ['FileStorageContainer.Selected'],
        redirectUri: '/'
    };

    const pca = new msal.PublicClientApplication(msalConfig);
    let containerTokenResponse;

    // Consent FileStorageContainer.Selected scope
    try {
        // attempt silent acquisition first
        containerTokenResponse = await pca.acquireTokenSilent(containerScopes);
        console.log(containerTokenResponse);
    } catch (error) {
        if (error instanceof InteractionRequiredAuthError) {
        // fallback to interaction when silent call fails
        containerTokenResponse = await pca.acquireTokenPopup(containerScopes);
        console.log(containerTokenResponse);
        }
        else {
        console.log(error);
        }
    }
}
The code sets up the MSAL configuration and specifies the required scopes for access. If a silent acquisition of the token fails, the code will prompt the user for consent by popping up an interactive window, which is what is occuring in the last consent screenshot.
We are now logged and consented in our app and ready to interact with storage containers!
In order to interact with storage containers and their functionality, we will need to create our first container. This can be done simply through the New Container UI flow. Once you have created a container, you can upload files, share links to files, and manage the permissions on the container, within the sample app. The functionality provided in the app was to give users an idea of what could be done with SharePoint Embedded storage containers and their associated APIs.
Below are snippets of how our sample application is making calls to SharePoint Embedded storage container endpoints (specifically container creation and permission management). The auth mechanism for token acquisition will be explained in the next section.
Create container (in \packages\azure-functions\CreateContainer\index.js)
    const containerRequestData = {
        displayName: displayName,
        description: description,
        containerTypeId: process.env["APP_CONTAINER_TYPE_ID"]
    };

    try {
        const graph = Graph.Client.init(options);
        const res = await graph.api('storage/fileStorage/containers').post(containerRequestData);
        context.res = {
            body: res
        };
        return;
    }
    catch (error) {
        context.res = {
            status: 500,
            body: 'Failed to create container: ' + error
        };
        return;
    }
List Container Permissions (in \packages\azure-functions\GetContainerPermissions\index.js)
    try {
        const graph = Graph.Client.init(options);
        const res = await graph.api(`storage/fileStorage/containers/${containerId}/permissions`).get();
        context.res = {
            body: res
        };
        return;
    }
    catch (error) {
        context.res = {
            status: 500,
            body: 'Failed to list container permissions: ' + error
        };
        return;
    }
Add Container Permission (in \packages\azure-functions\AddContainerPermission\index.js)
    const containerRequestData = {
        roles: [`${role}`],
        grantedToV2: {
            user: {
                userPrincipalName: `${userPrincipalName}@${tenantName}.onmicrosoft.com`
            }
        }
    }

    try {
        const res = await graph.api(`storage/fileStorage/containers/${containerId}/permissions`).post(containerRequestData);
        context.res = {
            body: res
        };
        return;
    }
    catch (error) {
        context.res = {
            status: 500,
            body: 'Failed to add container permissions: ' + error
        };
        return;
    }
Delete Container Permissions by Id (in \packages\azure-functions\DeleteContainerPermissionById\index.js)
    try {
      const graph = Graph.Client.init(options);
      const res = await graph.api(`storage/fileStorage/containers/${containerId}/permissions/${permissionId}`).delete();
      context.res = {
          body: res
      };
      return;
    }
    catch (error) {
        context.res = {
            status: 500,
            body: 'Failed to delete container permissions: ' + error
        };
        return;
}The general flow of the auth mechanism that this application uses is important to understand. Keep in mind, the SharePoint Embedded APIs in this sample app run on a separate server port (localhost:7071 in our case) than the client UI itself (localhost:3000). All the SharePoint Embedded APIs under the /azure-functions (code above) do the following:
- Accept an incoming bearer token for the API being requested, from the client running on
localhost:3000 - Use the #1 above token to exchange it for a Graph token using the on-behalf-of (OBO) flow with the Sites.Read.All and FileStorageContainer.Selected scope
- Call the SharePoint Embedded storage container endpoint with the #2 Graph token
Below are a few snippets for the general flow:
API Token (#1)
in \packages\client-app\src\services\raas.js
  async getApiAccessToken() {
    const msalConfig = {
      auth: {
        clientId: process.env.REACT_APP_CLIENT_ID,
        authority: 'https://login.microsoftonline.com/<tenant-id>/'
      },
      cache: {
        cacheLocation: "localStorage", // This configures where cache will be stored
        storeAuthStateInCookie: false
      }
    }
    const scopes = {
      scopes: [
        `api://${process.env.REACT_APP_CLIENT_ID}/Container.Manage`
      ],
      prompt: "select_account",
      redirectUri: "/"
    }

    const pca = new msal.PublicClientApplication(msalConfig);
    let tokenResponse;

    try {
      // attempt silent acquisition first
      tokenResponse = await pca.acquireTokenSilent(scopes);
      console.log(tokenResponse);
      return tokenResponse.accessToken;
    } catch (error) {
      if (error instanceof InteractionRequiredAuthError) {
        // fallback to interaction when silent call fails
        tokenResponse = await pca.acquireTokenPopup(scopes);
        console.log(tokenResponse);
        return tokenResponse.accessToken;
      }
      console.log(error);
      return null;
    }
  }
}
API token OBO exchange for Graph token (#2)
in \packages\azure-functions\utils\auth.js
async function getGraphToken(cca, token) {
    try {
        const graphTokenRequest = {
            oboAssertion: token,
            scopes: ["Sites.Read.All", "FileStorageContainer.Selected"]
        };
        const graphToken = (await cca.acquireTokenOnBehalfOf(graphTokenRequest)).accessToken;
        return [true, graphToken];
    } catch (error) {
        const errorResult = {
            status: 500,
            body: JSON.stringify({
                message: 'Unable to generate graph obo token: ' + error.message,
                providedToken: token
            })
        };
        return [false, errorResult];
    }
}ccais ConfidentialClientApplication constructed a using MSAL config object containing client ID, authority, audience, and client secrettokenis the API token constructed in #1
More information about how the On-Behalf-Of (OBO flow) works can be found here
Q: npm func.ps1 cannot be loaded after trying to start a debug session with your Azure Function
A: Run the following command in an Admin Powershell window then try again
Set-ExecutionPolicy -Scope CurrentUser -ExecutionPolicy RemoteSigned