- M5Stack devices
- We have tested with ATOMS3 Lite, ATOMS3, ATOM Lite, ATOM Matrix, M5Stack Core2, M5Stack, and M5StickC
- ATOMS3 Lite is inexpensive and recommended
- GeekServo 9G Servo-Gray x 2
- Gray 270° servo motor type
- You will need two of them
- Note that the red and orange ones are different
- GROVE - 2-branch cable for servo
- Not required, but it will make the wiring cleaner
- If not available, use a breadboard or jumper wires
- USB Type-C cable
- PC
- Windows / Mac / Linux is OK
- Android (Termux) also works
- Node.js v18 or higher must be installed
- Windows / Mac / Linux is OK
- Cube
- I think it doesn't work well if the rotation is heavy
- I used Tornado V3 Pioneer model and Flagship models
- It takes a little longer to arrive, but you can buy them cheaper on AliExpress
Install opniz CLI from npm.
opniz CLI is a tool to easily write opniz Arduino Library template sketches to M5Stack devices.
npm install -g opniz-cli
* The installation of opniz CLI will take a few minutes because it downloads the Arduino CLI executable and builds the ESP32 environment.
Set up the M5Stack device using the opniz CLI.
Connect the M5Stack device to your PC with a USB cable.
Then, run the following command and enter the necessary information in interactive mode.
npx opniz upload
The information required here is as follows.
- The serial port of the device
- SSID / password of the Wi-Fi that the M5Stack device will connect to
- IP address of the PC running the Node.js application
- Type of M5Stack device to be written
- opniz communication port number (default is 3000)
Of these, all but the Wi-Fi password are automatically retrieved and displayed in the list, so simply select them.
The opniz communication port number should be left at the default of 3000 and press enter.
[ image of opniz upload command execution ]

* GIF images are written immediately, but the actual compile/write process takes about 10 minutes.
When the write is complete, the M5Stack device setup is complete.
Execute a git clone of the Cube Scrambler repository.
git clone https://github.com/miso-develop/cube-scrambler && cd cube-scrambler
* If you do not have git installed, go to the GitHub page of Cube Scrambler and select Download ZIP from the green button marked <> Code to download and unzip the repository.
The following command will install the dependent packages and build the application.
npm install
* Be sure to calibrate GeekServo before assembling the LEGO robot!
First, connect the M5Stack device to GeekServo.
If you have the "GROVE - 2-branch cable for servos", simply connect it to the Grove port on the M5Stack device.
If you do not have [GROVE - 2-branch cable for servos], use a breadboard or jumper wire to connect the appropriate pin on the M5Stack device to the GeekServo.
At this time, change the STAND_SERVO_PIN and ARM_SERVE_PIN in config.ts to the pin numbers connected to the M5Stack device.
After connecting the M5Stack device and GeekServo, execute the following command.
npm run calibration
If GeekServo's axis moves and the message Calibration complete! is displayed, it is a success.
Please refer to the linked PDF and assemble your LEGO robot.
Execute the following command to start the application.
npm start
If you see Device connected!, you have successfully connected to the M5Stack device.
The web server for the Web UI is started at the same time the application is executed.
Please access http://localhost:3001 from your browser on your PC.
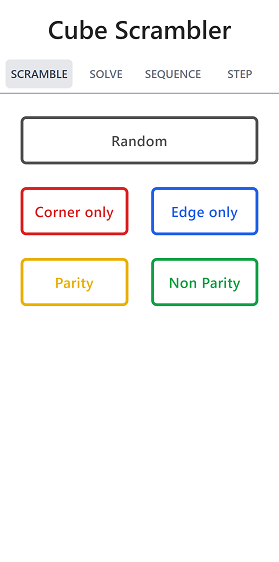
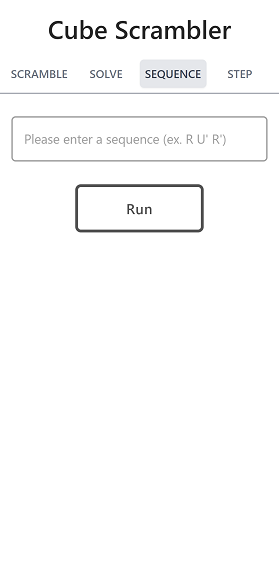
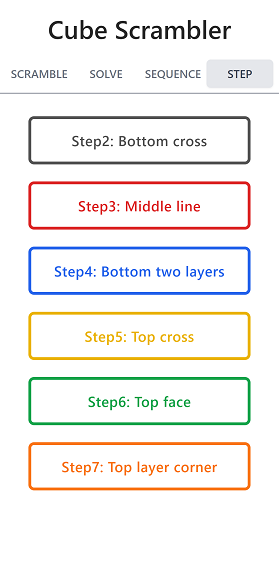
The Web UI will be displayed.
By setting the localhost part of http://localhost:3001 to the IP address of your PC, you can access it from other terminals on the same network.
For example, if your PC and smartphone are connected to the same network, you can access the Web UI from your smartphone.
Then, try to control the LEGO robot from the Web UI.
Have a good Cube Life😎

If the cube does not rotate vertically or falls off the stand, adjust the servo motor motion in the config.ts file.
You can adjust the arm movement with ARM_PULL_ANGLE, ARM_HOLD_ANGLE, and ARM_RELEASE_ANGLE.
Increasing the values of ARM_PULL_SLEEP_MSEC and SERVO_TURN_SLEEP_MSEC will slow down the movement slightly but make it more stable.
	ARM_PULL_ANGLE: 173, // Fine-tune the angle of the arm-side servomotor here
	ARM_HOLD_ANGLE: 220, // Fine-tune the angle of the arm-side servomotor here
	ARM_RELEASE_ANGLE: 237, // Fine-tune the angle of the arm-side servomotor here
	ARM_READY_ANGLE: 270, // Fine-tune the angle of the arm-side servomotor here

	ARM_PULL_SLEEP_MSEC: 250, // Arm sleep
	// ARM_PULL_SLEEP_MSEC: 350, // Use this if arm operation is unstable (e.g., heavy network environment)

	SERVO_TURN_SLEEP_MSEC: 250, // Stand and arm common sleep
	// SERVO_TURN_SLEEP_MSEC: 350, // Use this if motor operation is unstable (e.g., heavy network environment)
If you have any other questions about the setup process, please contact me via Issue on GitHub or my email address <miso.develop@gmail.com>.