
|
一鍵切換多個 Git 身分檔案。管理多個 GitHub 帳戶、SSH 金鑰、GPG 簽署,並自動將身分檔案套用到 Git 子模組。













 🇺🇸 🇯🇵 🇨🇳 🇹🇼 🇰🇷 🇩🇪 🇫🇷 🇪🇸 🇧🇷 🇮🇹 🇷🇺 🇵🇱 🇹🇷 🇨🇿 🇭🇺 🇧🇬 🇺🇦 🌍 🌺 🐻 🐉 ✨ 🖖 🐱 🏴☠️ 🎭 🇺🇸 🇯🇵 🇨🇳 🇹🇼 🇰🇷 🇩🇪 🇫🇷 🇪🇸 🇧🇷 🇮🇹 🇷🇺 🇵🇱 🇹🇷 🇨🇿 🇭🇺 🇧🇬 🇺🇦 🌍 🌺 🐻 🐉 ✨ 🖖 🐱 🏴☠️ 🎭
|
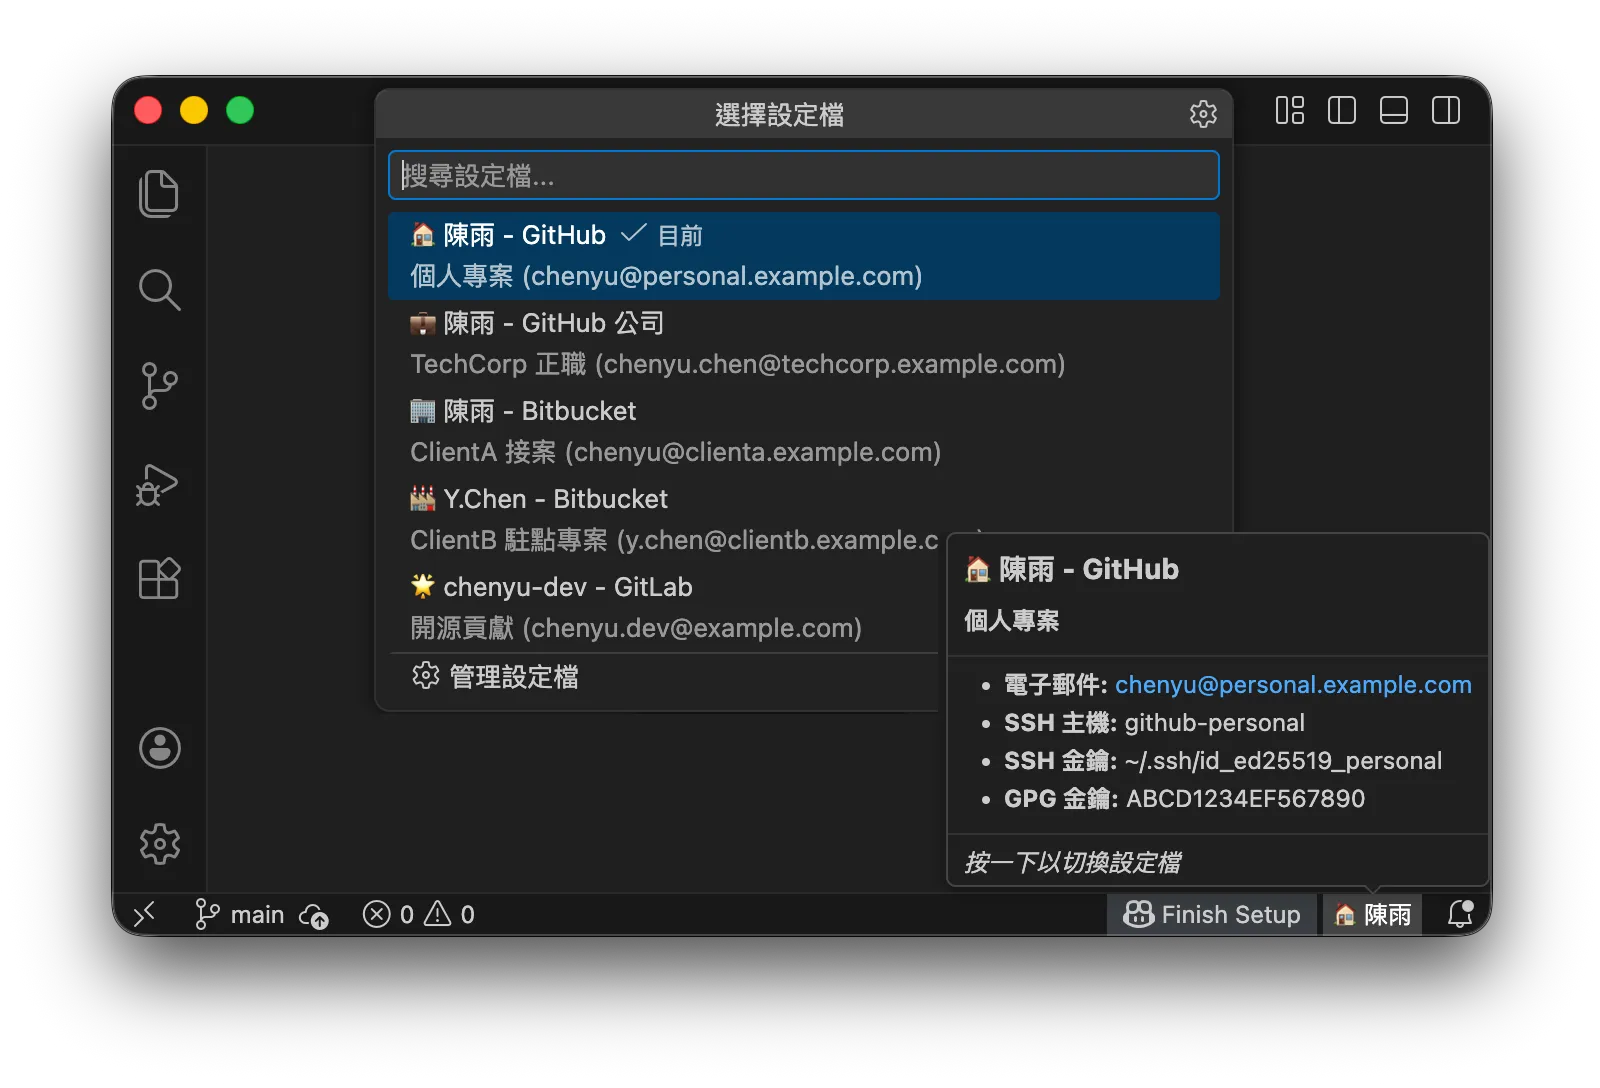
雖然有很多 Git 身分檔案切換工具,但 Git ID Switcher 解決了其他工具往往忽略的複雜問題:
- 子模組的困擾: 在包含子模組的儲存庫(如 Hugo 主題、vendor 函式庫)中工作時,通常需要為每個子模組手動設定
git config user.name。本擴充功能透過遞迴地將身分檔案套用到所有活動子模組,優雅地解決了這個問題。 - SSH 和 GPG 處理: 它不僅僅是變更名稱;它還會在 ssh-agent 中切換 SSH 金鑰並設定 GPG 簽署,確保您不會使用錯誤的簽章進行提交。
- 身分檔案管理 UI: 無需編輯 settings.json,即可新增、編輯、刪除和重新排序身分檔案
- 一鍵切換身分檔案: 即時變更 Git user.name 和 user.email
- 狀態列整合: 隨時一目了然地查看目前身分檔案
- 同步檢查: 即時偵測身分檔案與 git config 之間的不一致,並在狀態列中發出警告
- 子模組支援: 自動將身分檔案傳播到 Git 子模組
- SSH 金鑰管理: 自動在 ssh-agent 中切換 SSH 金鑰
- GPG 簽署支援: 設定用於提交簽署的 GPG 金鑰(選用)
- 豐富的工具提示: 包含描述和 SSH 主機的詳細身分檔案資訊
- 跨平台: 支援 macOS、Linux 和 Windows
- 多語言: 支援 17 種語言
我重視少數群體的存在價值。 我不想僅僅因為他們人數少就將其拋棄。 即使翻譯不完美,我也希望您能感受到我們理解和尊重少數語言的意圖。
本擴充功能支援 VS Code 所支援的全部 17 種語言。此外,對於 README 文件,我們還在嘗試翻譯成少數民族語言甚至趣味語言。
這不僅僅是「全球化支援」,而是「對語言多樣性的尊重」。我希望這能成為一個基礎設施,讓來自世界各地的開發者跨越語言障礙,提交讓世界變得更美好的程式碼。
管理個人帳戶和公司發放帳戶(企業託管使用者)的典型設定。
首先,為每個帳戶建立 SSH 金鑰(如果已有則跳過):
# 個人帳戶
ssh-keygen -t ed25519 -C "chenyu@personal.example.com" -f ~/.ssh/id_ed25519_personal

# 工作帳戶
ssh-keygen -t ed25519 -C "chenyu.chen@techcorp.example.com" -f ~/.ssh/id_ed25519_work將每個金鑰的公鑰(.pub 檔案)註冊到相應的 GitHub 帳戶。
注意: 註冊到 GitHub 的是
id_ed25519_personal.pub(公鑰)。id_ed25519_personal(無副檔名)是私鑰 - 切勿與他人分享或上傳到任何地方。
編輯 ~/.ssh/config:
# 個人 GitHub 帳戶(預設)
Host github.com
    HostName github.com
    User git
    IdentityFile ~/.ssh/id_ed25519_personal
    IdentitiesOnly yes

# 工作 GitHub 帳戶
Host github-work
    HostName github.com
    User git
    IdentityFile ~/.ssh/id_ed25519_work
IdentitiesOnly yes安裝後會立即提供範例身分檔案設定。 按照以下指南,將其編輯為您自己的設定。
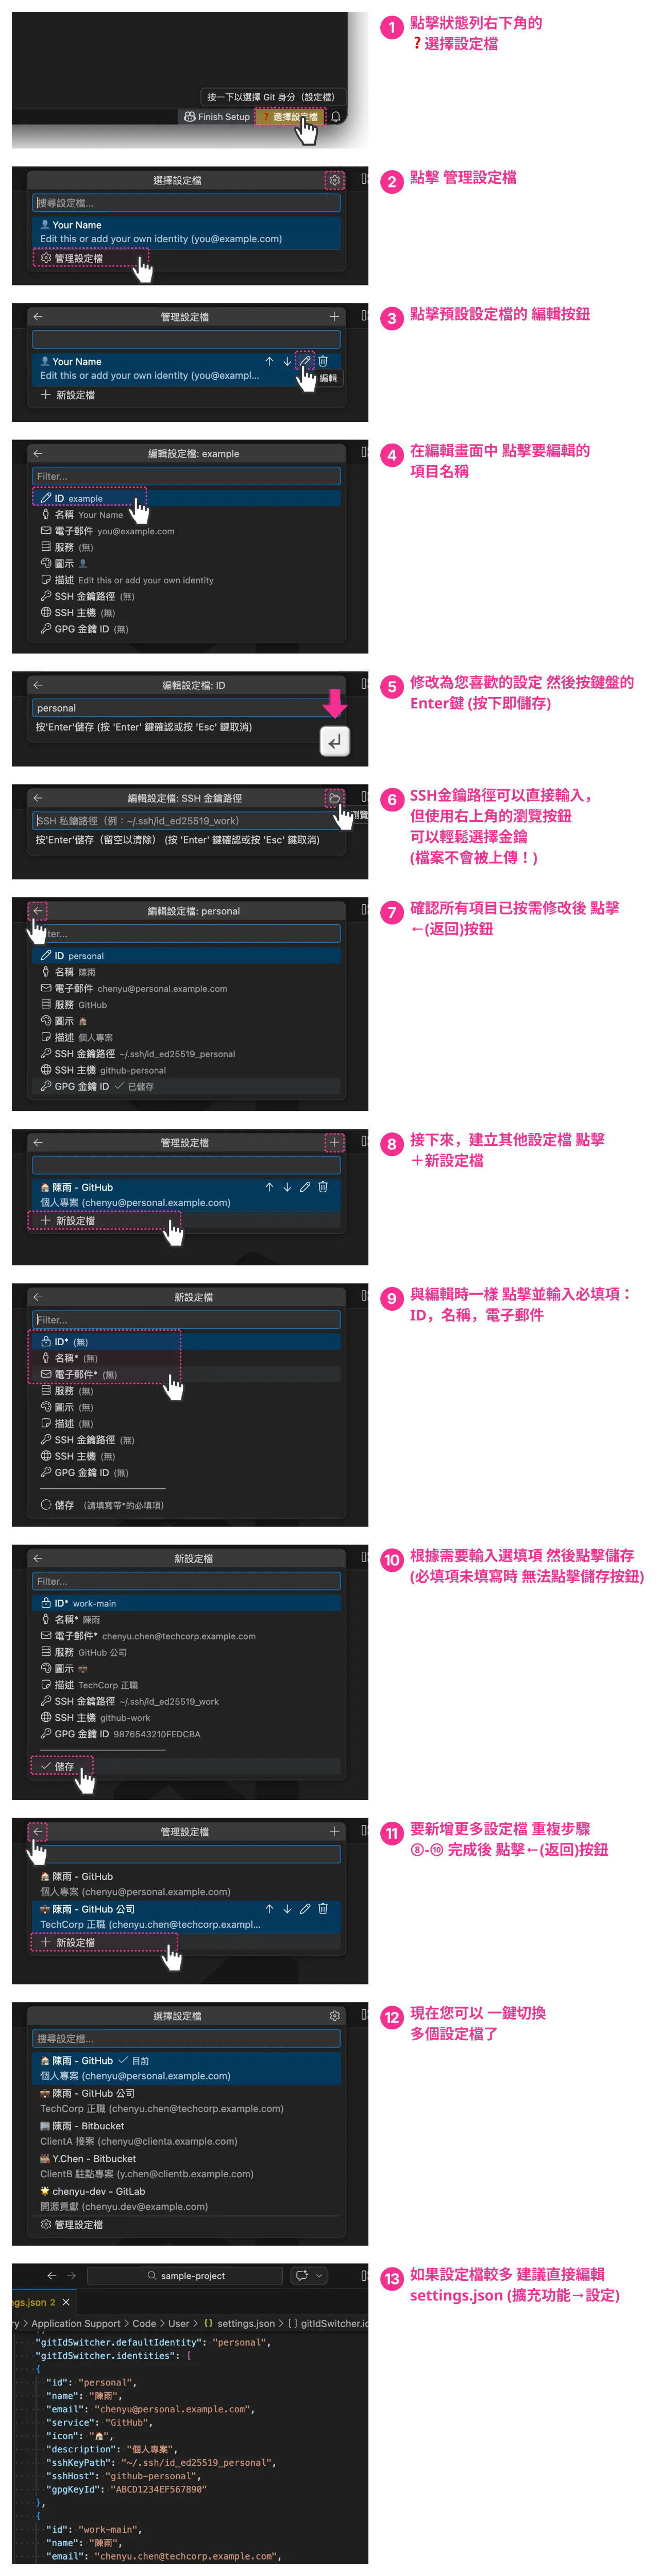
金鑰檔案不會被傳送: 設定 SSH 金鑰路徑時,只記錄金鑰檔案的路徑(位置)。金鑰檔案的內容永遠不會被上傳或傳送到外部。
如果使用 GPG 簽署: 您也可以在身分檔案編輯畫面設定
gpgKeyId。 有關如何查找 GPG 金鑰 ID,請參閱「疑難排解」。
提示: 您也可以直接從 settings.json 進行設定。 開啟擴充功能設定(
Cmd+,/Ctrl+,)→ 搜尋 "Git ID Switcher" → 點擊 "在 settings.json 中編輯"。 JSON 設定範例請參閱「完整範例」。
結合所有功能的完整範例:
# 個人帳戶(預設)
Host github-personal
    HostName github.com
    User git
    IdentityFile ~/.ssh/id_ed25519_personal
    IdentitiesOnly yes

# 工作帳戶(公司發放的企業託管使用者)
Host github-work
    HostName github.com
    User git
    IdentityFile ~/.ssh/id_ed25519_work
    IdentitiesOnly yes

# 客戶A 承攬專案(Bitbucket)
Host bitbucket-clienta
    HostName bitbucket.org
    User git
    IdentityFile ~/.ssh/id_ed25519_clienta
    IdentitiesOnly yes

# 客戶B 駐點專案(Bitbucket)
Host bitbucket-clientb
    HostName bitbucket.org
    User git
    IdentityFile ~/.ssh/id_ed25519_clientb
    IdentitiesOnly yes

# OSS 貢獻(GitLab)
Host gitlab-oss
    HostName gitlab.com
    User git
    IdentityFile ~/.ssh/id_ed25519_oss
IdentitiesOnly yes{
"gitIdSwitcher.identities": [
{
"id": "personal",
"name": "陳雨",
"email": "chenyu@personal.example.com",
"service": "GitHub",
"icon": "🏠",
"description": "個人專案",
"sshKeyPath": "~/.ssh/id_ed25519_personal",
"sshHost": "github-personal",
"gpgKeyId": "ABCD1234EF567890"
},
{
"id": "work-main",
"name": "陳雨",
"email": "chenyu.chen@techcorp.example.com",
"service": "GitHub 公司",
"icon": "💼",
"description": "TechCorp 正職",
"sshKeyPath": "~/.ssh/id_ed25519_work",
"sshHost": "github-work",
"gpgKeyId": "9876543210FEDCBA"
},
{
"id": "client-a",
"name": "陳雨",
"email": "chenyu@clienta.example.com",
"service": "Bitbucket",
"icon": "🏢",
"description": "ClientA 接案",
"sshKeyPath": "~/.ssh/id_ed25519_clienta",
"sshHost": "bitbucket-clienta"
},
{
"id": "client-b",
"name": "Y.Chen",
"email": "y.chen@clientb.example.com",
"service": "Bitbucket",
"icon": "🏭",
"description": "ClientB 駐點專案",
"sshKeyPath": "~/.ssh/id_ed25519_clientb",
"sshHost": "bitbucket-clientb"
},
{
"id": "oss",
"name": "chenyu-dev",
"email": "chenyu.dev@example.com",
"service": "GitLab",
"icon": "🌟",
"description": "開源貢獻",
"sshKeyPath": "~/.ssh/id_ed25519_oss",
"sshHost": "gitlab-oss"
}
],
"gitIdSwitcher.defaultIdentity": "personal",
"gitIdSwitcher.autoSwitchSshKey": true,
"gitIdSwitcher.applyToSubmodules": true
}注意:第4個身分(client-b)使用了縮寫名稱,第5個(oss)使用了開發者暱稱。同一個人可以為每個身分設定不同的顯示名稱。
點擊狀態列 → 在列表底部選擇「身分檔案管理」開啟管理介面。 您可以直接透過 UI 新增、編輯、刪除和重新排序身分檔案。
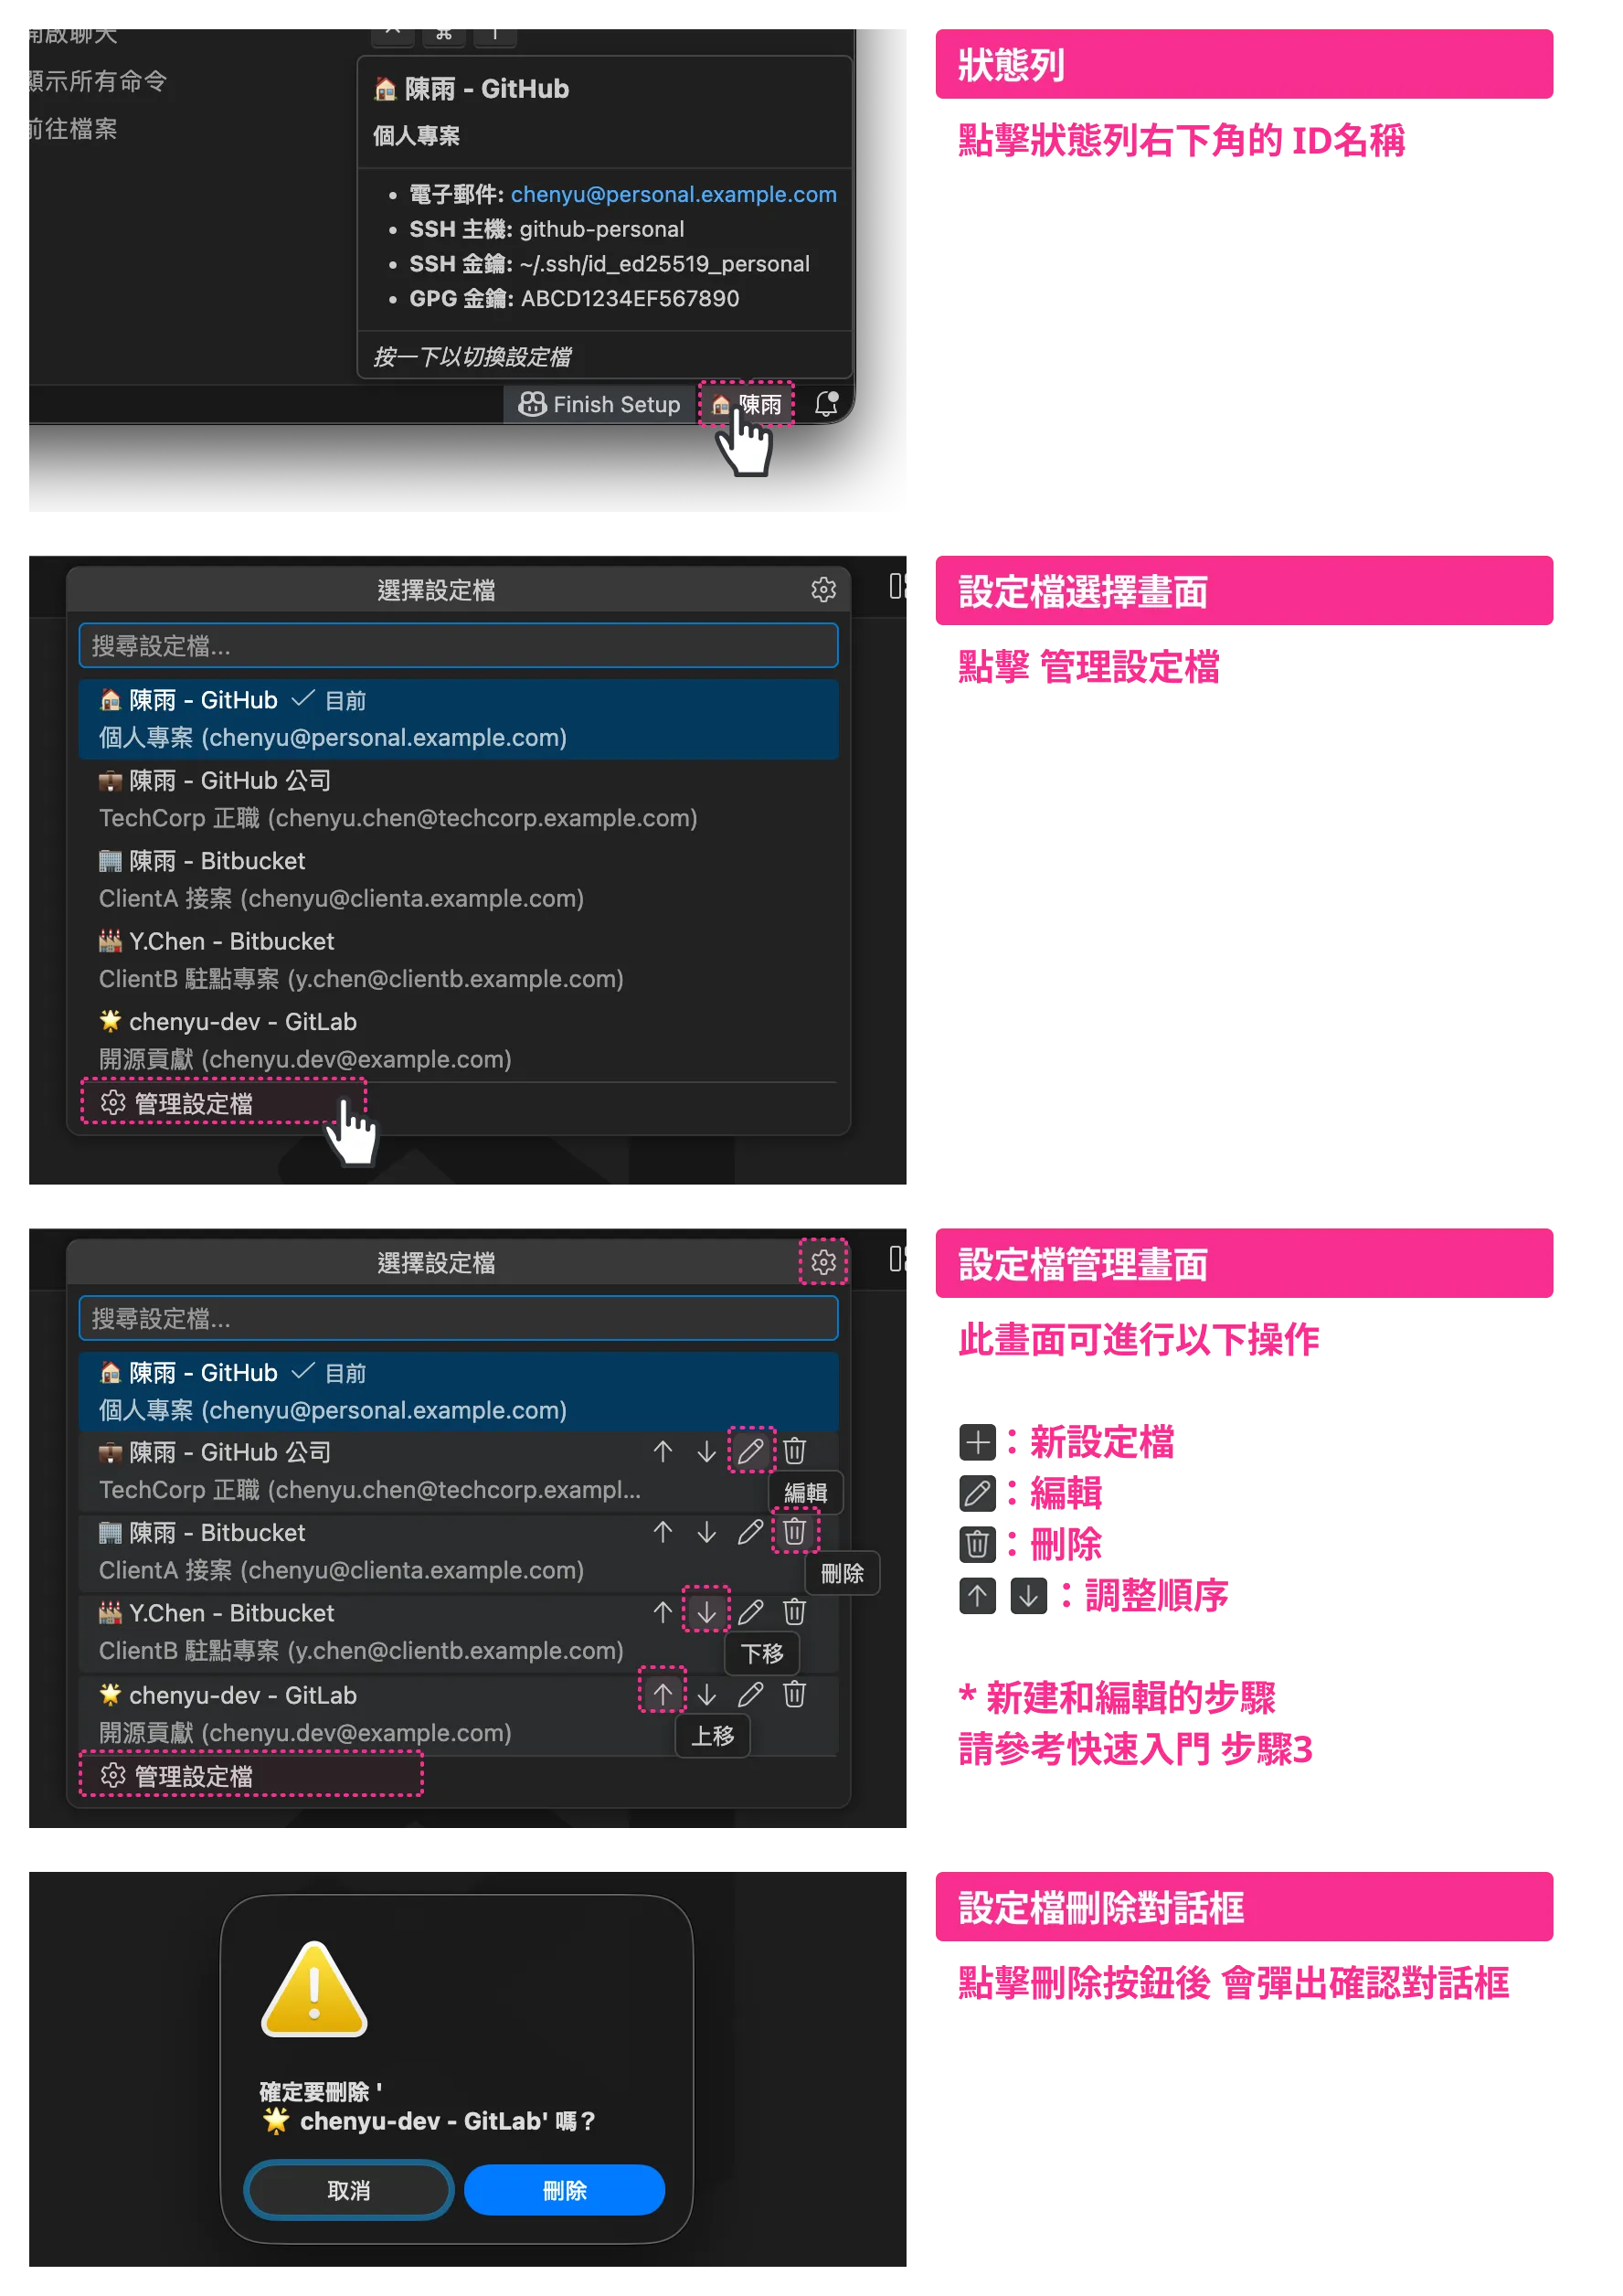
您也可以透過命令面板使用 Git ID Switcher: Delete Identity 刪除身分檔案。
| 命令 | 描述 |
|---|---|
Git ID Switcher: Select Identity |
開啟身分檔案選擇器 |
Git ID Switcher: Delete Identity |
刪除身分檔案 |
Git ID Switcher: Show Current Identity |
顯示目前身分檔案資訊 |
Git ID Switcher: Show Documentation |
顯示說明文件 |
| 屬性 | 必需 | 描述 |
|---|---|---|
id |
✅ | 唯一識別碼(如 "personal"、"work") |
name |
✅ | Git user.name - 顯示在提交中 |
email |
✅ | Git user.email - 顯示在提交中 |
icon |
狀態列顯示的表情符號(如 "🏠")。僅限單一表情符號 |
|
service |
服務名稱(如 "GitHub"、"GitLab")。用於 UI 顯示 |
|
description |
在選擇器和工具提示中顯示的簡短描述 | |
sshKeyPath |
SSH 私鑰路徑(如 "~/.ssh/id_ed25519_work") |
|
sshHost |
SSH 設定主機別名(如 "github-work") |
|
gpgKeyId |
用於提交簽署的 GPG 金鑰 ID |
- 狀態列: 超過約 25 個字元的文字將用
...截斷 icon: 僅允許單一表情符號(字素叢集)。不支援多個表情符號或長字串
| 設定 | 預設值 | 描述 |
|---|---|---|
gitIdSwitcher.identities |
見範例 | 身分檔案設定列表 |
gitIdSwitcher.defaultIdentity |
見範例 | 預設使用的身分檔案 ID |
gitIdSwitcher.autoSwitchSshKey |
true |
切換身分檔案時自動切換 SSH 金鑰 |
gitIdSwitcher.showNotifications |
true |
切換身分檔案時顯示通知 |
gitIdSwitcher.applyToSubmodules |
true |
將身分檔案傳播到 Git 子模組 |
gitIdSwitcher.submoduleDepth |
1 |
巢狀子模組設定的最大深度(1-5) |
gitIdSwitcher.includeIconInGitConfig |
false |
在 Git config user.name 中包含圖示表情符號 |
gitIdSwitcher.syncCheck.enabled |
true |
檢查所選身分檔案是否與實際 git config 一致 |
gitIdSwitcher.syncCheck.onFocusReturn |
true |
編輯器視窗重新取得焦點時執行同步檢查 |
gitIdSwitcher.logging.fileEnabled |
false |
將稽核日誌儲存到檔案(記錄身分檔案切換、SSH 金鑰操作等) |
gitIdSwitcher.logging.filePath |
"" |
日誌檔案路徑(如 ~/.git-id-switcher/security.log)。空字串使用預設路徑 |
gitIdSwitcher.logging.maxFileSize |
10485760 |
輪換前的最大檔案大小(位元組,1MB-100MB) |
gitIdSwitcher.logging.maxFiles |
5 |
保留的輪換日誌檔案最大數量(1-20) |
gitIdSwitcher.logging.redactAllSensitive |
false |
啟用時,日誌中的所有值都會被遮罩(最大隱私模式) |
gitIdSwitcher.logging.level |
"INFO" |
日誌詳細程度(DEBUG、INFO、WARN、ERROR、SECURITY)。記錄選定等級及以上 |
gitIdSwitcher.commandTimeouts |
{} |
每個命令的自訂逾時值(毫秒,1 秒-5 分鐘)。例:{"git": 15000, "ssh-add": 10000} |
控制設定 icon 欄位時的行為:
| 值 | 行為 |
|---|---|
false(預設) |
icon 僅顯示在編輯器 UI 中。Git config 只寫入 name |
true |
Git config 寫入 icon + name。表情符號會出現在提交歷史中 |
範例:icon: "👤"、name: "陳雨" 的情況
| includeIconInGitConfig | Git config user.name |
提交簽章 |
|---|---|---|
false |
陳雨 |
陳雨 <email> |
true |
👤 陳雨 |
👤 陳雨 <email> |
Git 設定有三個層次,下層的設定會覆蓋上層:
系統 (/etc/gitconfig)
    ↓ 覆蓋
全域 (~/.gitconfig)
    ↓ 覆蓋
本機 (.git/config)  ← 最高優先順序
Git ID Switcher 寫入 --local(儲存庫本機)。
這意味著:
- 身分檔案儲存到每個儲存庫的
.git/config - 每個儲存庫可以維護不同的身分檔案
- 全域設定(
~/.gitconfig)不會被修改
切換身分檔案時,擴充功能按順序執行以下操作:
- Git 設定(始終): 設定
git config --local user.name和user.email - SSH 金鑰(如果設定了
sshKeyPath): 從 ssh-agent 移除其他金鑰,加入選定的金鑰 - GPG 金鑰(如果設定了
gpgKeyId): 設定git config --local user.signingkey並啟用簽署 - 子模組(如果啟用): 將設定傳播到所有子模組(預設:深度 1)
- 同步檢查: 驗證所套用的身分檔案是否與實際 git config 一致
將所選身分檔案與實際的 git config --local 值(user.name、user.email、user.signingkey)進行比較,當偵測到不一致時在狀態列中顯示警告。
檢查執行時機:
- 套用身分檔案後立即執行
- 工作區資料夾變更時
- 設定變更時
- 編輯器視窗重新取得焦點時(500ms 防抖)
偵測到不一致時:
- 狀態列顯示帶有警告背景色的
⚠️ 圖示 - 工具提示顯示不一致欄位的表格(欄位、預期值、實際值)
- 點擊狀態列會顯示解決方案選項:
- 重新套用身分檔案 — 將目前身分檔案重新套用到 git config
- 選擇其他身分檔案 — 開啟身分檔案選擇器
- 忽略 — 在下次檢查前暫時忽略警告
停用方式:
將 gitIdSwitcher.syncCheck.enabled 設為 false 可停用所有同步檢查。
若僅停用焦點恢復檢查,將 gitIdSwitcher.syncCheck.onFocusReturn 設為 false。
本機設定是每個儲存庫獨立的,因此不會自動套用到子模組。 這就是本擴充功能提供子模組傳播功能的原因(詳見「進階:子模組支援」部分)。
Git ID Switcher 透過 ssh-agent 管理 SSH 金鑰:
| 操作 | 執行命令 |
|---|---|
| 加入金鑰 | ssh-add <keyPath> |
| 移除金鑰 | ssh-add -d <keyPath> |
| 列出金鑰 | ssh-add -l |
重要: 此擴充功能不會修改 ~/.ssh/config。SSH 設定需要手動完成(參見「快速開始」的步驟 2)。
如果您已有 SSH 設定,Git ID Switcher 會與其協同工作:
| 您的設定 | Git ID Switcher 的行為 |
|---|---|
~/.ssh/config 中指定 IdentityFile |
兩者都可使用;使用 IdentitiesOnly yes 防止衝突 |
環境變數 GIT_SSH_COMMAND |
使用您的自訂 SSH 命令;ssh-agent 仍然有效 |
git config core.sshCommand |
同上 |
| direnv 設定 SSH 相關環境變數 | 可以共存;ssh-agent 獨立運行 |
建議: 始終在 SSH 設定中使用 IdentitiesOnly yes。這可以防止 SSH 嘗試多個金鑰。
如果沒有此設定,SSH 可能會按以下順序嘗試金鑰:
- ssh-agent 中載入的金鑰(由 Git ID Switcher 管理)
~/.ssh/config中指定的金鑰- 預設金鑰(
~/.ssh/id_rsa、~/.ssh/id_ed25519等)
這可能導致身分驗證失敗或使用非預期的金鑰。
使用 IdentitiesOnly yes 後,SSH 將僅使用指定的金鑰。這確保了 Git ID Switcher 設定的金鑰被可靠地使用。
# 建議的設定
Host github-work
    HostName github.com
    User git
    IdentityFile ~/.ssh/id_ed25519_work
    IdentitiesOnly yes  # ← 這一行很重要
透過此設定,連線到 github-work 主機時將僅使用 ~/.ssh/id_ed25519_work,不會嘗試其他金鑰。
對於使用 Git 子模組的複雜儲存庫,身分檔案管理通常很麻煩。如果在子模組中提交,Git 會使用該子模組的本機設定,如果未明確設定,可能會預設使用全域設定(錯誤的電子郵件地址!)。
Git ID Switcher 自動偵測子模組並將選定的身分檔案套用到它們。
{
  "gitIdSwitcher.applyToSubmodules": true,
  "gitIdSwitcher.submoduleDepth": 1
}applyToSubmodules: 啟用/停用此功能submoduleDepth: 套用到多深?1: 僅直接子模組(最常見)2+: 巢狀子模組(子模組中的子模組)
這確保無論您是在主儲存庫還是在 vendor 函式庫中提交,您的身分檔案始終正確。
-
確保
ssh-agent正在執行:eval "$(ssh-agent -s)"
-
檢查金鑰路徑是否正確:
ls -la ~/.ssh/id_ed25519_*
-
在 macOS 上,加入到鑰匙圈一次:
ssh-add --apple-use-keychain ~/.ssh/id_ed25519_work
新複製時:
複製工作儲存庫時,使用 SSH 設定中設定的主機別名:
# 工作身分檔案(使用 github-work 別名)
git clone git@github-work:company/repo.git

# 個人身分檔案(使用預設的 github.com)
git clone git@github.com:yourname/repo.git
對於現有儲存庫:
-
檢查遠端 URL 是否使用正確的主機別名:
git remote -v # 工作儲存庫應顯示 git@github-work:... -
如需更新:
git remote set-url origin git@github-work:company/repo.git
-
查找您的 GPG 金鑰 ID:
gpg --list-secret-keys --keyid-format SHORT
-
測試簽署:
echo "test" | gpg --clearsign
-
確保身分檔案中的電子郵件地址與 GPG 金鑰的電子郵件地址相符
- 確保您在 Git 儲存庫中
- 檢查
settings.json是否有語法錯誤 - 重新載入 VS Code 視窗(
Cmd+Shift+P→ 「重新載入視窗」)
name 欄位中包含以下字元會導致錯誤:
` $ ( ) { } | & < >
如果要包含服務資訊,請使用 service 欄位。
更新擴充功能後,新的設定項目可能不會出現在設定介面中。
解決方案: 完全重新啟動您的電腦。
VS Code 等編輯器會將設定架構快取在記憶體中,「重新載入視窗」或重新安裝擴充功能可能不足以重新整理它。
如果新安裝後範例設定也沒有出現,Settings Sync 可能是原因。
如果您之前儲存了空設定,它們可能已同步到雲端,並在新安裝時覆蓋了預設值。
解決方案:
- 在設定介面中找到該設定項目
- 點擊齒輪圖示 → 「重設設定」
- 與 Settings Sync 同步(這會從雲端刪除舊設定)
「我是誰?」 — 這是本擴充功能唯一回答的問題
基於枯山水架構構建:簡單的核心(100 行), 被刻意的品質(90% 覆蓋率、日誌、逾時處理) 和有意的約束(無 GitHub API、無令牌管理)所包圍。

歡迎貢獻!請查看 CONTRIBUTING.md。
MIT 授權條款 - 請查看 LICENSE。
由 Null;Variant 建立