Many of the top Internet companies no longer require users to enter their gender when creating an account. However, predicting demographic data like gender and age is still crucial, particularly when it comes to correcting accidental age and gender bias in recommender systems. As a result, it is required to guess the gender of people who failed to disclose it when registering. I looked at the issue of identifying a registered user's gender based on their declared name. I discovered that genders can be extremely accurately categorized using the name string composition by looking at the initial names of the users.
-
Data loading: As required, I used the names.txt dataset from the nltk package in Python. After loading the names along with the required labels, I randomly shuffled the names. Initial dataset is fairly imbalance with nearly 5000 names belonging to Female class and only 3000 belonging to Male class. Figure 1 below illustrates the Count plot for both the classes.
-
Data Preprocessing: There were a lot of preprocessing steps implemented on the dataset. The labels were converted into binary format by replacing all the occurrences of Female with 0 and Male with 1. Names were converted to lowercase letters, and then I split them based on characters. I also used a Word2Vec model to get character embeddings for each and every character in the dataset. Later I mapped those characters with embedding vectors. Lastly I padded the mapped data with vectors of 0’s at the end to make all names of uniform length.
-
Data Splitting I split the data in the ratio of 0.15 wherein 15% of the data was used for testing and remaining for training.
- Conv1D layers:
I used 2 Conv1D layers each having 128 neurons and which were followed by dropout layers. The output was flattened and passed to a Dense Layer with 512 neurons. Lastly it was passed to the output layer with 2 neurons and softmax activation function. Results: The training accuracy achieved is nearly 71% and validation accuracy achieved is 73%.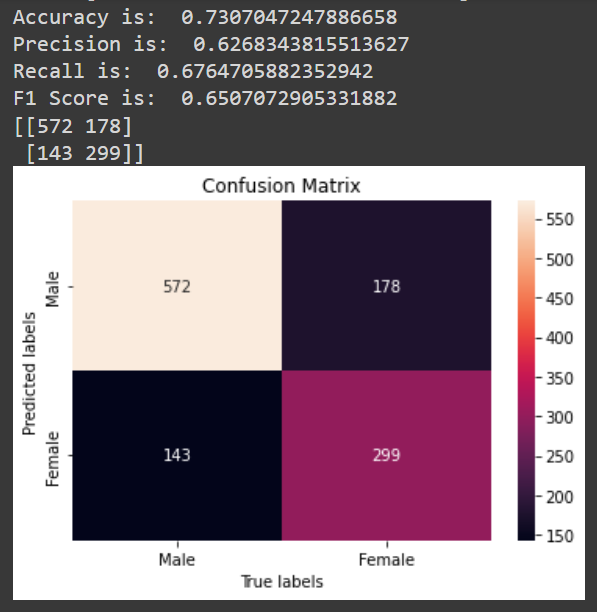
- LSTM Layer
Here I used an LSTM layers with 128 neurons. and which were followed by dropout layers. The output was flattened and passed to a Dense Layer with 512 neurons. Lastly it was passed to the output layer with 2 neurons and softmax activation function. Results: The training accuracy achieved is nearly 76% and validation accuracy achieved is 78%.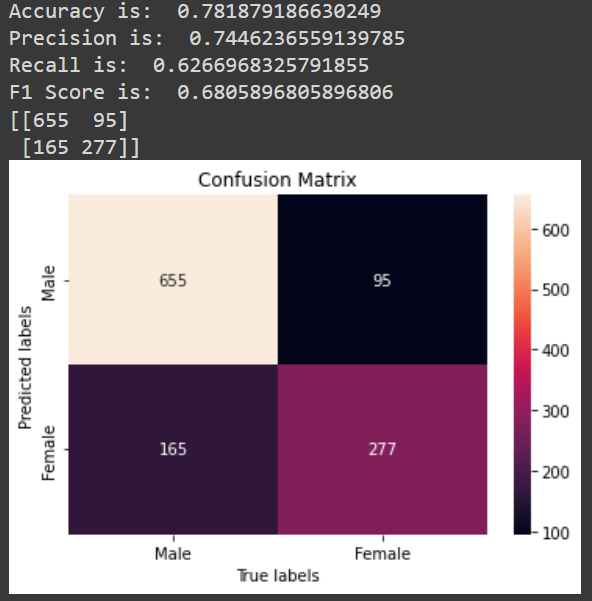
- LSTM and CNN Combined
Results:
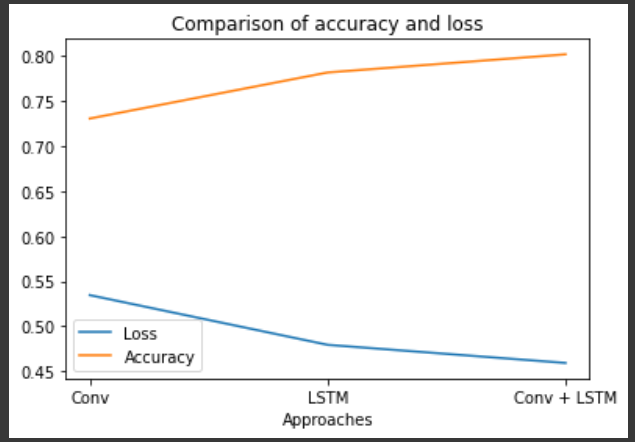
The training accuracy achieved is nearly 79% and validation accuracy achieved is 80%.

As it can be seen from the plot above, we get the lowest loss and highest accuracy when
using Conv1d layers along with the LSTM layer. Thus this approach of using Conv1d along
with LSTM is the optimal one since it gives us best results.
As it can be also seen from the confusion matrix above, Conv with LSTM gives maximum
precision, recall and F1 score.
You will be prompt to enter the name in the console which you wish to test for gender. You can see the Gender Predicted along with probability in the next code cell output. The code for inference is included in the last 2 cells of the notebook.